
If you have your own netbook right now, you can transform it into a fully working home recording studio. This is what you need:
a.) Audio interface or small mixer – for accepting and conditioning input signals from your musical instruments.
b.) Recording software – there are free such as Audacity and there are also commercial ones like Cubase, Reaper or Adobe Audition. If you still do not have a recording software, feel free to install it first to your netbook. This tutorial will illustrate Audacity since its free and simple to use.
This tutorial will focus on using connecting a small mixer (example Behringer XENYX502

![]()

Connecting a Small Audio Mixer to Netbook
1.) Plug your netbook power adapter. It is highly recommended to plug the AC adapter to your netbook because any audio processing tasks is power intensive and will consume your battery power very quick. Power-on your netbook and boot into Windows 7 (if you are using a different OS, the steps are somewhat similar).
2.) Connect your mixer output to your netbook microphone/line-input. The mixer output is stereo and you need connnectors such as this(red and white connectors are for left and right signal of the stereo output):

Behringer Xenyx 502 mixer output
And on the other end of this wiring connector is plugged to your netbook microphone/line-input such as this(red connector to your netbook mic input):
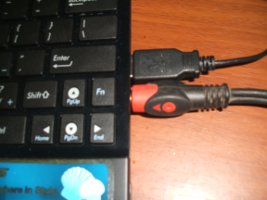
Netbook mic input from audio mixer
Do not yet plugged any musical instruments to your mixer.
3.) Now power-on your audio mixer.
Prepare the Recording Software
Now that your audio hardware mixer is ready to use, do the following test to prepare your audio signals for recording:
1.) Mute any speakers or studio monitors. Plug any musical instrument to your mixer line inputs. For example, in this tutorial a nylon guitar is used. Plug it to any available line input in your mixer, such as this (enclosed in yellow box):

Guitar input to mixer
In some netbooks particularly ASUS EeePC, the microphone and headphones function as one input. So you need to configure your Windows 7 built-in audio mixer to enable microphone/line inputs.
a.) Go to Start – Control Panel – Realtek HD Audio Manager – under “Analog” right click on gray circle (see screenshot):
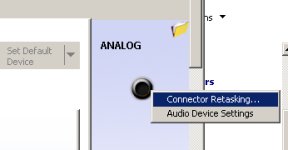
And click “Connector Retasking”. In the options “Which device did you plug in?”, select “Mic In”. Then click OK.

b.) Close the Realtek HD Audio Manager.
2.) You need to enable microphone as the default recording device. Go to Start – Control Panel – Sound – click “Recording” tab. If Microphone is not set as default device, right click on it and click “Set Default device”. Disable any device under recording except microphone, e.g. the “Stereo Mix”. Click OK.
3.) Launch Audacity or any recording software you are using. Configure Audacity to use the netbook microphone as the input recording device. You can configure this as follows:
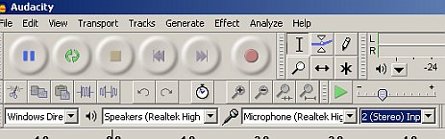
Audacity configuration when recording in netbook
In this example, the speakers are driven by the Realtek HD audio drivers while the input device is the microphone. Also you configure the recording to stereo.
Test for Audio Clipping
1.) Enable Audacity to monitor the input signal before recording. Mouse over the microphone icon near the level meters and click “Start monitoring”.
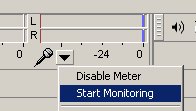
Start monitoring the input signals
2.) Try to strum the guitars. The level meter should move with respect to the volume input. If you strum hard, the level meter should move near the peak. You should not record clip signals (those above 0dB). You can refer to this tutorial for recording clipping prevention techniques.
Start and Complete the Tracking Session
1.) You can configure the recording bit depth and sample rate of the recorded tracks. This is very important. If you would like to record at 24-bit/96Khz, then in Audacity go to Edit – Preferences – Quality and set the “Default Sample rate” to 96000Hz then the “Default Sample format” to 24-bit. Finally click OK.
2.) Hit the record button (red button) to start the tracking session.
3.) Hit the stop button to stop the tracking session.
4.) Review your performance for any mistakes and re-record if necessary.
5.) Do not forget to save your session files. Below are some examples of guitar recording I’ve made following the steps outlined on this tutorial:
Blues guitar:
Guitar strumming:
Take note that the recording quality is clear and acceptable. With the use of a multi-track software, you can even create a complete music production project out of this guide.
Content last updated on August 14, 2012