
Conga is a wonderful piece of percussion instrument with its unique tribal sound. In this tutorial you will learn the methods on how to mix conga and apply EQ, panning, compression and reverb.
Analyzing the frequencies of Conga
Before formulating the conga best EQ and compression settings, you need to analyze the underlying sound characteristics of a conga sound. I do not have a conga. So I download a sample clip of conga sound here (Conga beat 2 and the last audio sample)
The downloaded conga audio was a mp3 file in 11025Hz sample rate and 16-bits for the bit depth. So I did some audio upsampling to 48 KHz, 24-bits using Voxengo R8brain. See the result below for the conga musical instrument frequency analysis:
Congra spectrum view
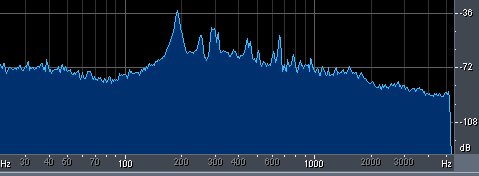
This is the raw conga sound (no effects applied):
Some interesting results:
1.) The fundamental frequency of conga can be found around 200Hz.
2.) It has some harmonics; notably at 400Hz and 700Hz.
To better analyze conga sound, you need to isolate the lower and higher frequency component of a conga. For example this is the lower frequency component:
And this is the frequency spectrum:

Congra spectrum confirmed
It confirms that the center low frequency component of a conga sound is around 200Hz.
Now let’s take a look at its higher frequency component, this is the sample MP3:
And this is the spectrum:

Frequency analysis of conga high-end
It confirms that harmonics of 400Hz and 700Hz are important higher frequencies to conga.
Panning Conga in the Mix – Example Application
Supposing you are including conga in your percussion mix with bass drum and cymbals; this is how the mix would look like in Reaper:
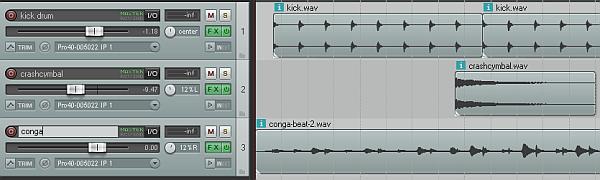
reaper conga mix
First, the following instruments have the following panning settings:
Bass drum – center
Conga- 12% Right
Cymbals – 12% left
Although panning settings for conga depends on the music. It can be panned anywhere in the mix. For best results, you need to pan conga near the center. For more information about panning drums, read more details here: How to pan drum instruments
Applying EQ on Conga
To EQ conga, it must be based on its frequency characteristics. The simplest method is to give some boost on its fundamental frequencies to make them sound more prominent in the mix. These are example settings (set using Waves Q3 Paragraphic EQ):
Boost +3dB 400Hz Q=7.0
Cut -6dB 50Hz low shelf – remove conflicting frequencies with bass drum
Boost +3dB 200Hz Q=5.0
Boost +3dB 700Hz Q=5.0
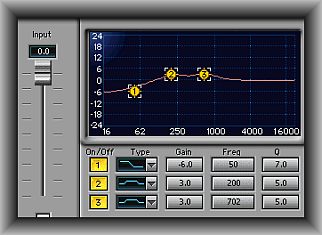
Conga EQ
If you have vocals in your mix that is played along with conga, I would consider cutting at 2000Hz -6dB provided the vocals are also boosted at this frequency (2 KHz).
Compressing Conga in the Mix
EQ is the first of the series of effects in the Conga FX chain, the next one is the compressor and the last one is the reverb (more details later).
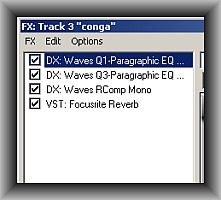
Conga FX chain
Compression settings for conga vary with the material. If you want more dynamics from your conga music, then you need to apply less or no compression.
In this example, it uses the Waves Rcomp compressor to even out the conga volume. To properly set the compressor settings for Conga, the first thing you need to set is the threshold. Solo conga track in your DAW and watch out for the maximum peak. For example, in the screenshot below the maximum peak is -18dB.

Conga Peak amplitude
The threshold can be set lower than -18dB so that the compressor should be working all the time to even out the volume. In this example a threshold of -20dB has been used.
The attack time of conga should be to very fast like 1ms because conga by nature has a very sharp transient sound (much like a snare). Setting this at 1ms, assures that the compressor is working immediately for those fast transients.
Release time can be determined using the formula: 30,000/bpm of conga music
You can determine the BPM of the material by following the tips in this tutorial: How to set recording BPM
The BPM of the conga music is around 89.11 BPM so the release time would be: 30,000/89.11 or 337ms. A reasonable compression ratio of 2.5:1 would be used in most cases.
Take note that audio compression would reduce the volume of your conga sound because of reduced peaks to even out the volume. You can bring back the lost volume brought about by compression by setting the compensation gain. In this example, a compensation gain of 3.5dB is used.
Therefore this is the final compression settings for conga using Waves Rcomp:
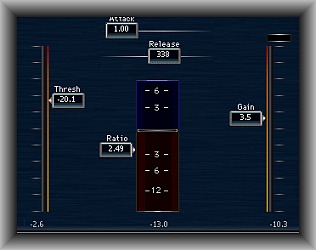
Compression settings on Waves Rcomp
Adding Reverb on Conga
Reverb on conga should just be enough for it to have some ambiance in the mix. In this example, I use Focusrite reverb small bright room presets. You can use any reverb plug-in you like as long as the result sounds good.

Focusrite reverb plugin
Below is an example Conga, bass drum and cymbal percussion mix implemented with the above audio mixing settings.
How to Mix Sitar- the tips
Sitar is an Indian musical instrument. This is how a Sitar looks:
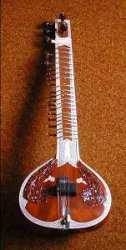
What a Sitar looks like
I bet you must have listened to Sitar. You can hear them a lot in Indian and Middle East based movies or a Hollywood film with Middle Eastern theme. Sitar sounds similar to an overbending “high notes” acoustic guitar.
I received an inquiry from a reader as to how would I mix Sitar in a recording project? Well, the mixing tips are still the same. In your multi-track editor, once you have recorded the Sitar very well, you should start Eq’ing the tracks then apply Compression.
The mixing objective really depends on what type of material you are mixing:
a.) Is it a solo performance of Sitar?
b.) Is it a instrumental performance of Sitar with some little percussions such as Conga. This is the common type of performance I’ve heard with Sitar.
c.) Is it a performance of Sitar along with vocals?
d.) Is it a performance of Sitar along with different string instruments such as violin, electric guitar or bass guitar?
OK, if it is a solo performance of Sitar, you really do not need any mixing and compression at all. Just leave the performance like it was recorded, Sitar sounds really unique and full when played alone.
However if it is an instrumentation performance with percussive background, you might want to position Sitar in the center of the mix (pan to the center) with percussions panned to either right or left.
It is because when you see them live, the percussions are on the right or left of Sitar. You do not need to cut or boost frequencies for Sitar in this case, so no EQ settings needed. However you do need compression to make the softer notes of Sitar sound stronger.
Use the same compression settings for guitar found in this guide: https://www.audiorecording.me/audio-compression-tips-for-mixing.html
Things start to become critical when a Sitar is played along with the vocals. The vocals will most likely be drowned with Sitar, because they fairly occupy the same frequency spectrum. In this case, if vocals seemed to be a more important track in the mix, you execute these EQ settings in your mix:
Cut -6dB 3000Hz Q=1.4 (for Sitar)
Boost +3dB 3000Hz Q=1.0 (for vocals)
Do the same for a performance with Sitar along with different instruments. You do not need to worry about the bottom, because Sitar does not have much bass, when you listen it playing live. So you need to deal with high frequencies only. As a rule of thumb the Sitar is occupying a higher frequency compared to acoustic guitars; but a little lower than a violin.
Content last updated on August 24, 2012