
I received a question from a reader of this site:
Hello,
I have been trying to record my buddy’s band practices so they can use the audio to remember things in the creative process as well as practice from home with the whole track. I wanted to try to keep it simple so I pick up a Blue Yeti USB microphone to record with my laptop. As far as software I’m using Sony sound forge 10. The room is small, and since it’s a rock band its very loud. The audio I’m recording sounds terrible and im not sure what settings can be used to clean up live full band audio. Not looking for CD quality obviously but wed like to get something without having to track and mix all the instruments individually. Thanks for any help you can provide.
My Reply:
As simple as recording the rehearsal is very important which is a common practice used by top recording producers to get the best musical arrangement out of the song. It is always a smart move to record everything during the rehearsal. It helps a lot in the songwriting process and a great input for any recording producers. Of course, since this is a live recording of the band, your primary objective is not to produce CD quality recordings. You are using a Blue Yeti USB microphone which of course is great enough to handle this kind of job in a home recording situation. You are having a sound recording quality related issue. Below are some of the recommendations to get the best result out of your current configuration:
1.) First when recording a band rehearsal, the most recommended microphone is at least something that has omni directional characteristics. This means that it will be able to pickup signals coming from all directions. Fortunately, you can use this microphone to pickup omni directional signals. To do this; at the back of the microphone you can see options for polar pattern selection. And turn/switch it to point to the one with a circle symbol for omni directional settings (inside the red box is the omni directional polar pattern option):
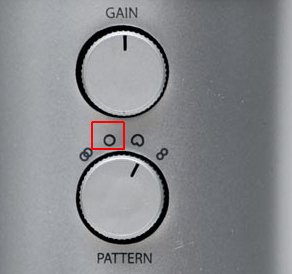
Polar pattern option USB Yeti microphone
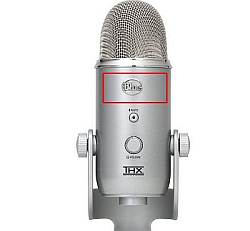
2.) The next thing you should do is to optimize your microphone placement. For best results you should face the “front of the microphone” directly in front of the main sound source (for example the vocals). This tip is provided by the microphone manufacturer in the manual. If you like to know where the “front of the microphone” is, it is the one with the “Blue” logo. For example, in the screenshot below, you are directly facing the front of the microphone because you see the “blue logo” (inside the red box):


For best results, I recommend the following configuration in your small room where the band will be playing (top view perspective) (the yellow arrows are the direction of different instruments sound source you wish to capture):
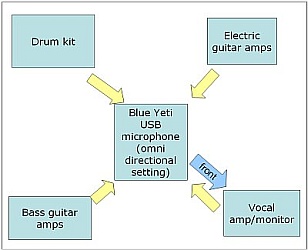
Live band recording room setup
So that means that the microphone will be placed in the center of the room with the entire amps/monitors/sound source directly facing it. Since the microphone is now in the omni directional recording mode, it should be able to capture the levels equally in all directions. And then the font of the microphone (indicated by blue arrow) will be facing towards the vocal cabinet since vocals is often the weakest signal in a live band recording session. You need it to be as clear as possible and not to be drowned with the rest of the loud instruments. It is also recommended to use a microphone on stage boom stand to hold the microphone and to easily place it within the room. This will let you adjust the microphone conveniently either in horizontal or vertical direction.
3.) Finally before you start recording anything to your laptop, once you have realized the setup above. Try to go to the center of the room where the microphone will be placed. Let the band play a specific song you wish to be recorded. Now try to assess subjectively if the quality of the sound you get in the center is great and balanced. If not, try to experiment by tweaking my suggested configuration or adjusting the amps, etc. My advice is that what sounds great to your ear will also translate to better recorded signals. Do not start the recording process unless you captured/optimized the quality of the sound played by the band inside the small room.
4.) Lastly, try to do a test recording. If what you will hear from your laptop are weak signals, try to tweak the gain of the microphone (shown in the screenshot previously). But since the band is already very loud, this is highly unlikely. Warning: If the band is too loud, you will notice that it will result to distortions when recorded. It won’t sound nice. The tip is to decrease the microphone gain settings so that it won’t overload. Make sure you do not open any software while recording. Make sure only Sound Forge is running. Lastly, you can always read the microphone manual as it contains a lot of tips and advices on how to properly use your microphone for best recording results.
Content last updated on July 5, 2012