
Parametric Equalizer is one of the most useful mixing tools available to any audio/recording/mixing engineer. Yet, beginners do not fully understand the concept and operation of these parametric equalizers. As a result, they misunderstood the usefulness of this tool and does not able to attain the sound quality they need.
To get started with the very basic and uses of parametric equalization, I recommend you will read this tutorial on Parametric Equalization Theory.
It discusses the 3 main elements of a parametric equalizer namely the:
1.) Center frequency
2.) Bandwidth
3.) Gain
Parametric equalizer is a perfect tool to shape the sound of your mix or any of the tracks. Beginners in recording and mixing are often acquainted with only one equalizer which is called “Graphics Equalizer”.
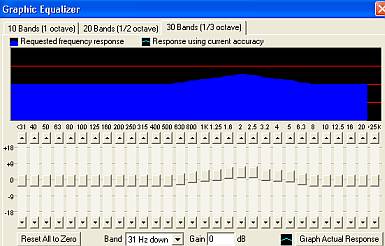
Graphic equalizer screenshot
While this is still an equalizer, it provides almost no use to mixing audio recording sessions. It is because of the following aspects:
a. Graphic equalizer does not provide Q control(more about this later).
b. Some graphic equalizers are NOT designed for serious audio mixing and just for hi-fi equipment monitoring purposes.
So it means that the accuracy of the graphics equalizer would not be very reliable if you want in-dept audio frequency adjustments.
Using the Parametric Equalizer
Now how to use the parametric equalizer? Shaping the sound is the general objective of using this tool. In details it is an audio frequency filtering tool that can be used by the engineer to alter the frequency response of the audio material.
Below is a picture of the Waves Q3 Paragraphic parametric equalizer:

Parametric equalizer screenshot
As you can see there are 3 important adjustments- center frequency, gain and Q. Center frequency is where the adjustments would be most felt. The gain would be used to set the amount of cut or boost. The Q would tell how wide or narrow are the EQ adjustments.
In addition, there are two important parameters:
a.) Input gain- controls how much would be the input level to the parametric equalizer.
b.) Output gain- controls how much would be the output level.
In schematic diagram, this would be:
Input — Parametric Equalizer — Output
If there are two sliders, it means it accepts stereo inputs otherwise if you only see one slider; that’s for mono. If you are using parametric equalizer for a mono track, use the mono version of the parametric equalizer.
Illustration of setting the optimum Input and Output Level
Proper gain staging must be observed when setting the parametric equalizer. Below are steps on how to set the input and output level of any parametric equalizer:
1.) Add the parametric equalizer to your track FX chain. If you are using Reaper digital audio workstation, you can read this Reaper FX chain tutorial to learn more about this.
2.) Set the desired EQ adjustment by setting center frequency, Q and gain.
3.) Play the mix and watch out for the output level meters. It should be moving in response to the playback.
4.) If it hits red, clipping occurs on the output of the parametric equalizer. Set the input level lower until the maximum peak on the output is not anymore clipping. Aim for a -3dB maximum peak for most of the time.
Setting this way, you prevent distorting the output of your parametric EQ. Take note that when you are boosting a significant amount in your parametric EQ, this would increase the output level. Too much gain applied can result to clipping the output.
Thus the solution is to set a lower input gain. For example in the above screenshot, the input gain is set to -5dB.
5.) The output of the parametric EQ is the input of the next effect in your FX chain. For example:
Parametric EQ — > Compressor
Apply the same concept, if the compressor input is clipping. It usually means that your parametric EQ output is so hot. So in this case, you might apply a reduced output gain on the parametric EQ.
Rules and Naming Conventions of using Parametric EQ
The usual naming conventions used in parametric equalizer are stating the audio settings in terms of dB, center frequency Q. So for example:
Guitar (Left-Rhythm) = 3 KHz, Cut 6dB Q=1.4
It means that the engineer is adjusting the guitar left rhythm audio track with center frequency at 3000Hz and cutting 6dB with Q=1.4. In audio mixing, the most common Q settings are the following:
Q= 8.0~ above (extremely narrow cutting/boosting)
Q=3.0 ~ Q=7.0 (narrow cutting/boosting).
Q=1.4 (wide cutting or boosting)
Q=1.0 (very wide cutting or boosting)
Q=0.7(extremely very wide cutting or boosting)
You can use the above Q guidelines in making parametric EQ adjustments.
Common applications:
In Boosting, I use a wider to narrow Q such as 1.0 to 7.0, and smaller gain adjustments (e.g. Q=1.0, +2dB Boost, 3KHz), commonly used in boosting vocals, guitars, etc in their resonant frequencies.
In Cutting, I use a narrow Q such as 1.4 or 10.0 with higher cutting dB (Q=3.0, -6dB, 400Hz) for example in removing the cardboard sound of the kick drums.
It is advisable to never cut or boost more than -15dB. This is too much and it would much better to have the material re-recorded. -6dB to -9dB cutting is sufficient in most cases. Boosting should be done more conservatively than cutting. Recommended values would be around +1.0 to +6.0dB.
Below are some excellent additional resources on how to use the parametric equalizer properly, it is must read for all beginners:
a.) Using Parametric EQ to Find the “Sweet Spot”
b.) What is a Low Shelf and High Shelf Filter in Parametric Equalization?
c.) Complete EQ settings to Start when doing Audio Mixing
d.) Musical Instrument Frequency Range Analysis
e.) EQ Best Practices in Audio Mixing
Content last updated on June 19, 2012