
Perhaps one of the most important skills you need to acquire when working with recording, mixing and mastering is the complete understanding of how dynamic range compression works. Using audio recording/mixing/mastering software, these are implemented using an effect called as “audio compressor”.
This is a beginner guide, so I will explain as simple as possible. First, let’s define what “audio compression” is. This is a technical method in reducing the dynamic range of the audio in an effort to bring an “even” volume throughout the track. This means, quiet sections of the audio will be boosted automatically by the compressor in an effort to bring up its volume. On the other hand, the “loud” sections will either be reduced in gain (volume level) if they exceed a certain level or simply be ignored (no boost or no reduction in gain). The overall purpose is to “even” the volume which will reduce the dynamic range.
You might ask what a “dynamic range” is. Dynamic range is simply the difference between the quietest and the loudest peak in your audio. The quietest and loudest peaks are measured in terms of decibels (dB) and you can use your favorite audio recording software to measure it. If you are using Adobe Audition, you can load up the audio in editor view, go to “Edit”—“Select Entire Wave” and then go to “Analyze”—“Statistics”. Then once the results are given; click “Histogram”. You can see it like this:
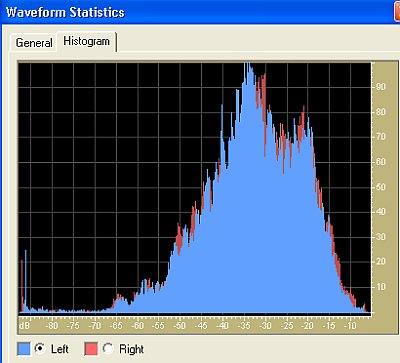
Amplitude histogram
In the above screenshot, the quietest sections are in the range of -65dB and beyond; while the loudest sections of the audio are around -10dB and above (left channel). Bear in mind that in digital audio, the loudest possible volume is 0dB. Since the audio wave investigated are in stereo, both left and right channels statistics are given, but the above screenshot only examines the left channel (will have similar results with the right channel).
To compute the dynamic range in this case: Dynamic range= -65dB – (-10dB) = -55dB
To see this action, you can read the post on Adobe Audition compressor tutorial. You will notice that an uncompressed audio has substantial loud and soft peaks in the audio waveform. This makes the dynamic range high. However, after compression the difference between loud and soft peaks are drastically reduced thus reducing/compressing the dynamic range.
In an uncompressed audio, the dynamic range is at maximum. The screenshot above is using uncompressed audio so you will notice a “big” difference between the quiet and loud sections. Now you will ask: “How does a compressor works?” The best way to understand a compressor is using a “graphical” type of explanation. Supposing an input audio is sent to a compressor and then the output audio of the compressor is the “processed” signal. Ideally, if there is no compressor in between, the volume of the input and output are the same. Screenshot:

Input and output audio when there is no compression
In the above screenshot, the x-axis is the input audio level to the compressor while the y-axis is the output audio level of the compressor. At any point of the input level, the output level is the same because there is no compression applied.
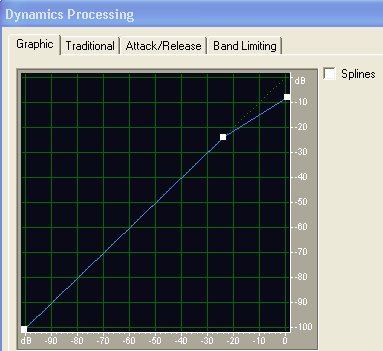
Supposing you are working with an untrained vocalist that cannot sing at a consistent volume; in this case, you will need to apply dynamic range compression to even up the vocal level. This is demonstrated clearly in the audio compression tips tutorial on vocals. Below is how this compressor will work (graphically):

vocal compressor using adobe audition
1.) Below -70dB, the compressor will further reduce the input volume. For example at an input level of -85dB, the output level is around -90dB. This will further minimize the noise which is often found at this level.
2.) At -70dB input level, the output level is the same (-70dB).
3.) However starting at -70dB above, the compressor starts boosting the input level. For example, if the input level is at -30dB. The output level is -20dB which is louder than the input.
4.) Finally, it reaches a “limiting” point. For example, if the input level is 0dB (which is the loudest peak), the output of the compressor is only around -10dB. The above dynamic manipulations are typical examples of how a compressor works.
How would you interpret the compressor behavior below?
classic compression
First below -24dB, the compressor will completely ignore the input audio. This means “no compression”. However as soon as the volume will hit -24dB and louder, the compressor will start to apply gain reductions to the input which will then reduce the output level.
For example, at input level of -10dB, the corresponding output level is -15dB based on the graph. Based on the compressor above, the following are its properties:
Threshold= -24dB
Compression ratio = Sample Input level/Sample Output level = -10dB/-15dB or 1:5
Below is an interesting input/output graph for different compression ratios:

compression ratio
You can read here the details on the compression ratio formula.
How about the attack and release? This is discussed in the following tutorial:
How compressor attack and release works- A Beginner Tutorial
Content last updated on June 14, 2012