
This guide is applicable to independent musicians and bands when recording their songs in a recording studio. This is an important checklist to follow when you are having a recording project. This will ensure that you will get the most out of the project, save time/cost and none of the critical aspects would be missed. This is based on my years on experience recording music and doing actual observations.
This checklist is best administered by the band leader or producer which is usually one of the band members if the project is self-produced.
Checklist#1: Are you fully rehearsed?
Most artist and bands in the independent music scene does not hire producers and instead they produce their own songs and recordings. They do their own songwriting, arrangement and scheduling/financing a recording project.
One of the crucial things is to be fully rehearsed before going to the studio. This means full mastery of the tracks to be performed and recorded. For example, the vocalist should ensure that all potential mistakes in the vocal tracks are corrected before recording. Or the lead guitarist can perfectly play the solo from start to finish. This requires hours and even days of regular practice!
This is also applicable to back up vocalist and additional musicians, make sure that each musician are aware that everything is perfect before going to the studio for a recording.
Sadly, there are musicians that missed this aspect and will do lengthy rehearsals inside the recording studio. As a result, the tracking session is a mess because the musicians are not fully prepared. Remember that you are paying per hour when renting a studio so make sure you are fully prepared.
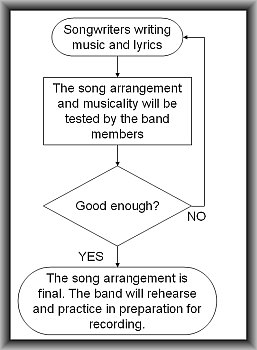
Checklist#2: Have you finalized the song arrangement?
There are times when musicians are too excited to have their songs recorded only to find out that they still need to revise the arrangement after or during the recording session. This is a very costly mistake. To avoid this problem, I would recommend this band songwriting flow chart below:
Band songwriting
It starts with the songwriters (it could be members of the band) writing the first version of the song. It will then be performed by the band to test the quality of the arrangement. If it does not sound good, it will be rewritten until it sounds OK.
This should not be done during the actual recording. Finalize this before going to the studio.
Checklist#3: Are all instruments and accessories ready?
Most serious musicians will have their own instruments that they will be bringing to the recording studio. Make sure it is ready and fully checked. Good examples are the following:
1.) Guitarist checking the battery status of their gears; or bringing extra battery in addition to the power adapters in case of accidental malfunction.
2.) Vocalist and backup vocalist printing the lyric sheets in advance.
3.) Drummers making sure their drum sticks work or in good condition.
4.) Checking for serious tuning problems in case of guitar strings and replacing faulty strings days before actual recording.
This may sound self-explanatory and common sense. But I’m amazed at the amount of time that is lost in the recording studio because of these mistakes.
Checklist#4: Have you fully booked with the studio?
You should contact the owner of the recording studio and book for the schedule days or even weeks before the actual recording. If you are not yet sure which studio to record, spend some time looking for recording studios suitable for your band; consider other important aspects such as the gears, engineers and the rate of the studio.
Get some recommendations from other bands and get their honest opinion about the studio. If you are doubtful about the quality of their recording gears, you can visit the studio in advance and examine their live rooms, control rooms, amps, drum sets, microphones, etc. And possibly get some sample recording from them.
Make sure that their gears are complete for your band needs. Visiting the recording studio in advance can be a very important requirement for recording album projects where you will be spending a lot of time in the studio.

Studio pic
Finally, you need to book your band with the preferred recording studio. Make sure you confirmed that this booking/schedule is final to avoid mishaps.
Checklist#5: Do you have the copy of all track recordings in highest resolution?
Most recording studio is now equipped with a DAW (Digital audio workstation). This means that the recorded audio files are saved inside a computer in digital format (.WAV). During recording, there will be LOTS of files that are created and recorded such as the vocals, drums, guitars, bass, etc. The recording is usually done in 24-bit which are a standard format in most recording studios. You should have a copy of all these files.
If you are not very familiar with this, you can read this tutorial on bit depth and sample rate for recording projects. The bit depth should be 24-bits and you can verify this with Reaper (read step#2 of this tutorial, load each of the track waveforms to confirm) once you have the copy (placed either in DVD or USB hard drive) of all the recordings. The sample rate should be at least 44.1 KHz (or even higher). Make sure no effects are applied on every recorded track WAV files except for the sample complete mix.
This is what you need to have. Make sure the track file names are labeled properly so you will know the final version of the recorded track. #1 to #5 should have no effects applied to them directly to the waveform. Leave it as original and dry as possible.
1.) All vocal recordings
2.) All drum recordings
3.) Guitar tracks
4.) Bass
5.) Backup vocal tracks, overdubs, etc.
6.) Sample audio mix down of the project (done by the in-house engineer)
I would recommend that all WAV files of those recordings should be using the broadcast wave format with embedded “start offset” information. Why?
After the song will be recorded and mixed by the in-house audio mixing engineer; the band might realize that the song needs to be remixed again. Audio remixing can be useful for bands looking for the best sounding mix version of their song.
When remixing the tracks, the band needs to hire another audio mixing engineer. As a requirement, the band will provide all the recorded tracks to the new mixing engineer. The audio mixing engineer will assemble all of these tracks in DAW software.
To re-assemble the project in a different DAW, it needs to be synchronized with the rest of the tracks the way it was done in the original recording. This is where “start offset” is very useful as timing information. This will be the basis of the new mixing engineer to layout the project tracks in the DAW and to start mixing it. Without this information, it would be virtually impossible for any engineer to remix your project.
Checklist#6: Have you completely list the credits in the recording project?
It is important to document music production credits. The band will be required to give accurate credits to musicians and engineers present in the recording project. There are many reasons for this such as future royalty tracking or listing credits in the future album release.
This needs to be done in writing to avoid guesswork. Remember that some of the band members might quit and will be replaced. But it doesn’t mean that the old band member will be forgotten but still deserves full credits for any work done. Failing to list down proper credits can result to legal issues.
Checklist #7: Have you settled the sound recording copyright issues in advance?
Decide who the owners of the sound recording copyright; this is different from the copyright of the song which is owned by the songwriters. You need to settle this with the rest of the band members in advance to prevent future dispute. You only need to copyright the final version (after audio mastering) of the song.
Make sure everything is done in writing; you can read the following useful tutorials about this topic:
What is sound recording copyright?
Correct steps in registering for sound recording copyright
Summary: Avoiding these mistakes
1.) Do not ask for a CD containing the recorded files. These are NOT high resolution audio files! Audio in CD is already in 16-bits (downgraded version of the original 24-bits) which are not what you want. Instead ask for 24-bit recordings of your song (in BWF format including the mix down). Do not forget to bring a big capacity external hard drive during the recording session where these files will be saved.
2.) Not making several backups of the recording. Your song is a valuable asset. You should protect the original recorded files by putting the copies in another storage medium; it could be DVD, another external hard drive, etc.
3.) Don’t force the studio engineer to make your mix very loud. Remember that a mixing engineer can only be an expert in audio mixing. Only a qualified audio mastering engineer can make this happen, your band should hire one after finalizing the mix.
4.) Do not come to studio unprepared. Print this checklist and ensure that your band will follow this list until the completion of recording project.
5.) Do not forget to list down credits. This includes musicians and engineers present in the project.