
Vocal recording is one of the most important tasks in the multi-track recording project that should be done carefully/correctly. It is because the artist fans will be paying MORE attention to the vocal tracks more than any other instruments in the mix. This beginner tutorial will highlight how to record vocals properly. You can do this by following the best practices of recording vocals in your digital home recording studio (using a PC, Mac, Laptop, etc). This tutorial is applicable to any recording software you will be using.
A Real Vocal Track Example – Issues Examined
Your will learn quickly how to record your vocals properly by showing a problematic vocal recording so that you will know what are these problems to avoid. I received an audio mixing request consisting of around 5 tracks (2 guitars, 2 violins and one lead vocal track). The client initially sends me the vocal track for a review. This is what the client provides (vocals start at 13 seconds after playback, but observed closely what you have noticed before the vocals, during the vocal performance and after it).
Vocal credits: Priscilla Nguyen
You will notice there is a lot of issues in the vocal track. These are the following:
a.) Significant background noise in the recording (see the hum in the first 12 seconds and that carries all throughout the track)
b.) Digital Clipping
c.) Lack of headroom, too hot vocal recording levels.
And this is the waveform of the recorded vocals described above indicating the problem points:
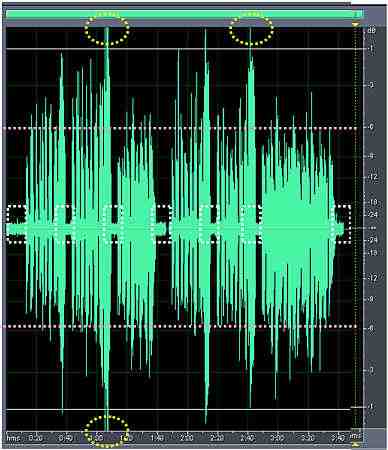
Vocal recording waveform
Legend:
a.) Yellow dotted circles are the clipped areas in the vocal waveforms; clipping in digital results to distortion which you should avoid.
b.) Dotted white rectangles are the significant background noise in the vocal recording. According to the client, this is noise due to the venting system which they have not turned off during vocal tracking.
c.) The dotted pink horizontal line at -6dBFS should be the optimum/maximum vocal peak amplitude when recording. However the vocals exceed a lot of times at this limit even exceeding 0 dBFS resulting to clipping. Below is the waveform statistics (red fonts are problem stats):

Vocal waveform statistics
The client however is CORRECT in choosing “mono” as the recording type of the vocals and choosing 24 bits as the recording bit depth. Recording at 24-bits is a standard although some recording software defaults at 32-bit float recording. 24-bit and 32-bit float have the same accuracy (read here: 32-bit float recording depth vs. 24-bit)
But the following are the added issues:
Problem1: Peak amplitude = 0 dBFS, possibly clipped: 1582
Correct1: The peak amplitude should be -6dBFS or less. In actual and correct vocal recording, the vocal amplitudes would be allowed to vary from the quietest section (around -48dBFS) to an average level of -18dB to maximum peak amplitude of -6dBFS. You should decrease your audio interface preamp gain if it hits above -6dBFS. This would increase the possibility of distorted and clipped vocals.
The most effective way of monitoring the incoming recording levels is to look at your audio interface recording level meters. For example, in the screenshot below of Saffire Pro40, it shows a peak level of -6dB.
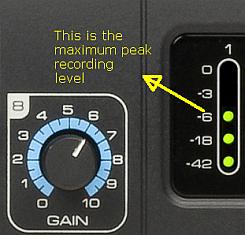
-6dB maximun peak recording levels
Problem2: 44.1 KHz Sample rate
Correct2: This should be greater than 44.1 KHz; 48 KHz sample rate is recommended. Although it won’t hurt either to record at 44.1KHz. Bit depth is more critical than sample rate. In this case, you should always be recording at 24-bits.
The Final Steps and Recommendations
You must have learned a lot by just reading the vocal track example above and the issues. To sum up, below are the steps and final recommendations:
Step1.) Always rehearse your singer regarding the piece, do the tracking only when the singer is ready and achieves vocal perfection during the practice. Meanwhile, setup your vocal recording equipments (condenser microphones, vocal booth, headphones etc). If you cannot find a vocal booth in your home studio that completely isolates the vocals from any background noise; find a place where it is reasonably VERY quiet.
Step2.) Set your recording software/audio interface to record at 24-bits/48KHz MONO resolution. If 24-bit is not natively supported by your software, you can use 32-bit float/48KHz resolution. Setting high recording resolution is very important for quality vocals in addition to the artist performance.
It is recommended to use an external/professional recording audio interface and not your computer PCI sound card for recording.If you do not have a standard home recording audio interface, you can read this post on cheapest 24-bit/96KHz USB audio interface.
When recording vocals, use a standard vocal recording microphones such as Rode NT1A for condenser or SM 58 if you are using dynamic microphones.
Step3.) Do not yet hit the record button and do a level test first. This is done by letting the singer perform the vocal tracks naturally (from start to finish where the loudest and softest peaks can be monitored) then watch the level meters in your software to fine tune levels before actual recording. Watch out for:
a.) Constant peaking beyond -6dBFS = you are setting levels too loud, try to lower it a bit.
b.) Clipping for the loudest section (level meters hitting red during the loudest part of the vocals) = you are settings levels too hot, aim for -6dBFS maximum.
c.) Obvious noise – there should be no obvious background noise in the recording.
d.) No peaks above -48dBFS – you are setting levels too low, try increasing it a bit but not hitting the -6dBFS for the loudest part of the vocals.
Setting proper levels are essential for proper gain staging.
e.) Sluggishness in the vocal recording/latency issues – your computer is running slow; make sure your computer is suitable for audio recording. Or you are opening a lot of programs, make sure only the recording software is running in your PC.
f.) Dropouts in vocal recording – associated with slow computers and un-optimized software/hardware configuration. Consult with your manual for best configuration practices of your equipments.
For more details about optimizing your PC for home recording, read the following tutorials:
Windows XP/7 audio recording DAW tweaks and optimization tips
Optimize Windows XP/7 for Firewire and USB audio interface
Step4.) Once you have cleared the potential problem areas in the previous step, you are now ready to hit the record button. Kindly tell the singer to be ready and then hit the recording button to commence the tracking.
Step5.) Watch out for drop outs, obvious noise and latency issues while recording. If any of that happens, stop the recording immediately and fix the issue before proceeding to finalize the tracking. If all is doing well, you should be able to record the vocals as cleanly as possible with all the required elements for mixing. For example the vocal recording below has been correctly done:
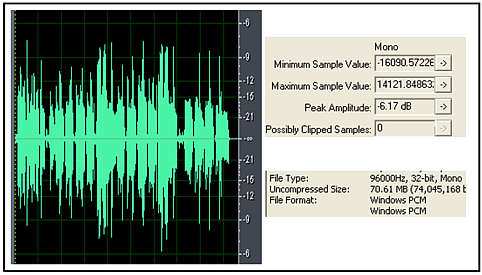
Correct vocal recording waveform
As you can see, the peak amplitude is less than -6dBFS (actual: -6.17dBFS) and there are no clipped samples. Also the bit depth, sample rate and type are 32-bit float/96KHz- mono (you can also record at 24-bits/48KHz or 24-bits/44.1KHz). Aim for something like this when recording vocals.
Content last updated on June 14, 2012