
I received a lot of request to write a tutorial on how to transfer or copy karaoke/minus-one music from YouTube or other sources like DVD player to computer. This tutorial is very helpful for singers looking for ways to obtain a high quality minus-one/karaoke music of their favorite songs. There are songs in YouTube and in your DVD player karaoke but the problem is that beginners find it hard to obtain a clear minus-one audio of the music.
Bear in mind that the scope of this tutorial is for personal use of karaoke music only. You are not authorized to distribute copyrighted music using the methods below. You should ask for a license from the music publisher and the owner of the sound recording.
For beginners: Using Youtube and other video sites
This is the simplest method, follow the steps below:
Step1.) Go to Youtube.
Step2.) Search a minus one for the songs. You can type it on the search box like this (artist + song title + minus one or karaoke):
“Jim Groce” “Time in a bottle” “karaoke”
You can also remove the quotation marks to get some broader results.
Step3.) The objective is to record the streaming audio from Youtube to a recording software like Audacity (which is free). You can read this very helpful tutorial on how to record minus-one or karaoke music from Youtube in Windows 7 using Audacity.
If you are using Linux, you can read this tutorial. After following all those steps, you should now obtain a clean minus one of your favorite songs.
For novice users: Extracting Audio from Youtube Videos
Sometimes, a lot of singers would take advantage of the lyrics posted along with the karaoke video in YouTube. This would be very helpful during the karaoke practice. So with this aspect, you can do the following:
Step1.) Find your favorite minus-one or karaoke music in YouTube.
Step2.) You can download the video of that YouTube URL. There are lots of ways you can download video from YouTube. You can start with this article.
Step3.) You can then practice the minus-one directly on your desktop even without an Internet connection since you have downloaded the karaoke video. The next challenge is to extract the minus-one audio from that video.
Step4.) You need to download Reaper here.
Make sure to select the correct installer. So if you are using Windows 32-bit, you should download the 32-bit version of Reaper. Proceed to install and all features are working even without the license. If you will be using Reaper on a continual basis, it is always better to get a license.
Step5.) Launch Reaper and go to File – Batch file/Item Converter.
Step6.) Click “Add” and find your video that you would like the audio to be extracted.
Step7.) Select the browse directory and the name of the audio file. See screenshot below:

Browse for output directory
Step8.)Set the sample rate to “44100Hz” and, channels to “stereo” and bit depth to “16-bit”. The purpose is to make the audio file playable in all CD players and also you can burn this file to a CD (creating an audio CD). You can also create a mp3 version on this audio file.
See screenshot below:

MP3 sample rate and resolution
Step9.) Finally click “Convert all”. The resulting WAV file (audio minus-one of the song) can be found in the output directory that you have set.
Advance users: Transferring karaoke/minus-one songs from DVD player to PC
Sometimes you would be unlucky that you cannot find the minus one version of your favorite song in the Internet (YouTube, etc.).
But most of the time, there are DVDs karaoke disc that would most likely include that song. The problem is that this song is still in DVD format and you would still need to transfer the audio to your computer.
This can be a complicated work as you need to have an external audio interface to do this job. If you are not familiar with this equipment, it is recommended to take a quick look at the following posts:
Buying an audio interface tips and complete beginner guide
USB vs. Firewire Audio Interface
Cheapest 24-bit/96KHz USB Audio Interface
The purpose of the audio interface is to convert the analog audio output of your DVD player into a digital audio such as WAV or MP3 which you can then burn to a CD or put in your mp3 players.
Below are the steps:
1.) Install the audio interface to your computer. You can refer to the manual on how to hook up this gear to your PC.
Make sure you have installed the drivers.
2.) Put the DVD (containing the minus-one version of your song) on the DVD player.
3.) You do not need to hook up the DVD player to a TV or your computer screen because the song tracks number can be controlled using the DVD player buttons or the remote control.
Hook up the DVD player to your audio interface. You need an audio interface with at least two inputs. See screenshot below:
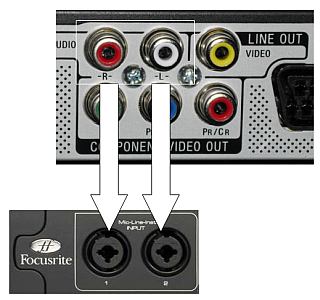
Connecting a DVD player to audio interface
Most DVD player audio outputs are RCA labeled in red and white. You need a male RCA (red and white) to dual TS male plug cable to connect this to your audio interface; such as this one:
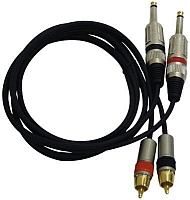
RCA to TS male plugs
4.) Prepare the minus one track on the DVD player but do not yet hit the play button.
5.) Launch Reaper; go to Track – Insert New Track.
6.) Configure the track to record in stereo (the DVD output is stereo; it’s why you are utilizing the two inputs in your audio interface). If you use the first and second inputs, it would look like this way:

Stereo recording in Reaper
7.) Switch the recording level to moderate. You can do this by switching the gain input on your audio interface; make sure it does not hit red (or clipping).
8.) Hit the record button on Reaper.
9.) Play the DVD player, the track would now be recorded to your computer. You can then export the recorded audio as wav file and burn it to a CD.
Content last updated on July 25, 2012