
If you are doing some audio mastering using Adobe Audition, this tutorial will help you find some great tools that you can use in your mastering. There are lots of tools available, some are built-in to Adobe Audition while others can be added via DirectX or VST plug-ins.
Some of these tools are not free, so you need to license it before it can be fully operational in Adobe Audition. These are the tools that I am using in my home audio mastering. And I will explain in details some of my tips and favorite settings. But first, below is the audio mastering flowchart I am using:
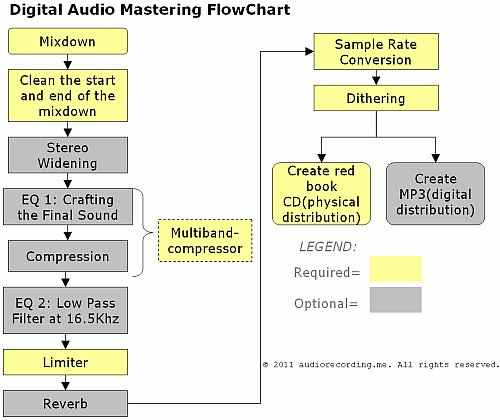
audio mastering process flow chart
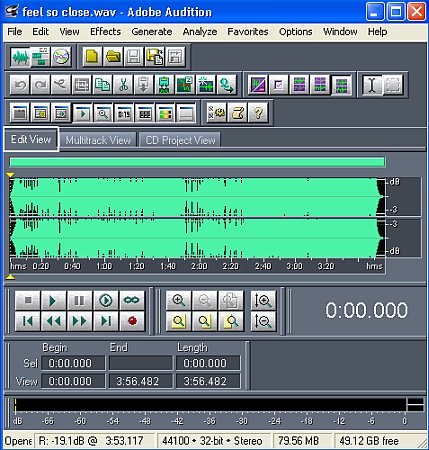
The input of the mastering stage is the 24-bit/96KHz WAV mix down file from the audio mixing process. The first step is the cleaning of the audio file, so there are no strict tools that I am using with this procedure. You can simply cut the extra beginning and end time so that the entire length is reasonable. You can read more details about here.Take note that all the mastering is done in Adobe Audition Edit view:
Edit view in Adobe Audition
Tools/Plugins #1: Adobe Audition Stereo widening Effect
In Adobe Audition, go to Effects – Amplitude – Pan/Expand. My favorite preset is “Mastering Width”.
When to use stereo widening in mastering? This is very helpful if you find the left and right panned instruments to be weak compared to the instruments at the center. Supposing the vocals is too strong in the center while the guitars are deeply buried in the background. You can use stereo widening effect to balance the volume. The effect is that the guitar volume will be brought up to a comparable level to the vocals.
Tools/Plugins #2: Multiband Compressor
Personally I am using the Waves LinMB (Linear Phase Multiband compressor). This is a plug-in so this means you need to install this first to your Adobe Audition software before using it.
When to use multiband compressor?This tool allows you to apply both compression and EQ in the same tool. Compression and EQ are two very important factors in shaping the final sound in the mastering process. You can read these following tutorials for details about this subject:
Waves Linear Phase Multiband Compressor Introduction
Using reference tracks when mastering using Linear Phase multiband compressor
Tools/Plugins #3: Adobe Audition Parametric Equalizer
This is a built-in tool in Adobe Audition. To use this EQ, go to Effects – Filters – Parametric Equalizer.
When to use Parametric Equalizer? If you like to shape the sound of your audio, you need to use Parametric EQ. You need to assign two settings and that is the amount of cut/boost as well as the Q. If you search for mastering EQ tutorials in this blog; all settings can be implemented using parametric equalizer.
Tools/Plugins #4: Low Pass Filtering for 16.5 KHz
Most commercially mastered recordings are applied with low pass filter at 16.5 KHz. If you do a frequency spectrum analysis of any commercial song, this is how it looks like:
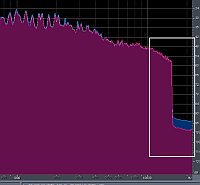
Low pass filter mastering cut off
When to use Low Pass Filtering: To save dynamic range and assigned it to a much useful frequency range (mostly 10Hz to 16000Hz). In Adobe Audition, you can use the Scientific Filters (Effects – Filters – Scientific Filters). I use the Butterworth filter behavior. You can read some tips here about Butterworth filter.
Tools/Plugins #5: Waves L1 Limiter
When it comes to limiter; my personal favorite is Waves L1 Limiter. This will allow me to maximize the volume of the audio track in the mastering process without getting distortion.
When to use Limiter? You will use this to get the maximum volume out of your music. Mastering is all about getting loud without compromising quality. The most useful tool here is the limiter. My favorite settings: Preset= > L1 Full Reset, then adjust threshold (-5dB for example) and out of ceiling (0.0) accordingly.
Tools/Plugins #6: Reverb
When to use Reverb? I seldom use reverb in mastering process. I only use reverb when the track is very dry compared to normal standards. I use the Adobe Audition built in studio reverb: Effects – Delay Effects – Studio Reverb. Select Room Ambience 1; you can set the decay from 1000ms to as low as 200ms just to get that reverb you need. Overdoing does not sound nice.
Tools/Plugins #7: Voxengo Sample Rate Converter
When to use Sample rate converter? You will use this to finally convert the 96 KHz sample rate to 44.1 KHz. The best sample rate converter is the Voxengo R8Brain. This is free to use. Read here for more details about sample rate conversion in mastering.
Tools/Plugins #8: Dithering
When to use Dithering: Dithering is used when converting a higher resolution bit depth into lower bits. For example to convert 24-bit depth to 16-bit depth, you need to use dithering tool. My favorite dithering tool is Waves IDR.
Tools/Plugins #9: CD Project Red Book standard
In Adobe Audition 2.0, you can burn your masters to CD using red book standard. You can read the manual here.
Tools/Plugins #10: MP3 project
You can also distribute music albums in terms of MP3 which is one of the most common digital means of distribution. In Adobe Audition, you can use the LAME MP3 encoder to create quality mp3 tracks.
Content last updated on June 29, 2012