
This post will list the most common recording mistakes in professional home-based music production. This is useful to a beginner home-based studio producer/engineer/musician looking forward to create commercial-quality recordings.
MISTAKE #1: Using onboard sound card when recording music to your computer
Onboard soundcard has lot of limitations that could prevent you from creating high quality recordings. It is because they have very low signal to noise ratio it means that the noise created will be substantial over the recordings. The second primary reason is that onboard card will not allow you to record at highest sampling rate/bit depth as possible which is crucial for professional sound recordings. Most onboard cards only support 16-bit/44.1Khz or 48Khz which is not optimum or recommended. The last reason is that they have limited connectivity; onboard card is designed not for professional music productions but for other less audio-intensive apps like gaming and chatting. So if you need to record two instruments simultaneously, you just can’t. Much worse if you are tracking/recording drums 🙂 Instead; invest in high quality audio interfaces such as Tascam US1641 USB 2.0 Audio and MIDI interface

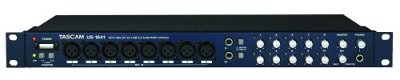

In this case, you really do not need a soundcard or an outboard audio mixer. All you need is an audio interface and connect it to your computer using USB 2.0 technology. They accept several inputs and is ideal for recording several instruments at once which includes drums. This audio interface cost around $300 dollars, so if you are on the very tight budget and plans to use a soundcard. You can start with M-audio Audiophile 2496
MISTAKE #2: Using Computer/Laptop multimedia speakers for monitoring audio.
These speakers are not designed for professional audio monitoring. They do not have flat frequency response. As a result, you won’t be able to monitor the details and assess the quality of your recordings objectively. Common multimedia speakers such as Creative, Altec, etc are designed for gaming applications and not suited for serious music production. One of my most favorite entry level professional studio monitor is Yamaha HS80M Studio Reference Monitor


Reference monitors allows you to assess the quality of your recordings accurately because they have a flatter frequency response compared to speakers designed for other applications. These are “powered” studio monitors under $500 and they have exceptionally flat frequency response.
MISTAKE #3: Not doing pre-production or recording production plan
If you are aiming to produce the best sounding album as possible, crucial planning is needed. You need to examine what musical instruments or instrumentation is needed to be added to the song to make it sound great. Test things in advance before recording the tracks. In this case, do some pre-production runs, let the band perform and experiment with different arrangements to decide what is good or not.
Then you make a plan and write it on a paper. Sequence your multitrack project in advance, so you will decide how many guitar tracks you need to record. How many vocal takes, back up vocal is needed. Or whether you need to hire violinist to fit the song, etc. Once you have completed that solid plan, then start the recording sesssion.
MISTAKE #4: Recording and Mixing in UN-treated room acoustics
Your room that you are recording or mixing has a HUGE impact on the results of your music production. In this case, you need to treat your room properly so that it won’t unncesssary bounce sound waves that could bias your mixing/recording decisions. You can read this tutorial on mixing studio setup acoustic design. This is more in-depth and complete tutorial on home studio acoustics that basically covers everything you need to learn.
MISTAKE #5: Recording everything in stereo
Some tracks will only be highly necessary to be recorded in stereo (such as a solo instrument). In a multitrack project, everything should be recorded in 24bit/96Khz mono since these tracks will be mixed and then summed up into a two-channel (left and right) signal known as stereo mixdown. The file sizes are also less compared to a stereo signal.
To illustrate some application, you can read this post on recording vocals in mono compared to stereo.
MISTAKE #6: Do not have a “trained” ear
If you are working in a studio both as an engineer or a producer, it is a requirement that you have “trained” ear. Your ear is the most powerful studio equipment. This means you can spot out of tune recordings easily, perceive minor changes in volume level, changes in tempo, pitch, noise, etc. There is no overnight success formula to have this asset. Instead you need to trained your ear on a continual basis so that you can sort out what sounds good and what sounds bad. In this case, you need to undergo ear training development exercises for recording/mixing engineers. Do not forget to monitor at reasonable level because consistent loud volume can damage your ears in the long run.
MISTAKE #7: Not recording in high resolution
A common newbie mistake is to record at 16bit/44.1Khz. This is not optimal since mixing and mastering needs digital audio sampled at much higher rate such as 24bit/96Khz for best results. It offers a much higher signal to noise ratio and the recording sounds cleaner and with depth.
So how to really make quality recordings? The secret is on your signal chain
When you start creating your own projects in your home recording studio; you always wanted to produce that top-notch recording quality similar to your favourite artist commercial CD. However, you find out that no matter what you do, it is always having lesser quality compared with professionally produced recordings. At this point, you begin to suspect your recording and mixing skills. Assuming you are very confident and knowledgeable with recording and music production, the biggest problem threatening the quality of your recordings lies in your “signal chain”.
What is Signal Chain in the Recording Studio?
Signal chain describes the flow of signal from your musical instruments, audio interface, analog to digital converters, computer digital audio processing unit that will be handled by your recording software or DAW (Digital audio workstation) and finally to your studio monitors.
Putting in simpler words everything in the signal path affects the quality of your recordings. When I studied electronics engineering, I remember the topics on signal circuits that state: “The signal chain is only as strong as its weakest link”.
What does this imply? To better understand the above statement, let’s have an example like recording vocals. Take a look at this highly simplified signal chain starting from the vocalist all the way down to your studio monitors.
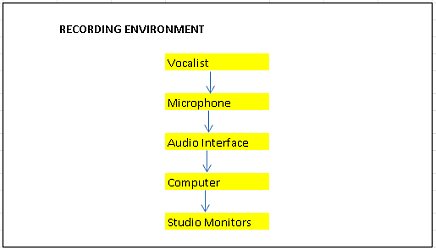
signal path example
Every component in the signal chain affects the quality of your recording.
How Each Component in the Signal Chain affects Recording Quality
So let us discuss how each factor can certainly affect the quality by following the above example:
Vocalist – it make sense that if you are tracking vocalist that does not even know how to sing, then you will have serious vocal recording quality issues even before the recording will start. Although this cause is not technical in nature, you should ensure that you are working with a great and solid vocalist. But this is beyond the recording engineers’ choice however recording producers/recording labels will be responsible for working with a great singer. Even high budget productions failed to appreciate the importance of having great vocalist, so they attempt to correct the vocal problems with technology such as Auto-tune, etc. Sad to say, there is no technological substitute for the art of great singing.
The above example is for vocal recording, but the concept applies to all musical instruments to be recorded like guitars, bass, drums, etc. Say you love the guitar tone of Slash, Joe Satriani, Steve Vai or Eric Clapton primarily because they using high quality guitars and amps that can provide that tone. Do not expect to get the same results from your idols if you are using very low quality musical instrument and equipment.
No matter how great the recording gears are or how skilful you are at recording, if the problem starts with the musical instrument; the entire result will still not sound good. So in this case the musical instrument is the weakest link of the recording. You need to fix that.
Microphone – let’s go back to the vocal recording example. The technical requirements of recording vocals is to “faithfully” reproduce vocal frequencies starting from 20Hz to 20,000Hz or even beyond, uncoloured or un-altered. Well, there is only microphone that can do this job- a quality vocal condenser microphone. So if you are using cheap dynamic microphones in your vocal recordings, do not expect that the vocals will sound complete, airy and amazing. Cheap dynamic microphones have very poor frequency response and sensitivity compared to condenser microphones. In this case, the microphone is the weakest link in your recording.
Audio Interface– this is very critical. A good audio interface accomplishes two functions: pre-amplification and analog to digital conversion. If you are using an audio interface without a pre-amp, the recording will be noisy and weak. No matter how great are your microphones or even the vocalist, the resulting quality will still not sound great because of noise or hiss. Or if the audio interface is poor in converting analog to digital signals then you are working with digital signals that are not a faithful reproduction of your analog sound. In this scenario, the audio interface is your home studio weakest link.
Computer– less engineers are putting emphasis on improving the quality of the computer hardware and software, but yes it is still part of the signal chain and will affect the recording quality. How? If you are running a computer with less powerful hardware (low memory or low CPU speed) or buggy software, it will tend to drop-out or experience instability during the recording session. Drop-outs or digital related issues inside your computer can accidentally add noise, spikes and other weird issues in your session. In this case, the computer is the weakest link.
Studio Monitors – OK, say for example you have now a great vocalist, a great sounding microphone, a high quality audio interface, powerful computer hardware and an industry-standard DAW like Pro Tools. You still have recording quality issue if your studio monitors does not faithfully reproduce what is EXACTLY being recorded. This is why you need to use high quality nearfield monitors that is flat that tells the truth. If it sounds bad, it will sound bad not the other way around. In this case, the studio monitors are the studio weakest link.
Recording Environment – this is the “sixth man” in your recording studio. Very few beginners in home recording are seriously paying attention to the recording environment. Yes, this will have a HUGE impact in your recording quality. For example, if you are recording vocals in a highly reflective environment as opposed to the dry-sound insulated room (which is recommended), the recorded vocals will not sound great because of sound reflections and discoloration due to the room. Or if you are monitoring the recordings in an “untreated” room, it will tend to emphasize a certain sets of frequencies which will result to in-accuracies in monitoring. This will lead you to wrong recording/mixing decisions. In this case, the recording environment is the weakest link in your recording studio.
As a summary, to make quality recordings is to fix ALL weakest links in your recording signal chain.
Does this imply that I should spend more for my studio?
Not exactly. The point of this post is not to let you buy or immediately upgrade your gears; but to educate the importance of having a great signal chain. So I recommend taking a deep look at your existing gears and checking if it’s doing the job well in your recording. Do some research regarding its technical specifications and read some reviews out there to make sure they are the right equipment for the job. If you are still doubtful, asked for expert opinions in the forums. Spend modestly and upgrade one at a time. In my experience, I found out there are gears that are still affordable yet it sounds great. You do not need to have your signal chain to be entirely consisting of highly expensive gears but I do recommend settling for highly rated/recommended gears (which is not always expensive) for every part of your signal chain.
Content last updated on October 14, 2012