
BWF (Broadcast wave format) is simply an upgraded version of the standard WAV file (lossless). In BWF format, a user can add non-audio information to the WAV file such as text. This information can be associated to the nature of the recording. It can be the name of the engineer, date of creation, timing/synchronization information, etc. There is however a limit as to what you can add and most standard DAW would provide text fields for convenience in filling up this information.
How to check if you are dealing with a broadcast wave format?
Take note that the broadcast wave format file extension is still .wav. So by file extension you won’t be able to distinguish whether that file is a BWF. The only way to check is to confirm through WAV file properties inside your DAW.
Follow the steps below:
1.) Load/import or insert the WAV file in your digital audio workstation. In this example, let’s use Reaper.
2.) Select any of the audio waveform in your project (you can check them one at a time).
3.) Go to Item — > Source Properties.
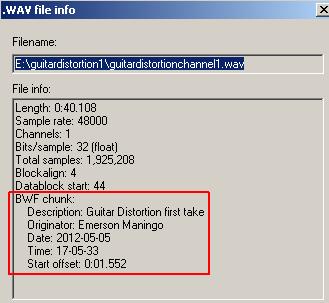
4.) In the properties, if you are able to see the text information under “BWF chunk”, then the WAV file is using broadcast wave format such as this:
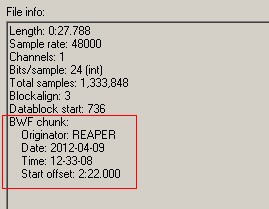
BWF Chunk example
Reaper by default will use broadcast wave format when you are recording and saving the tracks to the hard drive. As you can see on the above information, the date and time as well as the “start offset” has been provided. These are the most basic information that you can get from a BWF file.
What is “Start Offset” and why it’s very important?
Start offset is defined as the start time of that specific BWF file in your multi-track projects. This is a very important piece of information in synchronizing your tracks in a multi-track project regardless of any DAW.
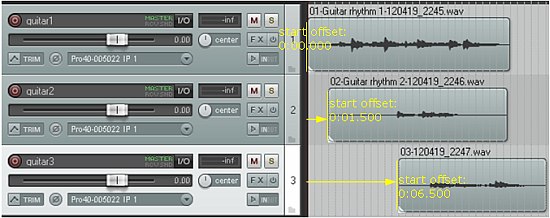
For example, say you recorded 3 guitar tracks in Reaper. By default, it will be assigned with a “start offset”. And supposing below are the start offset data taken from the BWF chunk.
Guitar1: 0:00.000
Guitar2: 0:01.500
Guitar3: 0:06.500
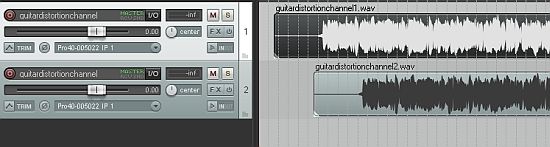
These are visualized as follows in your Reaper session:
Start offset screenshot
Start offset is referenced from time 0, which is the start of the multi-track timeline. These data is also called “timestamp” in other DAW. There are other methods on making your recordings compatible with any DAW. But using BWF is the best solution if this feature is fully supported by your DAW or recording software.
Assigning BWF Chunk data to your existing recordings
Supposing you are not using Reaper and would like to add BWF chunk data to your multi-track recordings. This is particularly useful if you want to import your recordings to any DAW and still retain synchronization of the tracks. Follow the steps below:
1.) Make sure your software is capable of adding chunk data to your WAV file. Not all software can do this. For example, this is not possible with the current version of Audacity. Other software does support but it’s not clearly visible as features. In this case, it is recommended to read the entire manual or ask the DAW software support on this matter. As an example, let’s use Adobe Audition 1.5.
2.) See the screenshot of the multi-track project:
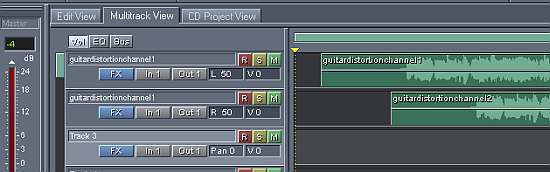
Adobe Audition BWF
As you can see, the two tracks do have different “start offset” properties. To retrieve the time offset (start time of the track) in Adobe Audition 1.5 (if you are using another DAW, refer to your manual); select the track waveform (by clicking on it) and click “audio clip properties”. The time offset is shown as (e.g. for track #1):
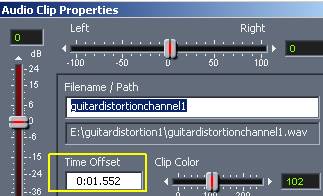
Time offset AA1.5
Take note of this time offset, maybe copy it to a blank text file. Now do the same for the remaining tracks in your project to get the time offset data.
3.) Once you have all the data, it’s time to embed them in BWF chunk header. Select the track, right click on it and click “Edit Waveform”.
4.) Go to View – Wave Properties. Look for a tab that says “EBU extensions”. In some DAW, this may be labeled directly as “BWF”; if you don’t see anything probably this feature is not supported. Better consult the DAW support.
Input your time offset data as well as other important information that you want to embed.
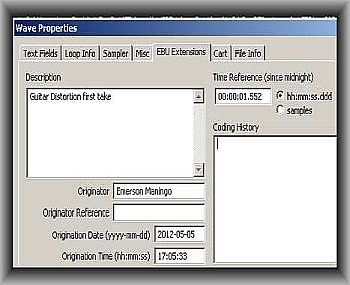
EBU extensions
Take note that the time offset format is in hours:minutes:seconds. Make sure you follow the format correctly. So a time offset of 0:05.590, (that’s around 5 seconds from the start), can be structured as 0:00:05.590
5.) Save the wav file. Don’t forget that this is one of the most important steps. Make sure you check the option “Save extra non-audio information”. This will add the BWF chunk data to the WAV file.
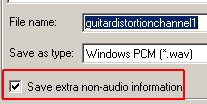
Save non-audio information
6.) Repeat the above steps for the rest of your tracks until you have completely assigned the BWF chunk header data to your WAV file.
Importing BWF files to another DAW
Supposing you have now BWF files, it’s now very easy to import them to another DAW. Simply load them up and retrieve their BWF chunk header data for time offset information.
Below is an example BWF file created in Adobe Audition 1.5 and loaded in Reaper session:
Imported to Reaper
Using the start offset data; you can re-assemble the tracks in another DAW even if it’s recorded in a different DAW. You can do it by:
1.) Retrieve/copy the start offset data of the recorded track in the BWF chunk header in “Source Properties”.
2.) Right-click the waveform in Reaper (let’s use this as the DAW example) and go to “Item Properties”.
3.) Paste the start offset data in “Position”. This is how it looks like:
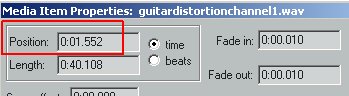
Start offset data
4.) Do the same for all the tracks until you have completely assembled/synchronized the entire session files.
Synch session in Reaper
If you want the complete technical specifications of the broadcast wave format, you can read this PDF file
Content last updated on July 21, 2012