
Distorted guitar is one of the most important instruments for rock music. Most genre will use distorted guitar in the music production process, for example in pop, alternative, grunge, punk, etc. Because of this popularity, this short guide has been written to illustrate the important processes.
This is written for someone who will use a personal computer (preferably Windows), a digital audio workstation (DAW) software (Cubase, Protools, Reaper, etc.) and a decent external audio recording interface (either in Firewire or USB) in recording the guitars. Budget audio interface for Windows are commonly USB type. If you don’t have one, you can read some recommendations here.
If you are ready, let’s get started.
Set for that Perfect Overdrive Tone
Of course, before you will record the guitar overdrive sound; you need to set the tone. This is usually done by adjusting settings on the guitar amplifier (such as Marshall or Laney) where they have built-in overdrive effect. Adjust for that best tone you are targeting.
Another popular use are overdrive effect pedals. For example, I am still using my Rockteck overdrive pedal which I bought in 2004 and yet still works and sounds great for an extremely low price. Of course there are tons of overdrive pedal that can have much a better sound than this.
In adjusting the tone, you will set the levels, distortion level and the tone itself. For example, this is my favorite setting:
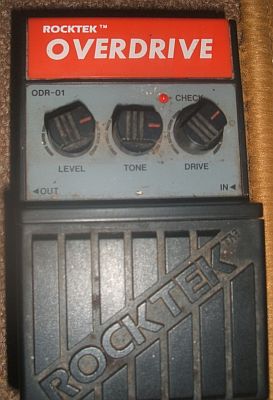
Rocktek guitar overdrive pedal settings
Other important settings that you can implement that will influence the overdrive sound are the EQ knobs in the guitar amplifier. There is no standard EQ setting but if you want some heaviness and punchy overdrive sound, you may want to switch the mid and treble to slightly above minimum while setting the bass to average.
Once everything has been set and you are happy with the sound proceed to the next section.
Method #1: Recording using your guitar amplifier and microphone
To set this up, the following is the very basic signal chain for recording.
Guitar — > Effects processor(distortion) — > Guitar amplifier — > One or two microphones— > Audio Interface — > USB — > Computer
In steps:
1.) Connect your guitar to your distortion pedal.
2.) Connect your distortion pedal to your guitar amplifier. In some high-end guitar amplifiers; outboard distortion effects are optional because quality guitar amplifiers like Marshall, Laney and Fender do already have built-in effects on them such as overdrive/distortion.
3.) Adjust your distortion settings to the best sound you want to capture.
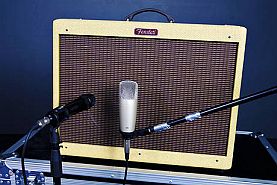
4.) Place the microphone around 4 to 6 inches from the guitar amplifier speaker (more illustration below).
For best results, you should be using dynamic microphone such as SM57. If you don’t have SM57, SM58 will do. You can use two SM 57 pointing to the one guitar amplifier to get some phasing/stereo effect. You can even use condenser microphones that you like. You can also utilize two guitar amplifiers during the recording with one microphone each. It all depends on your available resources.
As an example, in the screenshot below I use Rode NT1A and SM58. Position the microphones near the guitar amplifier cabinet around 4 to 6 inches for dynamic microphones and 8 to 12 inches for a condenser microphone. Condenser microphones are more sensitive than dynamic mic, so it should be positioned farther. See below:

Positioning the microphone for recording the guitar amplifier
Use XLR balanced output cables to connect them to your audio interface preamp inputs. Don’t use unbalanced TS mono when connecting to your audio interface; this will become noisy in the long term. Read this tutorial on balanced and unbalanced audio for more details about this topic.
5.) Again for best results, don’t clipped the recording levels. Allow -6dB maximum peak recording levels for proper gain staging. Do some test recording and play the loudest part to be recorded, if it exceeds -6dB, try to lower the preamp gain for your audio interface.
6.) For each microphone you use in recording, this is equivalent to one mono track in your DAW. So in the example above where there are two microphones used, you need to insert two mono tracks in your DAW for recording.
If you are using Reaper (or other DAW), configure the first track to accept inputs from Input 1 of your audio interface and the second track to accept inputs from Input 2. This is how it looks like in Reaper (inside the yellow box):
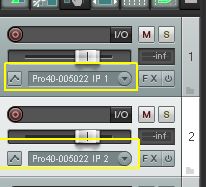
Saffire pro 40 two inputs
IP1 is Input 1 of the audio interface while IP2 is the second input. Then aimed these two tracks for recording by hitting the small red button; take note you are not yet recording but just aiming the track ready for recording. Always record in 24-bits. Minimum sample rate should be 44.1KHz.
7.) The signal coming from a microphone is very weak. You should be connecting the microphone to your audio interface preamp input as this will amplify the signal stronger in preparation to analog-to-digital-conversion. Read this article on the consequences of recording without preamp.
If you don’t have a preamp on your audio interface. You can connect first the microphone output to your mixer. This looks like the one below:
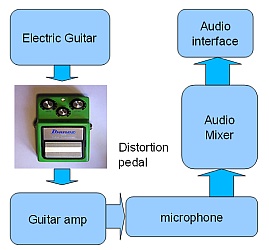
how to record electric guitar in a computer
Any audio mixer includes a preamp on them. Make sure you use balanced XLR inputs when connecting the microphone to the mixer preamp.
When doing a test recording, play your guitar with overdrive effect and see the resulting recording levels that fluctuate in the meter. You want the volume coming from those two microphones to be as similar as possible. For example see screenshot (see they have comparable peaks in the level meter):
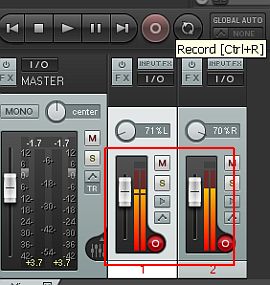
Reaper signal test level
If the output from one microphone is weaker, then adjust the preamp gain of the corresponding input accordingly. This is the sample overdrive guitar recording following the above steps:
Method #2: Recording direct to your audio interface
Recording direct to your audio interface using distortion effects are possible but this may not produce the best sound that you are expecting. It is because guitar amplifier tone is not captured before recording.
The signal chain are as follows:
Guitar — > Distortion FX gear — > (unbalanced high impedance input) — > DI box — > (balanced, low impedance output — > Audio Interface Preamp input — > USB — > Computer
The most critical piece of gear when you are recording direct to your audio interface is the DI box. This will convert the unbalanced high impedance output of your guitar to balanced/low impedance suitable for your audio interface inputs.
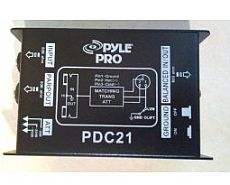
If you don’t have a DI, you can buy one as they are not relatively expensive yet very useful in home studio applications. You can find some good DI box such as Pyle-Pro PDC21


Balanced inputs and outputs are commonly done using XLR to XLR balanced cables. This is done when connecting to your audio interface.
Method #3: Recording Clean Guitar and implementing Re-amping
This is another concept of recording distorted guitar which is also very popular in modern rock recording studios. The first step is to record the guitar as clean as possible without any effects. This is the signal flow path:
Electric guitar — > DI box — > Audio Interface — > Computer
Or if your audio interface supports instrument level inputs such as Focusrite Saffire Pro 40 audio interface, then you can connect your guitar directly without DI:
Electric guitar — > Instrument level input (audio interface)
For more details about instrument level inputs, etc. find out in this tutorial.
Then after recording, the clean guitar is then captured in your DAW and saved in your computer hard drive.
You can then playback the clean guitar recording from your DAW to output that to your audio interface line outputs and finally to a distortion effects processor via the re-amping device. Then record it back to your computer with the captured distorted effects. This process is called re-amping. The signal chain are as follows:
Computer/DAW — > Audio interface line outputs — > Reamping Device(e.g. ProRMP Studio Re-Amper
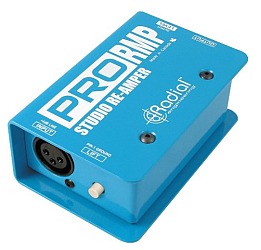

Above is an example of a re-amping device. This will convert the balanced/line inputs signals to hi-z outputs suitable for your distortion effects pedal or guitar amplifier cabinet. Take note that it accepts only XLR balanced inputs. If the line output of your audio interface is using TRS balanced. Then you need to purchase TRS balanced male to XLR male balanced cable to connect the audio interface output to this re-amping device.
Finally the one that is recorded back to your PC is the guitar sound with effects. The main advantage of this setup is that the producer/engineer will have a lot of time to experiment with different guitar distortion tone without the need of the guitarist to re-performed all the time. For details about re-amping, you can read the next section on overdubbing.
Overdubbing Guitar techniques
If you want to have that heavy-thick distorted sound of your guitar (common in rock music), then one of the reliable technique is “overdubbing”. So what is basically “overdubbing”? In music production, guitar overdubbing is simply doing simultaneous re-recording of the SAME guitar track using DIFFERENT production/recording settings.
For example, if you are using a Laney amp for recording guitars, SM 57 for microphones; Fender guitars and then you record a guitar track. After that recording, you re-record the same guitar track again using the same set of instruments and settings. This is NOT an effective overdubbing technique.
To accomplish effective overdubbing, you need to implement a wide variety of techniques/settings to arrive at a thick and heavy guitar sound. Below are the following tips I can provide:
Technique 1: Using Different Guitar Amps with Different Settings
Different guitar amplifiers have its own unique sound and character. You can record the first rhythm guitar take with one amp and another take using different amplifier with two microphones pointing on the amp; the resulting overdubbed sounds different from if you are using a single amp with varied settings. See the flow below:
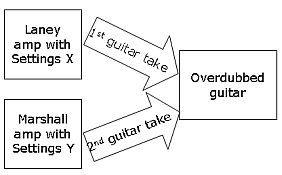
Overdubbed guitar technique 1
For best results, do more than 2 guitar takes to make the guitar sounds heavier with each take using different amp settings.
Technique 2: One guitar amp using two microphones with varied distance/settings
If you only have one guitar amp at home while having more than one microphone, you can still perform overdubbing. This is how to do it:
1.) First, put two microphones in front of the guitar amp.
miking the guitar amp with two microphones
Make sure that the distance between the first and second microphone to the amp is not the same to produce a different tone affected by phase. You can see a video illustration of this technique.
2.) Record the first guitar take.
3.) Adjust first the amp settings to a different sound and then adjusts the distance of one microphone by around 2 to 4 inches farther than before (feel free to experiment).
4.) Record the second guitar take of the same piece.
5.) You can overdub as many times as you want until you attain the desired heaviness.
Technique 3: “Re-amping”
If you want more flexibility during mixing to achieve the desired and optimum guitar tone, you might want to do re-amping. Re-amping works in the following steps:
1.) Recording the guitar dry and clean using DI techniques. This can be done by directly plugging the guitar into the audio interface pre-amp input (no effects placed between the guitar and the audio interface). The recording of guitar performance is only one take which is the best/perfect guitar take as possible.
2.) Once you have recorded a clean guitar tone. This tone is now saved in your hard drive for further processing.

first step of reamp
3.) You can now easily overdub them without the need for a guitar player to play over and over again. See the signal flow below on how to do this:

second step of reamp
The output of the DAW (from your PC) is then connected to a reamp box which will condition the signal back to the instrument signal level for the guitar effects pedal. The producer or sound engineer can then tweak the effects pedal to the desired settings and then record the performance using a guitar amp with microphones.
To produce overdubs, the producer or sound engineer may wish to re-record several takes using different settings of effects pedal to provide more contrasting layers of guitar sound. Experimenting with the microphone distance (applying the phasing effect) is also possible.
Then the recorded signal from the amp goes back to the audio interface again to be converted to be recorded and saved in your hard drive. The “processed” guitar tone can now be used as one of your overdub tracks. During mixing, the producer may want to overdub the guitar a lot of times. So re-amping is an easy and flexible technique to thicken the guitar sound.
You can read this post on mixing guitars with overdubbing.
Other important factors you need to know
1.) The most popular microphone used for recording overdrive guitars with an amp is SM 57. This is a very versatile microphone that can also be used when recording vocals, bass and even drums.
2.) Be careful of aiming a condenser microphone very close to a loud guitar amplifier cabinet. It is because some condenser microphones are not designed to handle high sound pressure levels. It can damage the microphone.
3.) You can even use the lowest wattage guitar amplifier (such as a practice amp) to fully capture the great overdrive sound. The wattage of the guitar amplifier does not play the role on the capturing quality.
Content last updated on October 23, 2012