
Accurate audio mixing does not only require good ears and great mixing techniques. The success of your audio mixing strongly depends on your accuracy of adjusting the “correct” musical instrument frequencies.
For example, if you are mixing the kick drums and using your ear you just “guess” that the fundamental/dominant frequency of the kick drum is around 100Hz.
However as you adjusted the kick drums, you might found out that it did not solve the mixing problems such as masking with the bass guitar frequencies.
The root cause is that, the dominant frequency of kick drums may not actually be 100Hz but around 55Hz. Therefore your settings did not hit the musical instrument fundamental frequencies.
The frequency range can be defined into the following terminologies:
a.) Fundamental/dominant or center frequency – this is the frequency which strongly defines the sound of the recorded instrument. A cut and boost of this frequency can strongly affect the instrument sound.
This is the frequency point where the energy is maximum; it is why it defines the instrument sound.
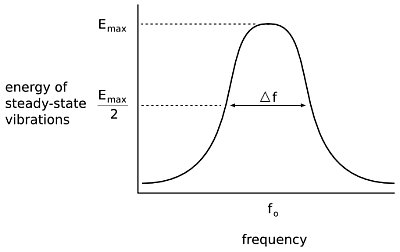
energy level in bandwidth
b.) Effective estimated maximum frequency– this is the maximum frequency limit which is still part of defining the instrument recorded sound.
c.) Effective estimated minimum frequency– this is the minimum frequency limit which still defines the instrument sound.
d.) Bandwidth (in Hz) = the difference between the effective estimated maximum and minimum frequency. Bandwidth is important when adjusting the instrument EQ using parametric equalizer.
e.) Q= stands for quality factor. Most parametric equalizer uses Q when defining how wide or narrow is the frequency range to be adjusted. Q is defined as:
Q= fundamental frequency/bandwidth in Hz
The best confirmation tool to be used during mixing is frequency analyzer. In Adobe Audition, there is a built-in frequency analysis tool that you can use. Read here for the details about viewing the audio frequency spectrum using frequency analysis tool. Other software such as Audacity and REAPER do include a spectrum analysis feature.
Case study: A sound mixing engineer is working on a project in the studio. He is interested in knowing the fundamental frequency of the recorded kick drum track as well as its recorded effective frequency range (minimum and maximum). He will use these data to determine how much Q he needs to adjust to the parametric equalizer to accurately adjust the kick drum sound in the mix.
Solution (using Adobe Audition although the process can be applicable to other audio mixing software):
1.) Open up the track in Adobe audition edit view.
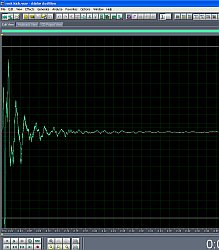
kick drum edit view in adobe audition
2.) Press Control-A to select the entire waveform then go to “Analyze” – “Show Frequency Analysis”
3.) In the FFT size, select 65536, this is the most accurate setting.
4.) Click “Scan”.
5.) Below is the result of the frequency range analysis of the kick drum instrument:
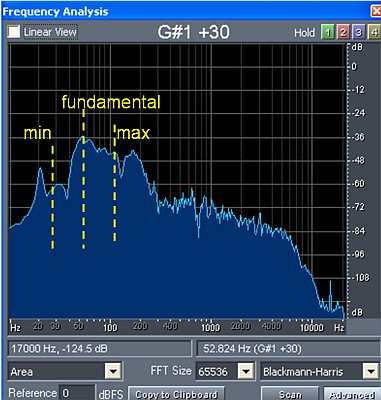
frequency range analysis of kick drum
As shown in the plot, the fundamental frequency of the kick drum is around 55Hz. The maximum is around 100Hz and the minimum is around 30Hz.
The bandwidth in Hz: 100 – 30 = 70Hz
To solve for Q:
Q= fundamental frequency/bandwidth in Hz
Q= 55Hz/70Hz = ~0.8
Therefore if the engineer will be cutting/boosting the kick drum fundamental sound, he will be centering the frequency at 55Hz and using a Q of 0.80.
Calculating the Minimum and Maximum Frequency of the Instrument based on recommended Q
I received a lot of inquiries (see comments on this post below) on how to estimate the min and max of a certain instrument frequencies in the above spectrum analysis. This is how to do it and how to use this information in your mix using parametric equalizer:
1.) First determine the center frequency. It is clearly explained in the previous section with the use of frequency analysis tool (read the kick drum case study above).
2.) Decide on the Q. In this tutorial on EQ best practices and using parametric EQ, the most recommended Q would be:
Q=1.4 — > 2.0 for cutting frequencies in the audio
Q=0.8 —> 1.0 for boosting frequency range.
3.) Use this Sengpielaudio calculator to estimate the minimum and maximum frequency range given a Q and a center frequency. This is the quantitative method of calculating these values.
4.) Confirm the maximum and minimum values returned by calculator by looking at the musical instrument frequency analysis result plot. Make sure it does make sense. If not, the Q setting you provide is not optimal for your application, try some values near to that.
Example: Let’s use the case study illustrated previously. Supposing the mixing engineer would like to boost the weak kick drum track but doesn’t know the proper center frequency and Q to use for the parametric EQ.
Step1.) Examining the center frequency. Based on the previous frequency spectrum analysis (see screen shots above), the underlying kick drum has a center frequency around 55 Hz where its energy is strongest.
Step2.) However, the maximum and minimum is not clear in the spectrum plot and you will only be guessing. However, since the engineer would like to boost, say for example he uses a Q of 0.8 based on the rule provided previously.
Step3.) Plugging the center frequency of 55Hz and Q of 0.8 in the calculator returns the following results:
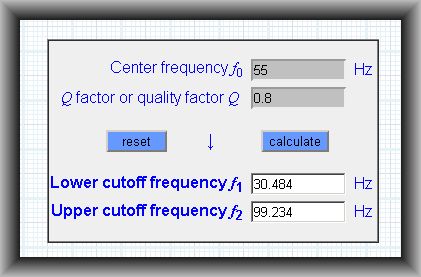
Min and Max frequency
Step4.) Looking at the kick drum frequency analysis, the minimum and maximum values (30Hz and 100Hz) seems reasonable. It is because when the mixing engineer boost the kick drum at 50Hz Q=0.8, the change is going to affect most of the kick drum sensitive frequency range (that is cover by musical instrument effective bandwidth and where most of the kick drum sound energy will be found).
Sometimes if the resulting min-max does not correlate with the plot, you might need to adjust and try slightly different Q values to the calculator until the results are sensible. Then use that in parametric EQ in your mix. This technique minimizes the trial and error of setting Q directly in your parametric equalizer to get the most effective EQ adjustment for boosting or cutting. This also reduces ear fatigue associated with frequency changes (as in some applications, this can take some time).
Of course, your ears are still very important to validate all changes in your mix. Don’t forget to use that.
Content last updated on June 20, 2012