
One of the most important requirements to come up with high quality or better recording is to record at the highest audio resolution as possible.
Industry recording standard starts at recording audio in 24 bit depth. The recording sampling rate varies starting with 44.1 KHz for some home based recording and for professional studios done at 96 KHz.
Therefore, if your sound card is capable of recording at this given bit depth and sampling rates, the most recommended resolution could be 24-bit and 96 KHz audio resolution.
Most home based recording studios using either a Windows or Linux based computers are using 24 bit, 44.1 KHz because of the limitation in hard drive space. The higher the bit depth and sampling rate, the larger will be resulting audio file size.
If hard drive space is not a limitation or an issue in your home based recording systems, then you can record at 24-bit and 96 KHz sampling rate.
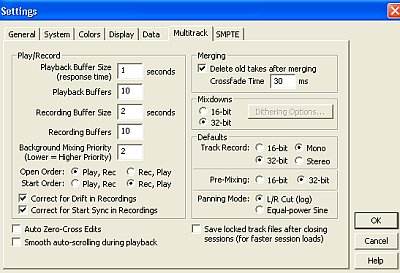
In Adobe audition, a 24 bit depth is equivalent to a 32-bit float resolution. For older versions of Adobe audition such as version 1.5, you will not be able to select a sampling rate when recording using multi-track view. Instead, you can only select the recording bit depth in: Options == Settings == Multi-track, and under “Track record” you will set it to 32 bit. I also recommend to try my multitrack settings if you are using fairly old soundcards (such as PCI), it is discussed in a separate section below.
The best way to start a session is to go then File –> New session. You can select the appropriate session rate. Another alternative will be discussed in this tutorial.
Screenshot:
multitrack settings
You either select stereo or mono recording mode. So how you are going to create a 24-bit/96Khz audio resolution in Adobe audition? The best way is to start recording in the Edit view and then importing audio to Multi-track view.
The following are the detailed steps.
1.) Launch Adobe Audition.
2.) Go to Edit View.
3.) Go to File == New, and then you are going to select the recording resolution. For 24-bit/96Khz recording, it will be:
Screenshot:
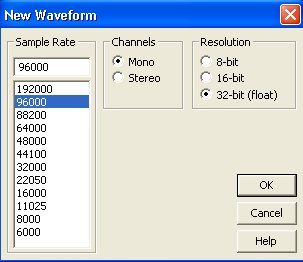
recording resolution
As mentioned earlier, you can get 24 bit quality from 32-bit audio resolution in Adobe Audition. Finally hit “OK” to get your recording ready.
4.) If all of your musical instruments are ready, then hit the recording button in Edit View to commence the recording. You can confirm if it is really a 24-bit/96Khz resolution by going to View == Wave properties. And look under “File type”.
5.) Now, to export the recording track to multi-track view, press Control-A to select the entire waveform. Then right click on the wave then click “Insert into Multitrack”
Screenshot:
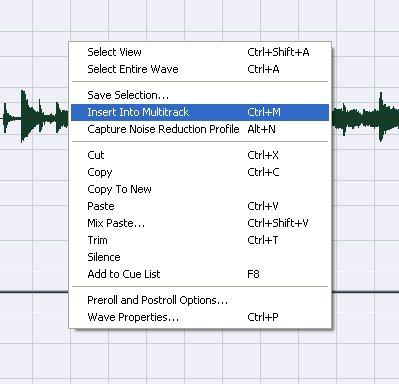
insert into multi-track session
6.) In Edit view, save the audio file (File – Save As). Then go to the multi-track view and save the session. File – Save session.
7.) To record another 24-bit/96Khz track is to go to edit view again. Go to File – New then select 32 bit-float/96 Khz option, the same as before.
8.) Record the second track by hitting the recording button.
9.) Repeat Step 5 to Step 6 above to export the second recorded track to multi-track view and save the audio files.
By repeating the steps above, you can record as many tracks as you need. Below is the screenshot in multi-track view for the two recorded 24-bit/96Khz tracks:
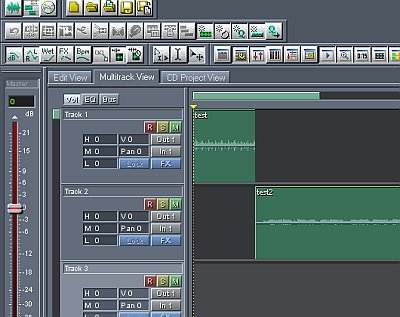
recorded tracks in multi-track view
Details about Multi-track settings for Recording and Mixing
In this section, I will be going to share my multi-track settings used in Adobe Audition as well as explained the importance of each.
Correct multi-track settings ensure that you are recording at the best recording quality as possible as well as working in the best mixing environment which will maximizes the overall audio quality of your mix down.
Currently this tutorial was written using older versions of Adobe Audition (version 1.5), although the concepts/principles and applications are well applicable to the latest versions available such as version 2.0.
If you are still new to Adobe Audition, you can see the multi-track and recording settings by:
Step1.) Launching Adobe Audition
Step2.) Go to “Options”
Step3.) Under “Options” click “Settings”.
Step4.) Adjust the multi-track settings according to the following settings:
multitrack settings
Explanation of each of those important parameters. Let’s discuss the most important:
a.) Track Record – set to 32-bit, if you set this to 32 bit you are recording audio in 32 bit quality (originally a 24 bit + additional headers). This is the most recommended recording bit settings for optimum quality.
Bear in mind that this is limited to your sound card; so make sure you install a sound card in your computer that is capable of recording 24 bits.
b.) Pre-Mixing – 32 bit, this will let you hear audio at 32 bits quality before mix down and after recording. This is primarily important for detailed monitoring of audio quality and lets you hear mistakes and other imperfections that would not otherwise be heard at lower audio quality.
c.) Correct in Drift in Recordings & Correct for Start Sync in Recordings – if these options are checked, Adobe Audition will automatically correct any latencies and delays introduced in the multitrack recording sessions.
If these options are not checked, you might find out that the recording material is lagging behind other multi-track audio tracks which can be impossible or very difficult to correct after recording.
Other factors that will contribute to the delay or latencies are the speed and quality of your PC components. For best recording results while eliminating latency, you should be using a high end sound card, a powerful PC (at least 2 GB RAM and 2.4 GHz processor).
Hard disk speed and size is also a factor so make sure your hard disk is not defective, at least 320GB and with a speed of 7200 rpm.
d.) Background Mixing Priority – set to 2, as you have noticed that lower this value the higher priority will be given to the background mixing which are important if you need to play multi-track recorded tracks quickly. This will allow more RAM to be allocated to the background mixing process.
IMPORTANT: If you find your old settings working and you need to change your existing settings with the suggested settings above, do not forget to have a screenshot of the old settings so that you can revert to it when needed.
Content last updated on August 24, 2012