
This is the online version of AudioSpectro FIRE, a tool that can be used to assess the track frequency balance. This characteristic can be used to measure the quality of the audio tracks in WAV or MP3 version.
The overall quality is measured in terms of %frequency balance, a rating system that will compare your tracks to professionally produced/commercially released tracks in rock, pop and country genre that serves as the “reference”.
Before you can measure the quality of your audio material; raw data must be generated. This raw data is a text file (.txt) that will be uploaded to the online version of this tool (later on).
Install Required Software for Generating Data
a.) Audacity – download and install this open-source software. The recommended is the latest version 2.0.2 although 2.0.0. This is tested under Windows operating system.
b.) LAME MP3 encoder library– installed in Audacity. Follow the installation steps:
1.) Make sure Audacity is installed first in your computer.
2.) Go to this URL.
3.) Download the LAME MP3 encoder library depending on the operating system used. For example, for Windows operating system, click the link under “For FFMpeg/LAME on Windows” to download the installer. See the screenshot (enclosed in red box):
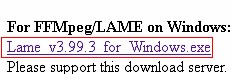
Downloading LAME
4.) After downloading, double-click the installer and proceed to installation. Use the default installation path provided by the installer.
5.) Launch Audacity, go to Edit — > Preferences — > Libraries.
6.) Click “Locate” and browse through the installed path (usually C:\Program Files\Lame For Audacity\lame_enc.dll) under “Program Files” in Windows; then select lame_enc.dll
Click OK.
7.) To check if you have successfully added the library, you should be able to find the MP3 library version such as the one shown below (inside the red box):

MP3 Library version
c.) TT Dynamic range meter– open this page in the browser and scroll down.
For Windows: download “TT-DR-Install.exe“.
For Mac: http://www.mediafire.com/?xzq2o9bpn84n5qz
After installation, you can view the program like this (e.g. in Windows XP — > Start –> All Programs)

TT DR meter installed
d.) (OPTIONAL) Voxengo R8brain sample rate converter (if the source audio to be analyzed is not using 44100Hz as the sample rate).
Generate and Upload the Raw data
Generating raw data is very quick and easy. Please follow the instructions very carefully in this section to ensure data integrity. You can also refer to this YouTube video tutorial on generating raw data if there are unclear items on the steps:
1.) Launch Audacity, go to File — > Open. Locate the audio file in your computer. The following audio format is acceptable:
a.) 24-bit/44100Hz stereo audio WAV file (this is high quality/resolution format)
b.) 16-bit/44.1KHz WAV (also known as the audio CD format)
b.) Any MP3 format (preferably at least 128kbps 44.1 KHz sample rate)
Make a backup of your file in advance to prevent from accidental overwriting.
If you see a warning, just select “Make a copy of the files before editing (safer)” as the Import method. If the sample rate of your audio file is not 44.1 KHz (e.g. 48 KHz or 96 KHz); you should convert it to 44.1 KHz using Voxengo R8brain.
Example settings in R8brain for converting a 48 KHz mix down to 44.1 KHz, bit depth should be left unchanged:
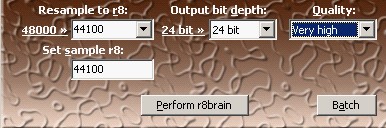
Sample rate conversion example
Screenshot below after adding the file to Audacity:
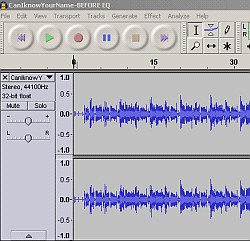
Audacity waveform
2.) After loading the file in Audacity, go to File — > Export. In the “Save as type”, select “WAV (Microsoft) signed 16-bit PCM”.
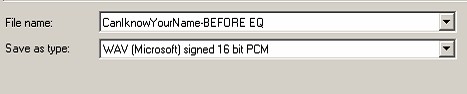
Save as 16 bit wave file
Save the exported 16-bit WAV file to your Desktop with the same filename. This file will be used for adjusting the volume of your track to -20dB RMS.
3.) Launch TT Dynamic range meter offline mode. Go to Start — > All Programs — > Algorithmix — > TT-Dynamic-Range 1.1 — > TT DR Offline Meter 1.1
Click “Load” button and locate the exported 16-bit WAV file in your Desktop then click “Open” to load the file. TT Dynamic range meter automatically calculates the track loudness in dB RMS. See the screenshot (in red box):
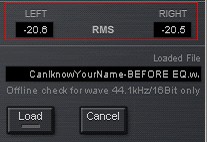
rms volume compared
There should be two values since the audio mix down file is in the stereo format.
4.) Calculate the needed volume adjustment by entering the RMS total loudness dB data for both LEFT and RIGHT channels in the calculator below. This is the needed adjustment to normalize the loudness of your track to -20dB RMS.
For example, inputting -20.6dB and -20.5dB as the RMS values (for LEFT and RIGHT) will provide a dB adjustment value of +3.47dB.
5.) Launch Audacity again and open your original source audio file (the file you open in Step1). Go to Effect — > Amplify. Enter the recommended dB adjustment (based on the above calculator) in the “Amplification (dB)”. For example (using the +3.47dB adjustment as illustrated previously). Don’t enter anything on “New Peak Amplitude (dB)“. Leave it as default.

db to attenuate
Click OK to implement the setting.
6.) In Audacity. Go to File — > Export. In the “Save as type”, select “MP3 Files” then click “Options”. Set the following options:
Bit rate mode: “Constant”
Quality: “128kbps”
Channel Mode: “Joint Stereo”
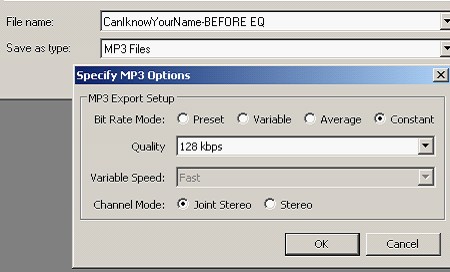
MP3 quality settings
**Note: 128kbps MP3 is used as the target file type since the computing algorithm uses this format for generating test specification. Finally click OK and then click “Save” the file to your Desktop or any folder you like.
7.) Then in Audacity, you need to open this converted MP3 file. Go to File –> Open; locate the rendered 128kbps MP3 file in the previous step. Then go to Analyze –> Plot Spectrum. Set it as follows:
Algorithm: Spectrum
Function: Blackman-Harris window
Size: 16384
Axis: Log Frequency
Click “Replot”.
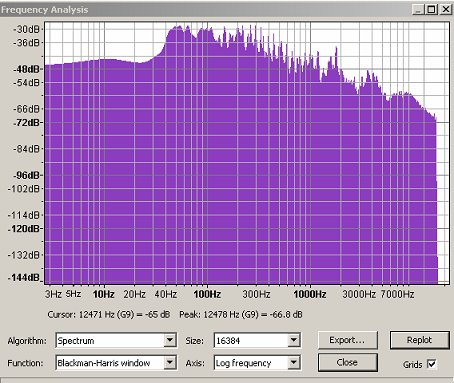
Frequency analysis in Audacity
8.) Click “Export” button. Assign a name of the raw data file, e.g. your_song_title.txt
Make sure it uses .txt file extension. Save it to your Desktop or any convenient location in your computer to access
9.) You have successfully generated your raw data. Exit Audacity. Don’t save any changes.
10.) Now click the “Upload Raw Data” button below to submit the text file (.txt) to the server and wait until the processing is complete.
Please enable JavaScript to use file uploader.
Interpreting % Frequency Balance Rating Results
The higher the percent rating for your audio, the higher the similarity of your track frequency response to reference tracks. The algorithm consists of test specifications which are formulated based on reference tracks that consist of a lower limit and upper limit.
Anything that exceeds these limits is out of specification and lowers the rating of the track frequency balance. If the frequency balance rating is high, normal or OK, the majority of the points fit within the test specifications.
Frequency balance rating depends on the quality of the recording material, the mix and the genre of the track. Below is the rating guide for your guidance:
A.) Assessment by Overall Classification
Description: This is the general assessment of the track frequency balance regardless of a music genre.
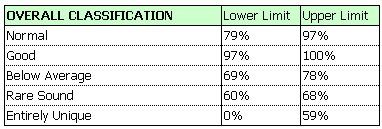
Audio quality classification
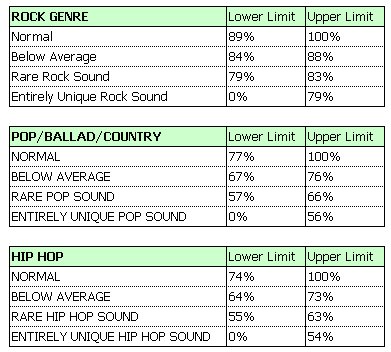
B.) Assessment by Genre
Description: This is the specific assessment of the track frequency balance with respect to a music genre.
By genre classification
EXAMPLE: Supposing the frequency balance rating is 83%. By looking at the ratings’ guide table below; this means that:
a.) By overall classification (if you don’t mind the genre), it is considered having a normal or acceptable frequency balance.
b.) If the genre of the track is rock, it is considered “rare” and not having the frequency balance common to modern rock tracks.
c.) Otherwise if this belongs to pop/ballad and country genre, the frequency balance is considered OK.
d.) Same thing with the hip-hop genre, this response is considered OK.
To view the track audio frequency response vs. test specifications, I recommend that you download the offline version of this tool (read the next section). This is an example plot:
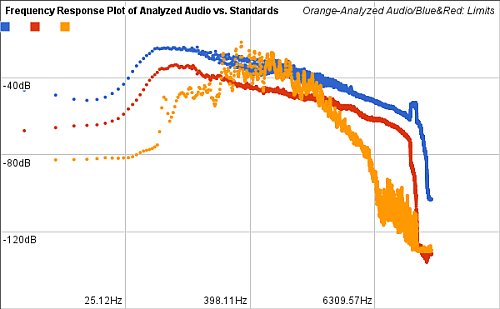
Resulting plot
As a quick interpretation, the track substantially lacks bass and treble response; actually this track is recorded in a low-fidelity cassette voice recorder.
Improving the quality of audio track frequency response
First, it should be well-recorded (in digital at least 24-bit/44.1KHz). Then the audio mixing should be well crafted. Finally the frequency balance is done in audio mastering process.
The engineer will be working closely with high quality audio mix down file (usually 24-bit/44.1KHz format) and will be doing EQ adjustments to balance the response. If you are doing your own mastering, I highly recommend you will download the offline version of this tool here:


(Latest version: 1.2, October 9, 2012)
It provides additional benefits not found in this online version such as:
1.) Performing frequency band analysis (per bass, mid and high audio frequency sections) to troubleshoot problematic sections in the audio frequency response.
2.) Formulating EQ settings to correct frequency balance issues.
3.) Confirming improvements in frequency response after EQ adjustments.
The goal of your adjustment is to obtain reasonable % frequency balance rating that makes your mixes sound comparable to broadcast quality/commercially released tracks. I highly recommend you check out the related tutorials below for an example application of this tool in audio mastering.