Make sure the condenser microphone would be directly facing the guitar (not necessarily the sound hole) when the guitarist would be performing.
Do not use a pop filter when recording the nylon acoustic guitar because unlike vocals recording; nylon guitar does not have too much sibilance on its sound.
The room acoustic environment is also a factor, if you want to record it as dry as possible while capturing its warm tone characteristics (you can apply effects during the audio mixing stage); record it in small room treated with absorption materials (thick carpets, etc).
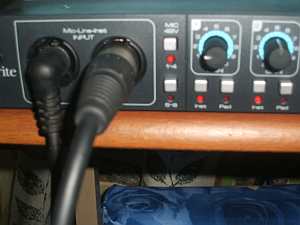
Step2.) Connect guitars and microphone to audio interface
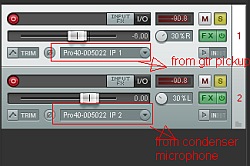
The next step is to connect your guitar pickup output to the first microphone preamp input of the audio interface. And then connect the condenser microphone to the second microphone input. This is how it looks like in Saffire Pro 40 with the audio interface settings for recording:
Saffire pro 40 recording settings
Input 1(pickup output) has a low gain setting of 2 while Input 2(condenser microphone output) has a moderate gain setting of 5. This is because guitar pickup output is already strong and needs little amplification by the microphone preamp. Meanwhile condenser microphone output is still very weak and needs more gain.
+48V phantom power and instrument signal button (if supported by your audio interface) should be enabled for condenser microphone to boost weak signals from both instruments. If the output of your guitar is too hot (amplified already), then you might not need to enable the instrument level button. The detailed settings on Saffire Pro 40 for recording classical guitar:
a.) 60% to 75% gain settings
b.) 48 volt phantom power –on
c.) Instrument level – on
Step3.)Launch your recording software and configure to record
The recording software used is Reaper. You need to make sure that your software supports simultaneous/multichannel recording. In this case two tracks are added to the multi-track (one for condenser microphone output and one for guitar DI output). In advance, the first track is panned 30% left and the other is panned 30% right to have that thick sound. Then both are enabled for recording:
Reaper classical guitar settings
In this tutorial, Reaper is configured to record at 24-bits/48KHz (recommended).
Step4.)Position the guitarist in front of the microphone
The next step is to position the guitarist. Basically the guitarist would like to sit in classical guitar position. Aim the microphone face somewhere in the upper neck, not in the sound hole because it would sound boomy:
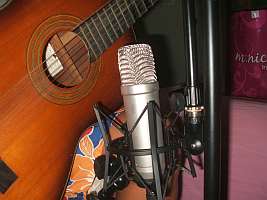
Microphone position for classical guitar recording
Then make sure the distance from microphone to audio interface would be around 6 inches at least. See the top view:
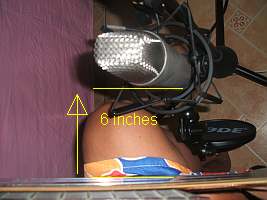
distance from Rode NT1A to guitar
Step5.)Hit the Record Button and make sure they have similar levels
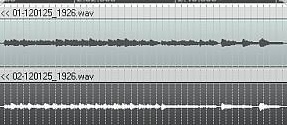
Recording levels of acoustic guitar
As you have seen above they have comparable recording levels; if the output from condenser microphone is too low (less than or equal to -48dB) then you need to increase the gain and re-record again. However ensure that the maximum peaks should not exceed -6dB and there is no clipped signal (red, beyond 0dB).
Step6.) Manually adjust the levels in Reaper until they have same levels
Listen carefully, if the first output (DI from classical guitar) sounds stronger than the microphone output. So lower down the DI output (which is in track 1) until the volume level is the same with track 2(coming from condenser microphone).
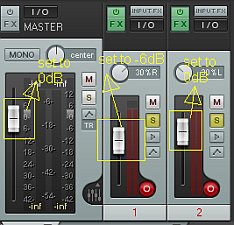
Volume level comparison
Track 1 is set to -6dB and Track 2 to 0dB. In your recording, you might have different dB settings, so use your ear to get the proper adjustments. You can solo each track and compare the level in volume for more accurate monitoring.
Step7.) Apply Effects
There are only two effects used, Reverb and EQ. This is how they are added in Reaper:
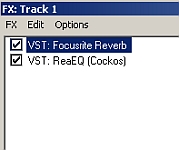
Plugin chain
The purpose why the reverb comes before EQ is to have the EQ; filters the undesirable high end caused by the reverb tails. Take note the EQ settings strongly depends on the material, you may need to use a different EQ setting as shown below. But you can start with it, and then start tweaking until you get the best sound.
These are the EQ settings (using ReaEQ plug-in):
DI output (Track 1):
High Shelf 4000Hz, -3dB cut
1000Hz, -3dB, bandwidth 2.0 (a cut in the mid range since sound from guitar pickup has a lot of mid-content).
Microphone output (Track 2):
High Shelf 4000Hz, -3dB cut
1000Hz, +2.5dB, bandwidth 2.0 (a boost in the midrange since sound from condenser microphone has a lower mid-frequency content).
These are the reverb setting: Focusrite Reverb plug-in: Using medium jam room presets
This is the complete recording example:
Common advice to guitar players in getting best sound
Different genre calls for different style in guitar playing. I am playing with my nylon acoustic guitar and record some samples for you as a reference. They are done at 24-bit/48KHz mono using Rode NT1A microphone. There are no EQ, compression and other effects applied to the sample recording.
1.) If you are recording a guitar strumming, strum smoothly to preserve the warm tone and decrease brightness/sibilance of the guitar due to the contact with the guitar pick. If you are strumming harder because the signal level is weak, instead fix it by increasing the pre-amp gain and not to strum harder. Rode NT1A is actually a quiet microphone and if you have a quality audio interface that is so quiet; it’s an advantage. Listen to this mp3 sample of nylon guitar strumming audio sample:
2.) If you are recording a blues/jazz guitar; increase the preamp gain to capture the full dynamics (low volume solo notes); but not too much. Play smoothly as you can and do not use a guitar pick. I recommend using your fingers to get the best guitar tone results. Listen to this mp3 sample of nylon blues guitar:
3.) For guitar plucking which are very common in classical guitar music (tirando technique); I recommend using only your fingers and no guitar pick at all. This will produce a great tone. Recording at sufficient pre-amp gain to pickup all the notes in the guitar; listen to this sample:
Content last updated on October 13, 2012