
This is a beginner tutorial about the very basic video editing features in Reaper. Before moving forward, make sure you have the latest version of Reaper installed in your system (version 4.20 as of March 2012). This tutorial uses Windows XP as the operating system. It should work with other OS provided they support Reaper and its video conversion files.
Install FFMPEG in Reaper
The first requirement is to install FFMPEG in Reaper. Make sure Reaper is not launched or active during the installation. FFMPEG are DLL files needed by Reaper to work with video files. Follow the steps below:
1.) Go to this URL.
2.) Look under “Latest working binaries”. And download the one that is compatible with your system. There are 3 options which are for Windows 32-bit, 64-bit and Mac OSx.
3.) Unzip the files to your desktop; the folder should contain the following files:
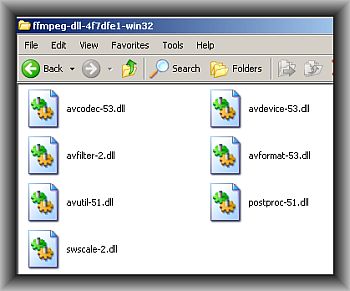
FFmpeg DLL files
4.) Select all files and copy them to your Reaper directory (where Reaper.exe is found). In Windows, this is usually found in:
C:\Program FilesREAPER
See screenshot for the Reaper directory with the FFMPEG DLL files:

Reaper directory with DLL files
Test the Installation by opening some video files
1.) Launch Reaper.
2.) Open your video file in Reaper. The following are the tested video file extensions to work:
a.) MOV
b.) WMV
c.) AVI
d.) MPG
If your video file contains a different extension, try to open it and see if it’s supported by Reaper FFMPEG. To open a video file, simply go to Insert – Media File and locate your file.
3.) Once it’s open, you simply see the audio waveforms by default. But take note that you are opening a video file. Bear in mind that a video file contains two distinct tracks synchronized together – an audio and the video track.
4.) Now let’s view the video properties to see if it’s properly recognized and decoded by Reaper. Click the waveform and then go to Item – Source Properties.

Video File Properties
The most important thing is that you can see the phrase “using FFmpeg DLL decoder”. If you see this, then the DLL decoders are correctly installed in Reaper. Another example:
Length: 3:37.000
Video: 160×120@15.00fps, Aspect=1.00, Decoding format=RGB
Audio: 8000Hz 1ch 8bps
It shows the specification of both audio and video content on the original video source. For example the video size is around 160 X 120 and the frame rate is 15fps. The audio sample rate is 8000Hz (very low fidelity, must be video recorded from a very small or old camera) and the channel is mono.
Let’s show another example of a high-fidelity work; those that are used by film projects and film schools. For example:

High Resolution Video
The audio sample rate is 48 KHz, stereo and the frame rate 25fps. The audio decoded in MP3 stereo at 64 kb/s. It also has bigger video size at 720 x 576.
Very Basic Video Editing – Selecting and Cutting Videos
One of the most important editing tasks is to cut or select just a portion of the video so that it will have a manageable file size.
This can be done in Reaper. The good thing is that you have full control of the audio although currently it lacks more video editing tools present in standard video editing software. Below are the steps:
1.) Launch Reaper and insert the video.
2.) You can view the video in sync with the audio by going to “View” – “Video Window”.
3.) Move the cursor/timeline bar to 0:00:00 (start).
4.) Hit the Reaper play button. You should now be watching the video with synchronized audio.
5.) Select the portion of the video where you would like to edit/extract. You can use your mouse then left click- hold the time section from a selected start to end. This will highlight it into white gray regions:

Selected video regions
6.) Now you have selected a specific region of the video, go to File – Render. Set the following:
a.) Under “Render bounds” select “Time selection”.
b.) Specify an output directory and filename.
c.) Sample rate – this should be the same with the original audio sample rate. If it’s 48000Hz, then set 48000Hz under sample rate (more examples below).
d.) Channels – if the original audio source is stereo, then also set stereo in the rendering options.
e.) Just set to “Full speed online”.
f.) Leave resample mode at default (not needed).
g.) In the output format, select “Video (FFmpeg encoder)”.
For best results, set all properties to be the same with the original video properties. This cannot be set exactly in some situations but at least it should be very similar to the original source. The objective is to retain the original video quality as much as possible. If it’s an AVI video, select AVI as well as the size. For example, below are the video properties of the original source:
Length: 8:27.408
Video: 720×576@25.00fps, Aspect=1.00, Decoding format=YV12
Audio: 48000Hz 2ch 16bps
Using FFmpeg DLL decoder v53.13.0
Video: mpeg4 (Simple Profile) (FMP4 / 0x34504D46), yuv420p, 720×576 [SAR 64:45 DAR 16:9]
Audio: mp3 (U[0][0][0] / 0x0055), 48000 Hz, stereo, s16, 64 kb/s
And the Reaper video render settings for the above properties would be:
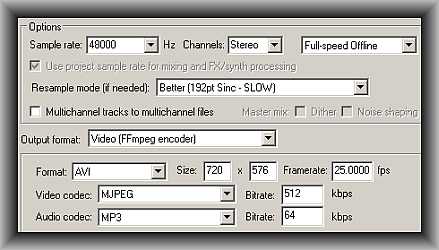
Video render settings in Reaper
As you have noticed, the properties such as sample rate, format, video size, fps, audio codec and bit rates are set to be the same as the original source.
7.) Finally hit the render button, wait until the rendering is complete. Try watching the edited/rendered video in VLC or Windows media player to see if it’s correct. You can experiment further with the render settings to tweak something in case of no video output.
Content last updated on July 24, 2012