
This is a beginner/novice Reaper users’ tutorial on how to use guitar amp modeling techniques and applying guitar effects inside the mix. This technique uses the guitar double tracking technique in the mix and entirely using Reaper free plug-ins in shaping the tone. This can be useful for users that do not have a real guitar amplifier and analog guitar gears at home. You can then have that 90’s “grungy” guitar tone sound without needing a vintage amp like Fender Bass man or Big Muff;
First, secure the following:
1.) Audio Interface with preamp
2.) Reaper (fully installed with plug-ins)
3.) Electric guitar with cable
4.) Direct Box
Step1.) Record the guitar clean
Since all guitar effects are applied within the mix, you need to record your guitar riffs clean. If your audio interface does not come with instrument level switch, you should be using a direct box to record guitars directly to your audio interface. This is the setup:
Electric Guitar === > Direct Box === > Audio Interface microphone input (XLR)
Some audio interface like Focusrite Saffire Pro 40 do include an instrument level switch button, so you can directly plug your guitar to its input without passing through a direct box. The setup:
Electric Guitar === > Audio Interface input (with instrument level switch on)
Switch the gain of the audio interface to 50% of the maximum and make sure it peaks around -16dBFS to -3dBFS.
Open Reaper and go to “Track” == > “Insert New Track” and configure to record from your audio interface. Hit the record button and record the guitar riff performance. This is a sample clean guitar riff recording:
This is the waveform:
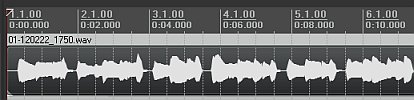
Reaper audio waveform
Finally double the guitars in mix by duplicating the original recording. You can do this by selecting the first track (the original guitar recording) then go to Track – Duplicate Tracks.
Pan the first track to 60% RIGHT and the second track to 60% LEFT. This is how it looks like:
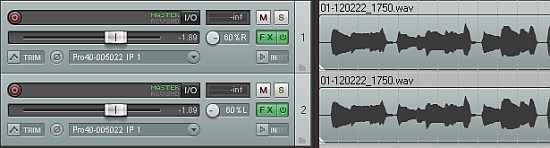
Reaper guitar panning
Later in your mix, you can adjust these panning to anything you like (75% for example).
Step2.) Apply and Tweak Effects to Perfection
To make this tutorial very easy to learn; it uses Reaper Effects (FX) Chain to get you started on implementing guitar amp modeling effects on Reaper.
Unzip the effects to your desktop. There are two effects. One effect is for the guitar panned to the right and other is to the left.
To implement and test the effects:
1.) Start with the guitar on the right (at Track 1) by clicking the FX button and add an FX chain. See screenshot below:

Adding FX chain on Reaper
2.) Browse to the extracted effects, select:
guitarright_grungyguitartone.RfxChain
Select “open” and then click x to close after adding the effects.
Do the same for the left-panned guitar, select:
guitarleft_grungyguitartone.RfxChain
This is how the effects chain would like when added:

Reaper Effects Chain implemented
3.) At a start, set the master volume, track 1 and track 2 levels to 0dB. And then try to play; there should no clipping from start to end of both guitar riff tracks:
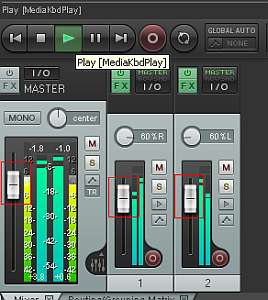
Level adjustment
Once this is OK, you can further adjust the levels in the fader of both tracks or the master fader for proper gain staging during mixing so that the overall master level should not exceed -3dB.
Take a listen at the resulting guitar effects:
Of course, the effect settings used in the above example can be further tweak according to the guitar tone you need in the mix.
Tweaking further the guitar tone in the mix
To help you tweak the current guitar effect settings, refer to the following guidelines below:
1.) The Reaper effects chain simulate an actual guitar live setup. The electric guitar is connected to an effects pedal (overdrive/distortion) and then the output is then feed to another effect (like a chorus). Finally the effects output is then connected to a guitar amplifier.
You can experiment adding more effects in the signal chain. You can put them in between the distortion and the chorus. You can even remove one of the effects, it’s up to you.
2.) The default guitar amp used in the model is Fender Bass man (Tweed champ for right channel). See screenshot below:
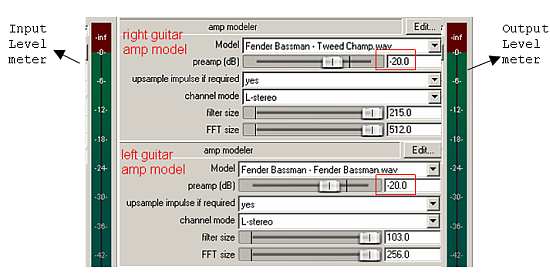
Preamp model settings on Guitar
You can try changing the amp model, e.g. changing to Marshall Amps.
3.) When tweaking the settings, observe the input and output level meters. If the output level meter is clipping; slightly lower down the preamp gain until it’s not anymore clipping.
4.) If the input level meter is already clipping, lower down the output level of the previous stage (which is either chorus or distortion effect).
5.) You can adjust the tone of the guitar by EQ.
Those are the only settings you need to tweak first. Reverb and delay can be left untouched.
Content last updated on July 24, 2012