

In audio mixing using Reaper Digital audio workstation; one of the most effective techniques that you should know is how to use the Reaper FX Chain. This would let you apply effects quickly and efficiently without going through the entire process of resetting and re-assigning settings for each of your track.
Let’s illustrate how to do this with your Reaper DAW.
Load your Mix
The first step is to open your mixing session in Reaper. It is assumed you have not yet applied any effects on your mix. Supposing you have three tracks on it, one instrumentation and two lead vocal tracks (screenshot):
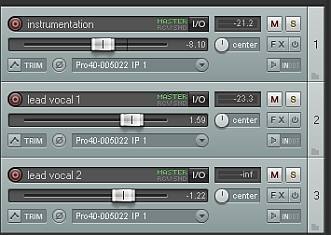
Reaper mix without any effects
Since you have two lead vocal tracks, you would most likely applying the same effects on them; so Lead vocal 1 and Lead vocal 2 will have to use the same vocal effects.
Using Reaper FX chain technique, you will formulate the effects first on the first lead vocal track, and then test it. If it sounds good; you can then save it as an effects chain and use it on your second vocal track without the need to define the settings again. This saves time and improves efficiency in your Reaper audio mixing process.
Creating Sample Reaper Vocal FX Chain
To create an FX chain, follow the steps below:
1.) You will need to formulate the FX chain on the first lead vocal track. Click FX button.
2.) Let’s start by adding an EQ effect, on the plug-ins select “VST: ReaEQ (Cockos)”.
Set the parametric EQ as follows:
Low shelf (1-Enabled)
Frequency: 50Hz
Gain: -6dB
Bandwidth: 2.0
Band (2-Enabled)
Frequency: 2000Hz
Gain: +3dB
Bandwidth: 3
Band (3-Enabled)
Frequency: 15000Hz
Gain: +2dB
Bandwidth: 0.8
Band (4-Disabled/Unchecked)
This is how your Reaper Parametric EQ would look like after implementing the above settings:
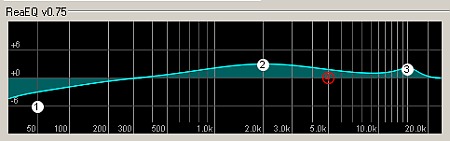
Reaper parametric EQ
The purpose of the EQ is cut the bass parts of the vocals (not needed) and then boosts the mid-frequency presence to improve lyrics clarity. A slight high-end frequency boost is to improve the vocal ambiance and presence.
For other instruments (guitars, bass, drums), you can refer to this guide on the complete EQ settings to start when doing audio mixing.
3.) The next effect on the chain would be a compressor. Simply “Add” to add another effect on the chain. Screenshot:
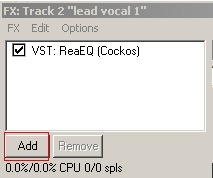
adding effects
Then look for “VST: ReaComp (Cockos)”. Select and click OK.
4.) On the Reaper compressor, simply select the preset “stock-Modern Vocal”.
5.) Lastly, you will add the Reaper reverb. Click “Add” again and select “VST: ReaVerbate (Cockos)”. Click OK to add to the chain.
6.) Select “insert-Live Vocal” preset on the reverb effects.
Finally you have three effects on your vocal FX chain. They are EQ- Compressor and Reverb, see screenshot below:
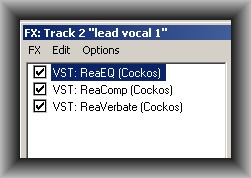
Final FX chain added
7.) To make this as a permanent vocal FX chain that you can use in your other tracks or in your other Reaper mixing projects, simply click “FX” and click “Save FX Chain”. See screenshot:

Saving effects chain
8.) You will then ask to provide a filename, select one that you can easily remember and describe exactly what the FX chain is all about. For example; vocal_effects_chain_reaper

Saving FX chain with a filename
By default it will be saved in the Windows application data folder in this path:
C:Docments and SettingsYour Windows UsernameApplication DataReaperFXChains
You can save it at that path. You have completely created your first Reaper FX chain.
How to use and load a Reaper FX Chain
OK now you have created an FX chain, how you will be able to use it? Refer to the steps below:
1.) Supposing you are now mixing lead vocal tracks #2 and you decide to use the same effects with lead vocal tracks #1 for consistency. To get started, click FX on lead vocal tracks #2.
2.) Click “FX Chains” on the category of effects. See screenshot below:
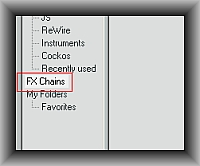
FX chain category screenshot
3.) On list of the FX chain, select the one you have created earlier and click OK. See screenshot below for the FX chain that is selected and to be added:
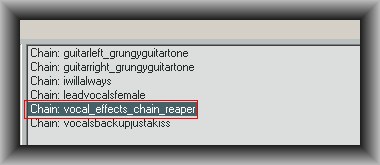
Reaper effects identified
4.) That’s it. Lead vocal track #2 is now having the same FX chain as lead vocal #1.
To completely implement the settings, simply save your Reaper session (File – Save Project)
Other Important things that you should know
1.) If you are editing an existing effects chain, you should be saving it as a new FX chain (following the same procedures illustrated previously); so that you won’t be overwriting your previous stable FX chain.
2.) You can choose to save a single effect in the chain as the FX chain itself. For example, you would only be using EQ as an effect for the rest of the vocal processing.
To save time, you will only be using this EQ as an FX chain. To do this, select EQ from the existing/currently loaded FX chain and then go to “FX” then select “Save selected FX as chain”. See screenshot below:
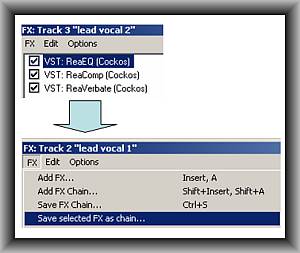
Sole reaper effects
This is not only useful for mixing vocals but it can be used for any audio mixing process like guitars, drums, bass, etc.
Content last updated on July 24, 2012