
In this tutorial, you will learn how to use aux send in Reaper. However this is not only limited in Reaper DAW but could also be implemented in any DAW software. Common audio mixing application of this technique includes parallel compression and implementing effects on parallel/aux such as reverb.
Schematic Signal Flow of Aux Send and Return
If you are using aux send and return in your DAW software such as Reaper, it is important to know the basics of how the audio signal flows. The best way of understanding this concept is to present a classic audio mixing console channel strip (that is also used by most digital audio workstation software). This is one channel in a mixing console. If you have an audio mixer in your home, take a minute to look at them and examine each channels. The simplified signal would look like this:
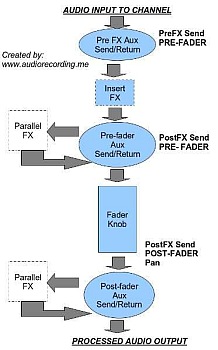
Signal path in a mixing console
It shows that an aux send can either be applied before Insert FX (that is Pre-FX) or after FX (Post-FX). Aside from these options, you can also decide whether to send the signal after fader (that is Post-Fader) or before the fader (Pre-fader). For details on this topic, you can read this tutorial on pre-fader vs. post-fader that also includes important information pertaining to pre and post-FX processing.
Parallel FX is created using aux send and the processed signal (which is also called “wet”) is being returned back to the signal path back via return. Therefore:
After Parallel FX = Dry Signal + Wet Signal = Mixed (blend)
The wet signal is the processed (output) signal of the parallel FX and it is mixed/blended together with the dry signal.
Application #1: Adding Reverb on Aux Sends using Reaper
Now you know the little basics, let’s illustrate a sample application. The common practice is to use reverb unit with your mixing using aux sends and return.
With this method; you can easily apply the same reverb settings for a number of tracks in your mix. For example, you have two tracks in Reaper, a snare drum and a kick drum that you want to add some reverb via aux. Below are the steps on how to do this:
Step1.) Launch Reaper and load your mixing session.
Step2.) Go to Track – Insert New Track.
Step3.) Name the track as “reverb aux”. This is how it looks like:
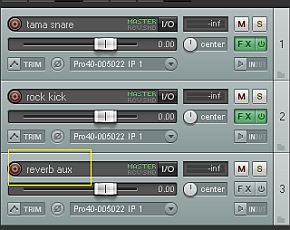
Reverb aux example
It also shows that there are two tracks above it: snare drum and a kick drum.
Step4.) Click FX button on “reverb aux” track. And then add a reverb plug-in and configure it.
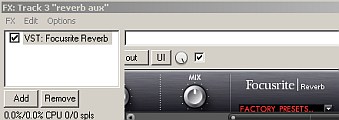
Reverb plugin added
Step5.) You will then need to configure the aux send on the snare track, click “Master I/O” (inside the yellow box):
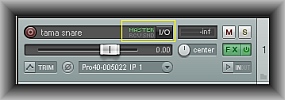
Master IO in Reaper
You will see something like this:
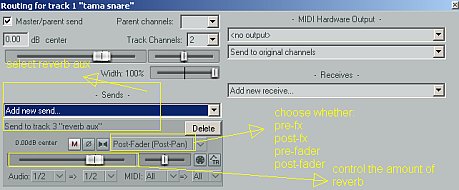
Snare aux send settings
Configure it as follows:
a.) Under “Sends” drop down, select the name of the aux track you created in Step3 (which is “reverb aux”). You will then see “Send to track 3 “reverb aux”.
b.) You can also decide whether to send post fader, etc. There are several options that you can select as discussed previously (pre-fx, post-fx, pre-fader, and post-fader). For this example; setting is set to “post-fader”.
c.) The amount of dry signal you send to the reverb plug-in can be also be controlled. This sets how much reverb effect you want. The resulting amount of reverb is directly proportional to the dry signal you send.
Step6.) Now select “Master I/O” on reverb aux track. Since you have set an aux send on snare to reverb aux track; the “receive” would be automatically set as shown below:
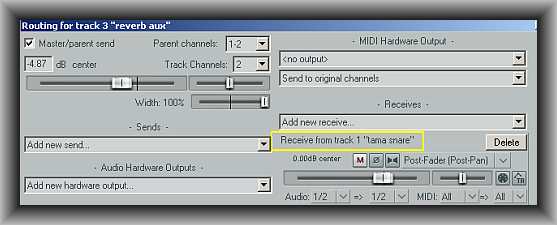
Routing aux return
Now repeat Step5 and Step6 if you want to add reverb to your other tracks (e.g. kick drums);
If you want to have less reverb effect on a certain tracks, simply decrease the amount of dry input you send to the reverb aux track. In this way, you can control the amount of reverb for each track even you only use one reverb aux.
Application #2: Parallel Compression Technique
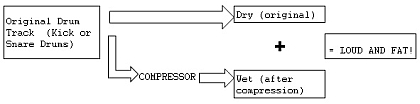
Parallel compression technique is used in how to make loud snare and kick drums in the mix. Generally it can be used to make bigger and fatter drum sound. It can also be used with vocals and other instruments.
The concept of implementing parallel compression is the same as applying reverb on aux send. Parallel compression blends the dry signal and wet signal to produce a strong and fat sounding sound.
Parallel compression kick drum and snare
The wet sound is VERY compressed with reduced dynamics. However the resulting mixed sound dynamics are restored by blending with the original sound (the dry one). Below are the procedures on how to implement parallel compression:
Step1.) Follow steps 1 to 3 in the previous section except that you need to change the track name as “parallel compression”.
Step2.) In your newly created parallel compression aux track, add a compressor (instead of a reverb for which the previous example is using). For example, select Reaper VST ReaComp and set to “Master bus NY Comp” preset.
Step3.) Configure the aux sends of all tracks that you need to be implemented with parallel compression. Refer to Step5 and Step6 in the previous section for details.
For example, this is the configuration settings for snare aux send to parallel compression aux track:
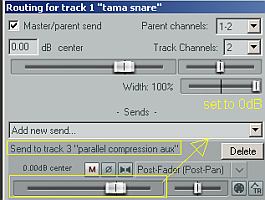
Snare aux send settings parallel compression
Enclosed in yellow box, you will see that it send the snare track to track 3 (which is the parallel compression aux track). Make sure to set the dry level to 0dB. The aux send for other track would be configured the same and all are sent to parallel compression aux track.
Step4.) Confirm that all send tracks are received by your parallel compression aux. See screenshot below (in yellow box):
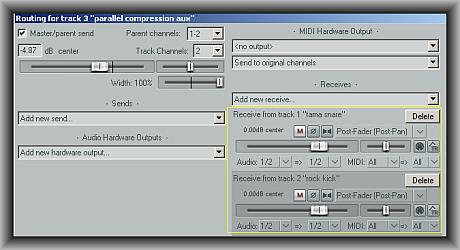
Aux return confirm
It confirms that it receives all drum tracks for parallel compression (you see two tracks being received, the snare and the kick drum).
Aside from snare and bass drum, you can also implement parallel compression to other drum components such as the tom and hi-hats.
Below is an example of snare and kick drums without parallel compression:
And this is how it sounds with parallel compression applied:
You will know that the one applied with parallel compression sounds stronger and bigger. Experiment further with pre-fx, post-fx and see how the resulting sound changes.
On the other hand; if you are looking for some audio mixing creativity that can enhance the presence of vocals in your mix; try adding parallel compression to it.
Content last updated on July 23, 2012