

Let’s have this example. Have you ever thought; “How am I going to make my recordings compatible with any DAW for mixing”? Supposing you are proaducing a song; then you are recording the tracks. All tracking is now complete in your own DAW or tracking software. You won’t be mixing the track; then you asked this question: “How am I going to make the recordings compatible with any mixing engineer DAW?” All of these details will be discussed in this post.
Basic Essentials- Complete the Tracking and Don’t Apply Effects
If you are record producer in-charge of the project, don’t apply effects to the recorded tracks on your mixing software. Leave that to the mixing engineer. All necessary/required effects should be applied during the recording session such as:
1.) If you are recording/tracking guitars; the guitarist would naturally use some effects on his own such as distortion, chorus, etc. To capture these effects naturally you would be recording the guitars using amp cabinets. So the effects are added naturally during recording. The signal paths are as follows:
Guitars — > Effects pedal (distortion, chorus, etc) — >Guitar amplifier — > microphones — > Audio Interface — > DAW
2.) Some bass guitars or other instruments are using effects just like guitar. So you need to capture them during the recording process.
The vocals are mostly recorded dry without any effects on it. Then you should complete all the needed recordings for the song. This includes all the overdubs, back-up vocals, additional guitar solos, etc.
Then make sure you are correctly naming the audio recorded files. Do not simply name the track as “Track1.wav” because it can confuse the mixing engineer. Make it as descriptive as you can, e.g. “Guitarleft.wav” or “Leadvocals.wav”.
When saving the audio files using a new name, make sure to save it in correct format as it was recorded. If you are recording it as 24-bit/48KHz then save the new file with the new file name also in 24-bit/48KHz. The PCM WAV audio file format is a standard and can work with any digital audio workstation software.
OK, at this stage your recording should be clearly labeled and no effects applied on the DAW (except during the recording).The next thing is to combine all loops into a single WAV file. For example, a very common loop used in a track are drum loops created by drum sequencing software, see below:
Drum Sequence
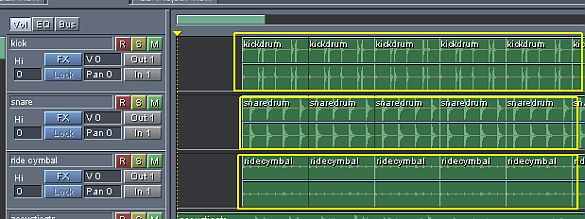
There are three drums section loops above (kick drum, snare drum and ride cymbal). Each of them consists of replicated drum loops; you need to combine all loops in each track into a single continuous WAV file.
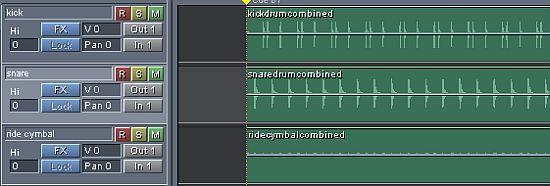
Combined drum loops
Start all tracks to “0”
Update June 4, 2012: Aside from tracking everything to zero. You can save your WAV files in broadcast wave format and embed the time offset data on each file. In this way, when you transport these files to a different DAW, you can synchronize/assembled them again using these data. If your DAW or recording software does not support this feature, you can still use the method discussed in this section.
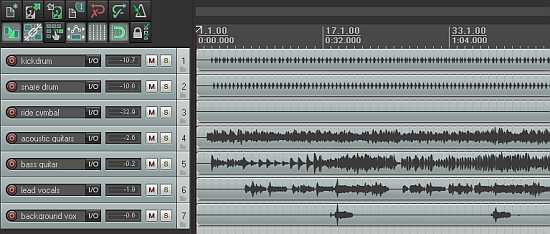
One problem remains, see the recorded tracks assembled below:
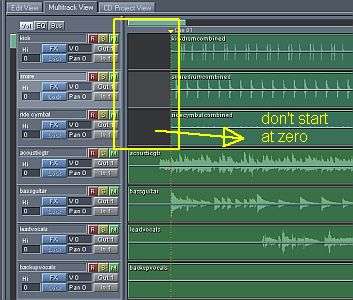
Start everything to zero
The first three tracks don’t start at zero. When your recorded tracks are to be mixed by another engineer, it would be load up in audio mixing software starting from zero. If your tracks for mixing do not at zero, all tracks would not be synchronized and the mixing engineer cannot do anything to solve it. Make it should start everything to zero to avoid any synchronization issues.
To make everything starts to zero; you simply need to add silence before it. Below are the complete tracks aligned and synchronized to zero:
How to synchronize recordings
Place all audio files to be mixed inside a single folder
Before sending all recorded tracks for mixing; you need to place all files in a single folder. Do not include any tracks which are not used by the project.

Files for mixing
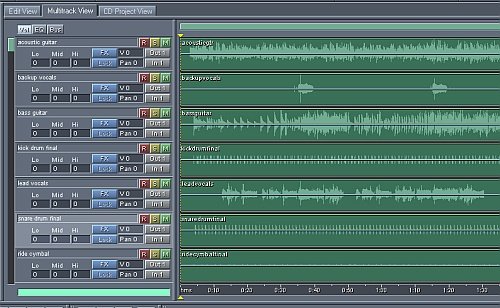
So when the mixing engineer receives the file for mixing, it will be added in a DAW ready for mixing. The engineer can then starts mixing the tracks and apply some effects. For example, below is how it looks like in Reaper DAW:
Loaded in Reaper DAW
To send these files for audio mixing over the Internet or any cloud based solutions, you will need to zip the folder first for convenience. You would only need to send one zip file that containing all tracks to be mixed.
Content last updated on July 14, 2012