This tutorial will teach you how to install a VST plugin for different audio recording and music notation software. VST is a very useful feature that extends the audio processing functionality of existing software. For example Notion 3 does not include an EQ in its mixer by default; but Notion 3 allows VST plugins. So you can simply install and add EQ to Notion 3 mixer using a VST plugin. Another example is that Audacity does not include a parametric equalizer by default.
But since Audacity allows VST plugins, you can add a parametric equalizer using third party plugins. This tutorial is illustrated using Windows 7 and Windows XP although concepts and principles can be applied to other OS versions. VST plug-in offers additional sets of effects which are not otherwise included in the default Adobe Audition list of effects as well as other DAW like REAPER.
Installation Procedure of VST in Adobe Audition
Step1: Searching for free VST plug-in. – in this case, you may want to visit KVR Audio and search for available VST plug-ins. Follow the rest of the procedure until you will be able to download the VST exe file which will act as the installer.
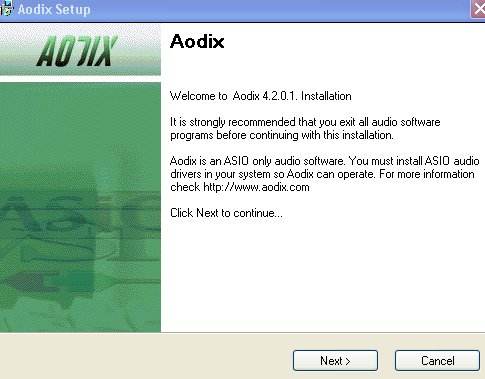
This is the sample download page of the VST plug-in: Aodix v4 plug-ins
Step2: Double check the integrity of your file. Some VST plug-in developers includes an MD5 hash to their software. So after downloading, you need to double check the MD5 hash to make sure it matches with the provided by the developer. You can read this tutorial on checking the file integrity using MD5 checksum. The MD5 checksum method can be applied to any downloadable assets such as WAV or MP3 files.
Why do you need to bother checking the MD5 checksum?
a.) If the original authors/developers provide a checksum; you will always ensure that the file you have downloaded is not corrupted or altered intentionally by other parties (if your checksum results matches with the one provided).
b.) Downloading files from the Internet can easily become corrupted or injected with other codes not included with the original installer.
Another big issue that you need to deal with is to ensure that it does contain any viruses or malware. You can upload the exe file here to be checked by the scanners.
Step3: Once it is clean, double click the installer to start the installation process. It is suggested to close all open programs to avoid conflict during installation.
You might see a warning before continuing the installation such as this:
VST plugin in Adobe Audition
It says that your system (audio interface and digital audio workstation/multi-editor/recorder) should support ASIO. These are low latency audio drivers that is very different from the one used and installed by Windows in default. Windows is using WDM; however if you are using professional audio interface; they have ASIO drivers on it. For more details about ASIO and WDM audio drivers, you can read this article on ASIO vs. WDM. If you are using older versions of Adobe Audition such as the 1.5 version, it does not support ASIO. Read for more information here: Will Adobe Audition 1.5 or 3.0 record a Firewire audio interface.
You should pay attention to some warnings to make sure the VST plug-in will work without problems. Example of these warnings are common when the VST plug-in is not freeware. In this case, it requires license key or authorization code during the installation.
If you encounter this problem, read the tutorial section on the installation of proprietary VST plug-ins.
Step4: Launch Adobe Audition – go to Effects – Add/Remove VST Directory. Navigate to the folder where the VST plug-in has been installed. If you find many folders under the plug-in, make sure to select the general path, example: C:Program FilesAodix.
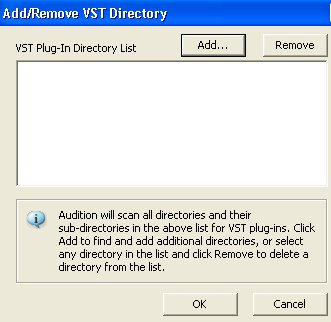
VST directory example
Based on the screenshot above, Adobe Audition will automatically scan the sub-directories under the main folder for VST plug-in related files.
Step5: Once added, go to Effects – and click “Refresh Effects Lists”. The VST plug-in should then be added to Adobe Audition.
This is just one example, there are countless of VST plug-ins available in the internet for downloading. I also recommend the plug-in reviews before proceeding with the installation to determine if it is great or not.
The good thing is that Adobe Audition support both VST and DirectX plug-in. So it is your choice what type of plug-ins you need to install. Although most of my Adobe Audition plug-in is DirectX based, I am still using Steinberg VST plug-ins.
If you are using DirectX plug-ins, you can refer to the following tutorial below for the installation steps:
How to Manage & Remove Directx Plugin in Adobe Audition
General Procedure of installing VST plugin in Windows operating system
Step1.) Make sure you have an installer (.exe file) of the VST plugin you need to install. There are lots of VST plugins available, some a free and some requires you to have a license. For illustration purposes, supposing you need a free and complete VST plugin that already includes the following important effects: parametric EQ, compressor, etc. In addition to the one provided in the previous section; another great free VST plugin that will run in Windows is the Reaper VST audio plugins. Download the installer here.
Step2.) After downloading the installer, double click the exe file to install it to your Windows 7 OS. Make sure to select all effect plugins during installation.
Step3.) Confirm that you have properly installed the Reaper VST plugin. Go to your C:Program Files, you should see a directory named as “VSTPlugins”. If you visit that folder, you should see the “ReaPlugs” folder with the following contents:
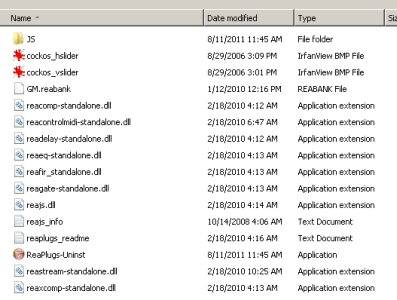
Installed Reaper VST plugins
As you can see after installation, the actual VST plugin that is very important are those with .dll extension. For example this dll file: reaeq-standalone.dll is the actual ReaEQ plugin. And also reacomp-standalone.dll is the application extension of ReaComp Compressor. Take note that these programs are standalone so it can be move to other directories and would still work.
Add/Enable VST Plugin to Notion 3
Now you have successfully installed the VST dll plugin files, it is time to integrate it with your recording or music notation software. Let’s start with Notion 3:
Step1.) Launch Notion 3 music notation software.
Step2.) Open any existing Notion 3 project that you are working which you would like to apply VST effects
Step3.) Click “Mixer” in the Notion 3 menu.
Step4.) You should see different tracks in the mixer representing different instruments in your project. Take note that this mixer works exactly like a real mixing console. To connect an EQ to a mixer, you should be using Inserts.
In Notion 3, each track or channel allows you up to 4 effects to be added as “Insert”. Click “Insert” on any tracks or channel. Start with the top most insert of the channel.
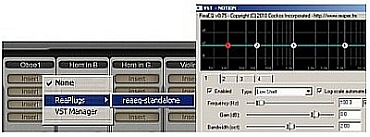
Step5.) After clicking on it, it will show two options in the dropdown: “None” and “VST Manager”. Currently “None” is checked since Notion 3 is not yet configured to use any VST plugins, so you need to check “VST Manager”. You will then see all the VST effect plugins automatically discovered by Notion 3 based on installed VST plugins in Windows 7.
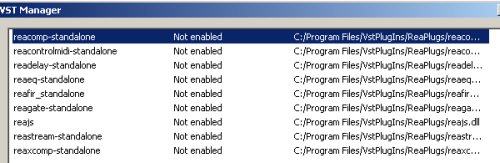
VST effects discovered by Notion 3
Step6.) You will then need to click “Enable” for example the ReaEQ parametric equalizer (ReaEQ-standalone) to use it and then click “close”.
Step7.) Now go back to the mixer in Notion 3, click again “Insert” and select “ReaPlugs”. You can then click “reaeq-standalone”. Finally you can see the EQ options where you can apply desired settings.
VST plugin in Notion 3 mixer
The effects will then be highlighted on the Insert section of the Mixer as shown below (for example- Oboe, Violin I, Violin II and Viola are applied with the EQ effect):
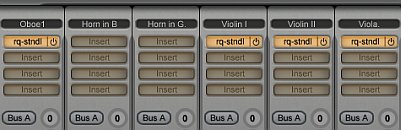
Mixer channels applied with effects