A simple guitar/piano and vocal arrangement is enough. If you are technology savvy you can create your recording studio and upgrade some gears like replacing your PC speakers with standard studio monitors. You do not need to hire a band or spend a lot of money. This is important because a lot of your fans and subscribers in YouTube will ask you where they can buy your music.
Step5.) Let your music available for purchase in Cdbaby or in another digital music distribution outlet. Then send message to all of your YouTube subscribers, fans and contacts where they can buy your music. Depending on your hard work, dedication and talent; you can make a living out of this way.
Sharing your Original Music in Youtube
You might need to share your music in You Tube and the only way is to convert the audio (MP3 file for example) to video. The good thing is that Windows movie maker is a bundled-free application in your Windows operating system.
To get started, follow the steps below:
Step1: Go to Start – All Programs – click Windows Movie Maker.
Step2: Go to View and click “Task Pane”.
Step3: Under “Capture Video”, click “Import audio or music”.
Step4: Find the audio file in your Windows hard drive. Make sure you are using a much higher audio resolution for best quality. The recommended is 320Kbps MP3 constant bit rate encoded.
Step5: Try clicking the play button to hear the music.
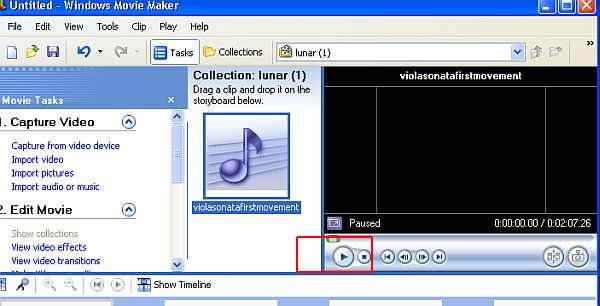
Windows movie maker test audio file
Step6: So far your video does not contain any images or background. This is where you can add pictures, images which will “synchronized” with your audio file. First, create a folder in your desktop and name it as “pictures”. Put all your images to that folder.
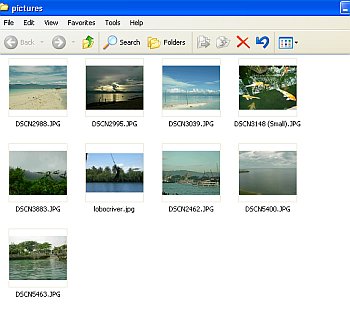
Pictures for movie project
Make sure you own rights to your images, music and everything in your project. This will prevent any possibility of copyright infringement.
Step7.) You then need to import your pictures to your movie project. Under “Capture Video” in movie maker, click “Import pictures”. Browse to the picture folder that you have created in step6. Select all pictures (selecting one picture then press Control- A). All pictures will be highlighted after selection. Click Import.
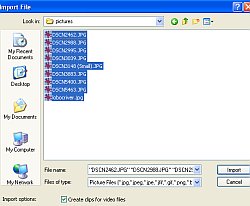
importing pictures
Step8.) Let’s formally add the audio file to your timeline. Under collections, right click on the MP3 audio file and click “Add to Timeline”.
Step9.) Now for the images, right click each of them and click “Add to Timeline”. Make sure you do this for all of your images.
Step10.) Examine your timeline to make sure all images fit the entire audio file timeline. In this example, the images still did not fit the entire audio file timeline such as shown in this screenshot:
not fit the audio file
Inside the red box are the missing images.
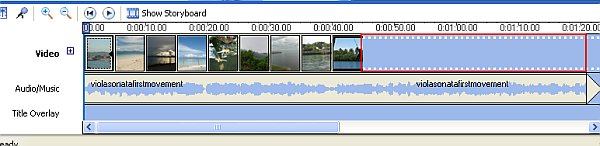
Step11.) You can drag, adjust and fit all images in the audio file timeline. To do this just select any images in the timeline, click and drag it to adjust its length.
fit pictures in audio timeline
As you see all images now fits cleanly in the audio timeline.
Step12.) You can select each image in the timeline. Right click on it and add video effects if you want. You can test the video effects by playing the video.
Step13.) Select “Make titles or credits”. You can customize your title and credits easily. You can preview it by selecting it and clicking the play button.
Step14.) Its time to save your project, go to File – Save Project, then assign a project name.
Step15.) Finally when everything has been done, click “Save to my Computer” under “Finish Movie”. Assign a file name of your video and path to save.
Step16.) Just select the “Best quality for playback on my computer” (recommended)
Step17.) After Windows movie maker successfully creates the video file out of your audio. You can watch it using Windows media player to see if it works according to your plan.
Step18.) Now that everything has been created, you can now upload the video to You Tube and share it to everyone.
Below is a sample video of my originally written/produced classical piece “Viola Sonata in Gb Major-First Movement”. Take note that the raw audio file is only 320kbps MP3 and then I use Windows movie maker to convert the audio into a video file with images.
Content last updated on August 18, 2012