
This is a tutorial for complete beginners in using a reverb hardware unit in your mixing console. This post talks about the concepts of using reverb unit, setting the dry and wet signals in the mix and adjusting the desired reverb in the mix.
The standard connection of reverb to a mixer is using parallel connection in the screenshot below (this is connected after fader or post fader). Read this tutorial if you are not familiar about post fader and pre-fader in audio mixer.
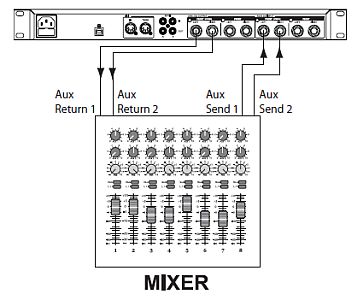
Parallel connection of reverb unit
Photo credits: Lexicon Pro
The aux in 1 and 2 (stereo) is connected to the reverb unit inputs 1 and 2 (stereo). And then the output is connected back to the mixing console aux returns 1 and 2.
In some mixers or reverb units, it is common to have one aux send input (EFX) (also known as mono input) to be sent to the reverb unit and then the stereo outputs of the reverb are then connected back to the stereo aux returns 1 and 2.
When the reverb unit is connected in parallel, you will be dealing with its dry and wet signal. The dry signal is defined as the signal without an effect applied on it. This is also known as the “unprocessed signal”. So the signal from the mixer aux input is still dry because it is not yet implemented with reverb. However the signal at reverb outputs which are connected to aux return is termed as “wet” because they are already processed with reverb.
Controlling the Dry Signals in the Mix going to the Reverb Unit
To properly assign reverb to each channel in the mix, it is essential that you know how to control the dry and reverb signals in the mix. Start by understanding the flow of dry and wet signals in a mixer:
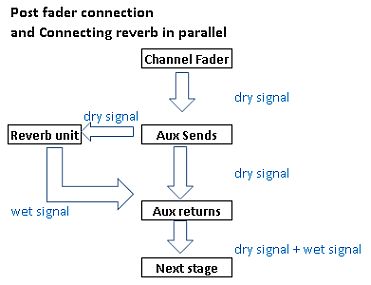
Dry and wet signal flow in the mixer
Based on the signal flow diagram above, the reverb output which is now “wet” (because this signal is processed with reverb) is combined with the “dry” signal of the mix. The reverb input which is coming from the aux sends is still unprocessed or dry.
The dry signal sent to the reverb unit is controlled by the aux send level. For example in Mackie DF6 mixer, the amount of signal sent to aux sends can be controlled individually on each mono channel strip of the mixer, see screenshot below (enclosed in yellow box):
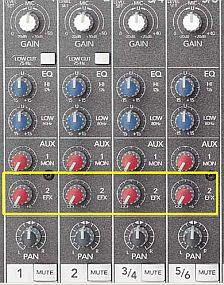
Mackie aux send level
For example if you are using 3 mono channels on the mixer for mixing 3 tracks (e.g. one vocal, one lead guitar and one rhythm guitar); you can control the amount of dry signal to be sent to the reverb unit from each channel by using the aux send EFX knob.
Controlling the amount of Reverb Effect that you want for each channel
In some reverb unit such as Lexicon MX400, the amount of reverb effects that you want in the channel depends on the amount of dry signal going into the unit. This means that higher aux send EFX setting in particular channel also corresponds to higher reverb applied on the signal. Let’s have a practical example, supposing you are mixing symphony orchestra music with dry and wet ratio setting assigned as follows:
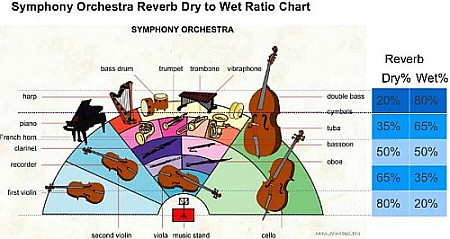
Orchestra reverb settings
(Taken from this tutorial: Symphony orchestra panning and reverb settings)
There are 5 distinct dry to wet ratio that you wish to assign:
1.) 80% dry, 20%wet
2.) 65% dry, 35% wet
3.) 50% dry, 50% wet
4.) 35% dry, 65% wet
5.) 20% dry, 80% wet
OK, here is how to set them. First, if the entire aux send EFX knobs in all channels are set to 0, you are not sending any dry signals to the reverb unit and the entire mix will be dry (no reverb effect applied). Supposing a 0% knob (minimum or zero) corresponds to 100% dry, 0% wet and full knob setting corresponds to 0% dry and 100% wet then the above dry and wet ratio can be implemented as follows:
1.) 80% dry, 20%wet =20% aux send EFX
2.) 65% dry, 35% wet = 35% aux send EFX
3.) 50% dry, 50% wet = 50% aux send EFX
4.) 35% dry, 65% wet = 65% aux send EFX
5.) 20% dry, 80% wet = 80% aux send EFX
Therefore you can say that the %wet (reverb) that you want in each channel is proportional to the aux send EFX settings.
Content last updated on August 5, 2012