
Introduction
Let’s face it, even software versions of synths can look pretty intimidating. That is the benefit of presets though, right? Well, when the newness wears off like it did with your first crush and you begin to feel restless, then it’s time to break away from the safety of the preset.
It’s time to start from scratch and invent your own sound. The only problem is so many knobs, buttons, and options where do you even start?
That’s right, right here. And of course, before we dive on in, it’s education time.
Moog Synthesizer History
I am going to start with an original classic. The Moog Synthesizer. Moog started his own business in 1953 selling theremin kits. In 1964 the first voltage-controlled subtractive synthesizer to utilize a keyboard as a controller was released. In the mid 60’s Moog’s company led the way in the commercial manufacturing of analog synths.
Subtractive – When partials of an audio signal are modified by a filter to alter the timbre of the sound. Starting with a waveform that is being generated by an oscillator, then removing certain frequencies with a filter.
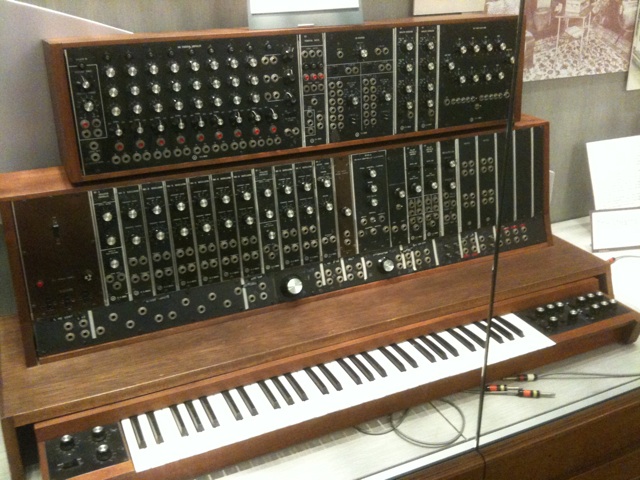
Moog Synthesizer
Rather than dissect the monstrous Moog synthesizer, we are going to learn the Mini Moog.
What is Minimoog Synthesizer?
The Minimoog is a monophonic analog synthesizer, invented by Bill Hemsath and Robert Moog. It was released in 1970.
Monophonic Definition.
Mono = 1.
Phonic = producing sound.
If you would like to follow along you can download a free Mini Moog emulator. This VST plugin is 32 bit and can be used in most DAWs or stand alone. You can get information on its creator on his website. To start a direct download of this plugin just click here.
Let us begin.
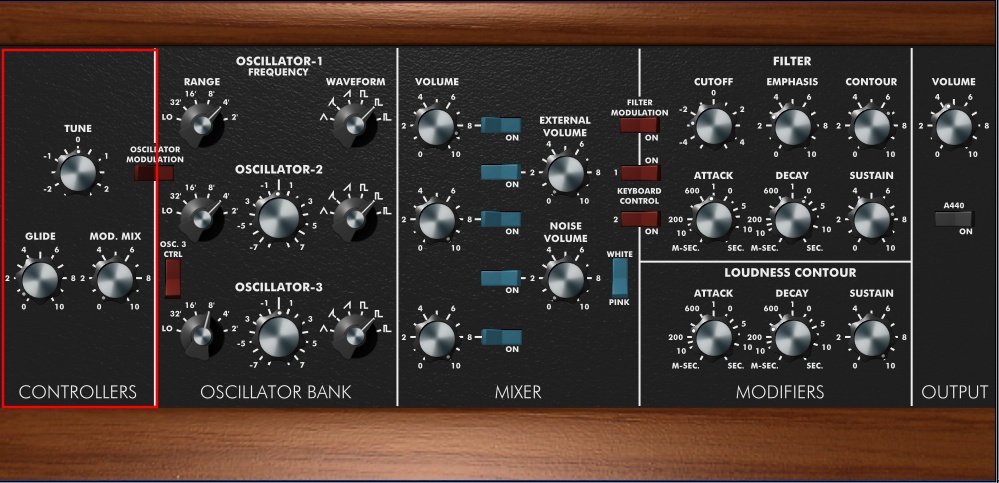
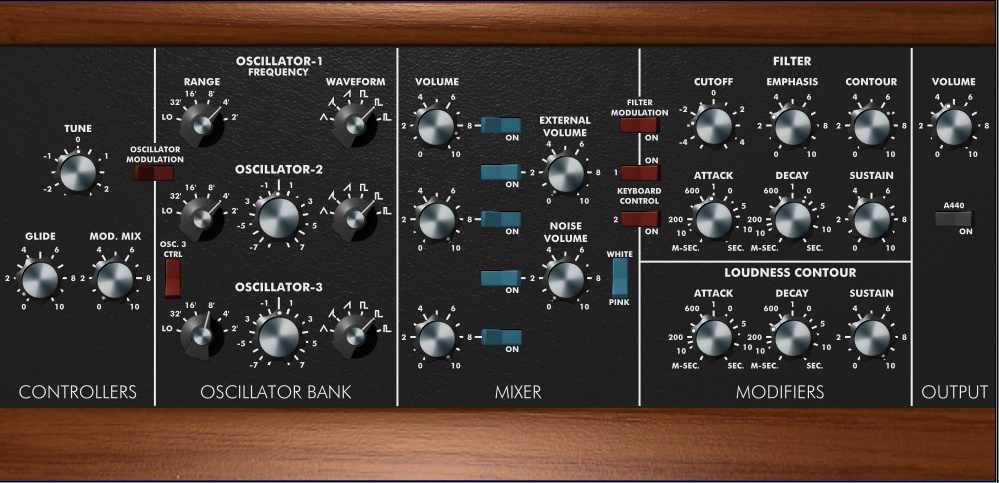
The controllers’ section has 3 functions within it.
1. Tune.
2. Glide.
3. Mod Mix.
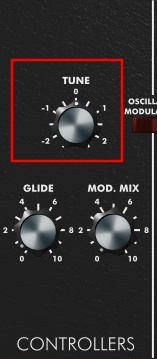
1.Tune
This is the master tune knob.
It provides the tuning for oscillator 1.
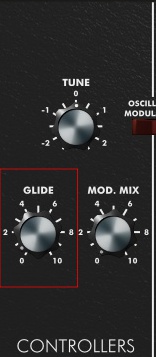
2.Glide
Glide allows the pitch to transition softly as you change notes. The knob determines the time needed to transition from note to note.
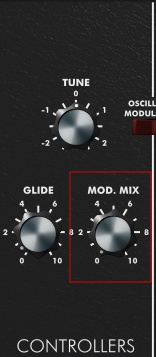
3.Mod Mix
The Modulation Mix knob is variable between oscillator 3 and “noise” as its sources. If the knob is rotated counterclockwise the source is oscillator 3. With the knob, turned clockwise “noise” is the source. If the knob is in the center position both oscillator 3 and “noise” are equally modulated. The switch located between the controllers’ section and the oscillator bank is “oscillator modulation.”
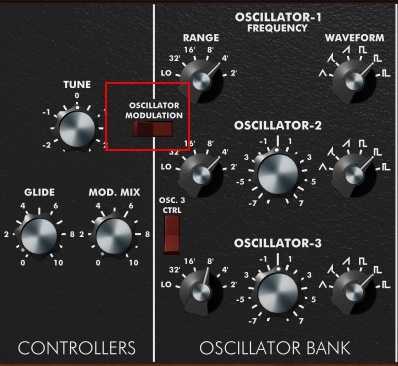
When this switch is “on” the oscillators can be modulated by Oscillator 3.

The oscillator bank is where you will generate a sound. The Mini Moog has 3 oscillators. Each one can be manipulated to generate its own tone.
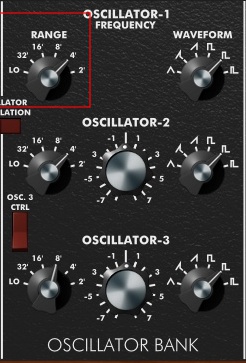
The Range knob selects the octave of oscillator 1. The “Lo” setting allows you to bring the octave down even further, allowing the oscillator to be used as a modulation source.
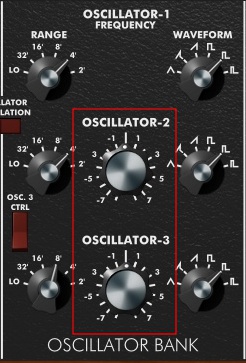
There are 3 oscillators. Oscillators are the primary source of sound. Since there are 3 this means that
each key can sound up to 3 oscillators each within its own waveform, octave, and pitch. The mixer then controls the balance between them.
Oscillator 2 and 3 have frequency knobs. It will detune from Oscillator 1. Detuning slightly can create a “chorus” effect. You can also tune the oscillators to intervals like a 5th above or a 4th below.
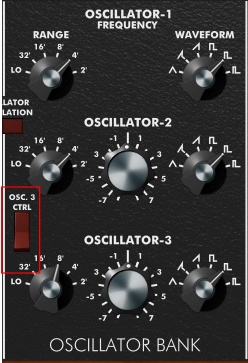
Oscillator 3 switch. Turning the switch off releases Oscillator 3 and provides a greater range of frequency control and allows it to run as a modulation source.
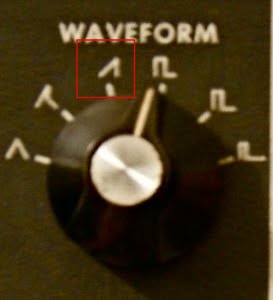
Waveforms
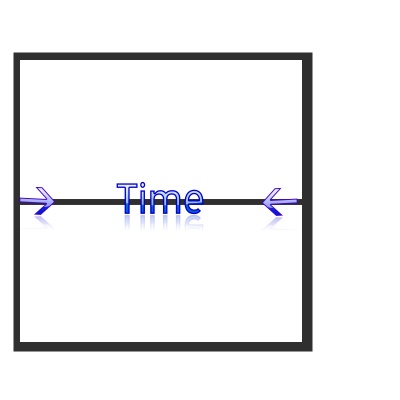
Each Oscillator has a WAVEFORM knob. Each knob offers 6 choices. Before we can understand the functions of each we need to understand waveforms. A waveform is basically a graph or visual image of sound. It allows us to see changes that are occurring and define its structure. A wavelength of a waveform is the time it takes for the sound to complete one cycle. The topic of waveforms and wavelengths can get very deep and technical. I am giving you the short and sweet crash course version. If you would like to further your knowledge on the topic you can do so here.
Below is a blank graph.

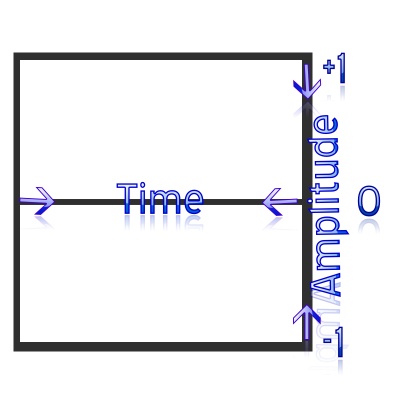
The center line from left to right represents time.
The center line also represents our sound at 0. Silence. Anything above or below is amplitude. Amplitude is also referred to as loudness.
The red lines represent our sound. It has cycled twice. Each cycle is 0.5 seconds long.
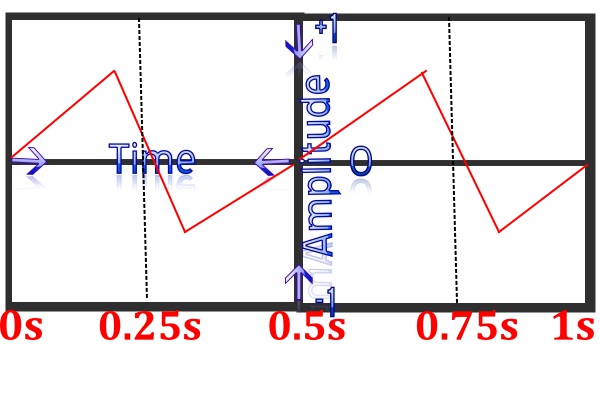
Frequency is measured as the number of wave cycles that occur in one second. The unit of frequency measurement is Hertz (Hz for short). A frequency of 1 Hz means one wave cycle per second. A frequency of 10 Hz means ten wave cycles per second, where the cycles are much shorter and closer together. Since our graph measured a time of 1 second and the wave has repeated twice in that time we can then conclude the wave is oscillating at 2Hz. Frequency is like pitch. The slower the lower, the faster the higher.
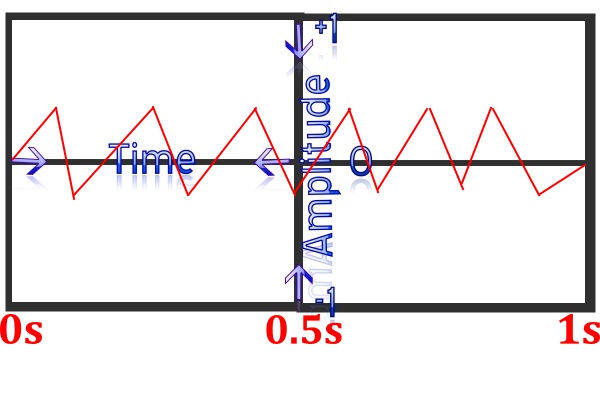
In this instance, our wave cycled 6 times in the same time of 1 second making it a higher pitch than when the wave cycled twice. Another way to look at frequency and pitch is if you took a record and slowed it down, the pitch or frequency would be lower. If you speed it up and it then sounded like chipmunks singing, the frequency or pitch would be higher.
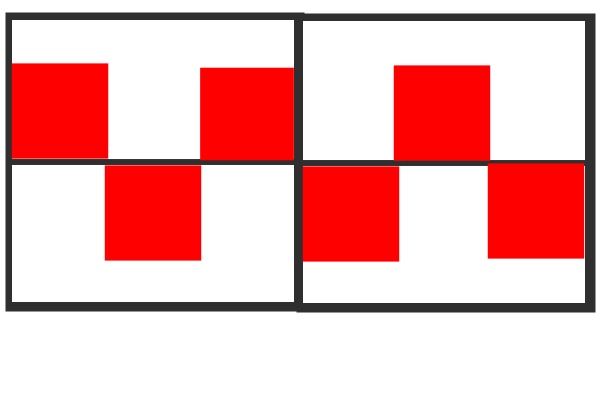
Square, Triangle, and Sawtooth are simple waves that contain a consistent harmonic structure. Their simplicity comes from being continuous and repetitive. A cycle of a square looks identical to the one prior as seen below.
Again, this is useful information but it is not all there is to know on the topic. Back to our synth and the types of waveform options that are available. Each Oscillator has a waveform knob. Each waveform has 6 different ways to adjust the harmonic content.
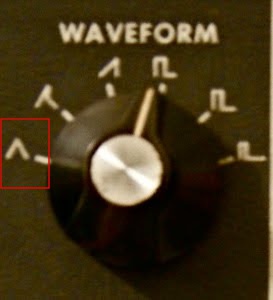
The Triangle waveform only contains odd numbered harmonics at the low end. This is a good choice for creating soft sounds.
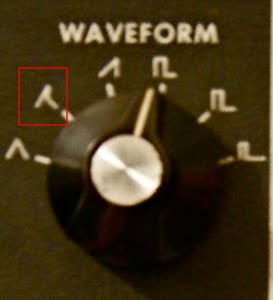
This is a hybrid of the Sawtooth and Triangle waveform. It has more harmonic energy than the triangle and offers even-numbered harmonics. The sawtooth triangle has more edge to the sound but remains clear.
The Sawtooth is the most harmonically dense. Creating thick and brassy sounds the sawtooth can produce powerful leads and is also good for bass sounds.
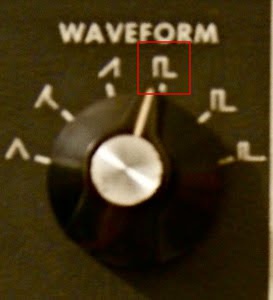
The Pulse Square contains only odd-numbered harmonics The square creates a rich starting point for strings while the pulse is based on the width of the top half in relation to the bottom half of the waveform.
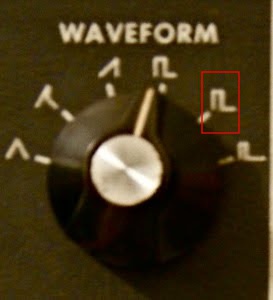
The Pulse Wide Rectangle. The more the square changes to a rectangle the more even-numbered harmonics are added. This is good for creating hollow sounds.

The Pulse Narrow Rectangle As the pulse rectangle is narrowed lower number harmonics, both odd and even numbered, are added. This applies a more nasally sound.
The Mixer Section
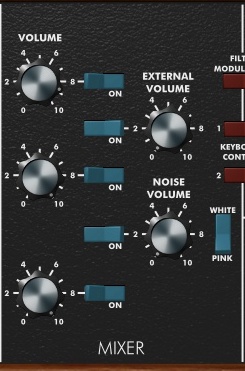
The mixer sets the volume level of all 5 audio sources. The 3 oscillators, the external audio source, and the noise generator. The combined output of the mixer then will pass through the filter then finally reach the audio output. In addition, a volume switch is present for quick access to cut a signal completely on or off.
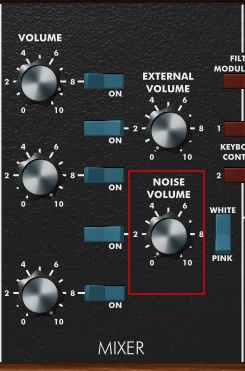
The Noise control can be Incorporated or used alone to create sounds like a rocket launch.
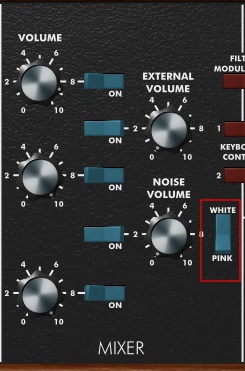
White noise will generate things like TV static while Pink noise will deliver more percussive crashes.
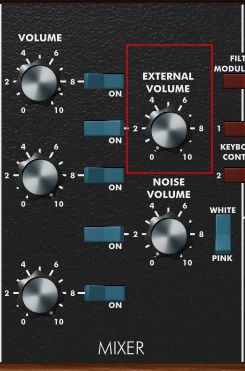
External Volume.
“There is a switch on the synth for an external input. In a real Minimoog, this could receive any audio input,but for this plug-in, it has been hardwired as a feedback loop from the audio output of the synth. Be careful pushing the volume of it too high!” – A note from the plugin creator.
The 3 switches between sections are filter modulation and keyboard control 1 & 2.
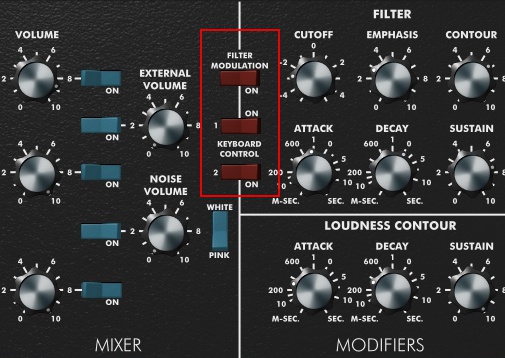
Filter modulation.
When this switch is on the filter cutoff frequency can be modulated by the noise generator, filter contour, and oscillator 3. The modulation source and amount are defined by the controllers setting.
Keyboard control 1 & 2.
This allows notes played higher to be brighter.
Control 1 provides 1/3 of the total amount. Controller 2 provides 2/3. Combining the 2 provide 1.
The Modifiers Section
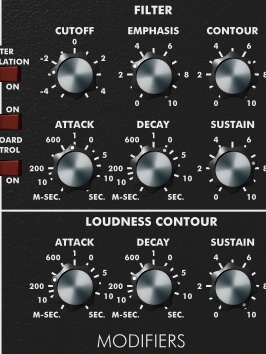
This is where all filtering and modifications occur. There are 6 ways to filter and 3 when determining loudness.
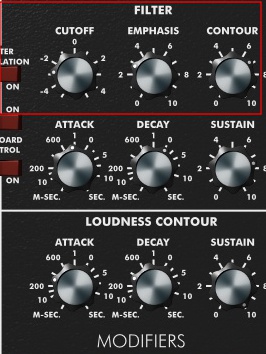
The Filter.
The filter modifies the harmonic content of the sound.
Cutoff
When a note is played the harmonic occurring above the filter is cut off. Harmonic content occurring below the cut off filter is allowed to pass through. When closing the filter by cutting off the amount Lowering the cutoff filter the sound will come across dark and growling.
Emphasis
Emphasis, in this case, is reconsidered resonance, taking some of the output signals and returning it into the input filter.
Contour
The contour section is where you add articulation to the sound. One option changes the cut off frequency over time and the other option controls loudness over time.
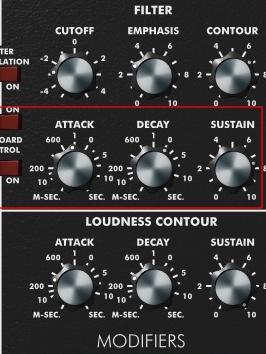
Attack
Sets the time control for the filter cutoff. This determines how much time passes until the cutoff filter engages.
Decay
Sets the time required for the filter cutoff frequency from the level achieved by the attack stage to the sustain.
Sustain
Will hold the filter cutoff frequency at the level determined as long as the note is held.

The Loudness Contour
This section controls loudness. You can determine the levels of loudness to carry the same throughout the
duration of a sound, have it ascend or descend at any given rate.
Attack
Sets the time required to raise the volume from zero to its maximum level once a key is pressed.
Decay
Sets the time required to lower the volume from its maximum level achieved by the attack.
Sustain
Will hold the volume for as long the note is held.
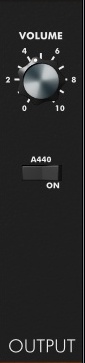
The Output Section
The output section controls the final mix signal strength.
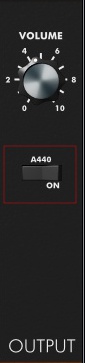
Switch A440
A reference tone in the key of A at 440Hz.
And there you have it. A breakdown of the functions of a Mini Moog Synthesizer. Now let us take another look at the interface as a whole.
Taking another look it doesn’t seem as baffling as it did before. With some basic knowledge of key functions, you should be able to approach any synthesizer without fear or hesitation and be able to generate a tone, tune it and modify it. The rest is all experimentation and customizing your sound.
Artists that have used the Minimoog include:
Gary Numan “Cars”
Pink Floyd “Shine on you crazy diamond”
Dr. Dre “The Chronic”
New Order “Blue Monday”
Nine Inch Nails “Head like a Hole”
There is a PDF book available that will show you the settings on how to obtain certain sounds as well as some of the settings used by the pros, it is free and available to download here.
You can pick up a real Minimoog ranging from $2000 all the way up to $9000. While playing around with the VST version if you come up with any cool sounds be sure to save the preset and share the settings in the comment section below.