This is a tutorial for Audacity beginners in creating high quality recordings. It is required that you will be using external audio interface hardware (either Firewire or USB) to create a high quality recordings even using Audacity recording software. If you do not have yet, you can read this post on the cheapest 24-bit/96KHz USB Audio Interface.
As a background, Audacity is recording/tracking software and cannot be used in audio mixing. If you are a musician/producer with home recording studio, this is an ideal software to start with if do not know how to mix music. You can arrange, record and produced your songs using Audacity and then let someone mix the tracks for you.
Configuring Audacity for High Quality Recording
High quality or professional recording should be done at least 24-bits/44.1KHz. In this example, you will be using 24-bit depth and 48 KHz sample rate. Most professional audio interface defaults to 24-bit recording and supports this sample rate. In this tutorial, the audio interface to be used is Focusrite Saffire Pro 40. This tutorial assumes you have fully installed Audacity in your computer.
Step1.) Launch Audacity.
Step2.) Configure Audacity to record and play using your external audio interface. You can do this by going to Edit – Preferences; then click “Audio I/O”. In other Audacity versions, this is called “Devices”. For example, for Saffire Pro 40, the device name is “Saffire Audio”, so it is set as follows:

Audacity Input/Output Devices
Also you should be setting channels to “mono”. Most recordings should be in mono format (vocals, guitars, etc). It is also important to check “Play other tracks while recording new one”. This would play any recorded background tracks while you are recording a new one. For example a rhythm guitar is playing while you are recording a lead guitar.
Step3.) Still in the preferences, click “Quality” Tab. set all of them to as follows:

Audacity preferences 1
You need to set all dither options to none since you would not be using this in recording. Knowing how to use dithering and sample rate conversion is only done in audio mastering.
Step4.) Then go to “File Formats” tab in preferences. Under “Uncompressed Export Format”; click “Other” and then set the “Header” to “Wav (Microsoft)” and “Encoding” to “Signed 24-bit PCM”.
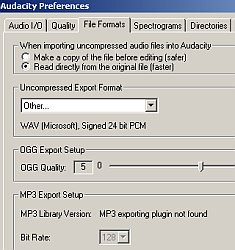
Audacity file formats
Step5.) Click “Interface” tab and set “-145dB” for “Minimum of dB mode display range”. This is necessary to view the entire dynamic range of the waveform for a 24-bit recording. Finally when everything has been set, click OK and restart Audacity.
Step6.) (OPTIONAL) You can also change the waveform settings to standard dB scale because its easier to understand. The default waveform settings in Audacity in Windows is a scale from -1.0 to +1.0; the waveform varies alternately with +1.0 as the loudest (this can also be applied in Windows operating system if the default scale is the same). See examples below:
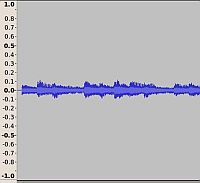
basic waveform screenshot in Audacity
You noticed that when there is no volume , it will all be a straight line and the amplitude is 0. Subjective, you can say that the audio waveform depicted on the screenshot sounds so weak and needs to be amplified/compressed to make it loud. This is where the default waveform dB chart settings in Audacity needs to be changed. When you are doing compression, you need to look at the very important components of your waveform objectively in order to make sound decisions, these are the things to look at:
a.) Maximum Peak Signal in dB.
b.) Average signal in dB.
c.) Noise level
As you can see, since the default waveform settings is in a scale of -1.0 to +1.0, you cannot determine the maximum peak signal in dB units. So lets change the audio waveform so that the vertical axis will be using decibel units. These are the steps:
a.) Go to Edit – Preferences.
b.) And click “Tracks”.
c.) Change the “Default View Mode” from “Waveform” (this is the default) to “Waveform (dB)”.
d.) Click OK.
e.) Go to File – Exit.
f.) Launch Audacity again.
g.) Open any audacity project (those with .aup extension) by going to File – Open. If you do not have a .aup project yet, you can open any wav file.
h.) When the project has been open, you will see that it is now using a decibel y-axis of the audio waveform. It should look like this:
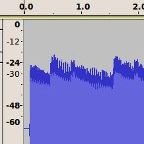
Audacity waveform in dB
You will notice that the scale of -1.0 to +1.0 in the y-axis has been replaced with decibel values.