The orange are fiber glass boards, you mount it in all walls as possible in your small room (excluding the ceiling and the floors). For the floors, you can use thick carpet. Do not forget the bass trap which will be placed in the corners of the room. It is still using fiber glass (look at the screenshot above). Then the black circles are your nearfield monitors. You will sit in the yellow circle which forms an equilateral triangle with the monitors. Finally if you want to record, plug your musical instruments.
For details, you can read this tutorial on room acoustic treatment for your studio.
Newbie Questions on Setting up a Home Recording Studio
I got an e-mail from a recording newbie asking questions regarding how to set up a home recording studio (italicized are the user questions). I believe many of these questions are applicable to most beginners.
Hello Emerson:
I found you online, and will be so happy with your response. I really like to create my own home studio. I have a number of questions, and each answer will be so useful to me.
There is a couple of questions asked, so I will be answering it one at a time:
If I am using software to record into the computer, would a 32 tracks mixer still be useful?
The answer is either yes or no. You can use a mixer or not when recording into a computer. Today, most home recording studio is now equipped with a so called “audio interface” which is enough to provide a professional quality recording at a lower cost. You can connect an audio interface to your computer as follows:
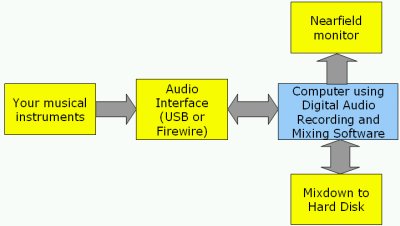
Digital audio mixing
The audio interface can either be firewire or USB type. The function of audio interface is to let you record any musical instruments into your computer (drums, guitars, vocals, etc). For details about how you can use an audio interface, you can refer to the manual. In this case, you do not need a mixer anymore as the tracks will be mixed digitally (within the computer using software). 32-tracks mixer can be very expensive; it’s not a practical solution just to get started creating a home studio. Make sure the audio interface is compatible to your computer hardware and your audio recording software.
I am trying to do a live band recording with 8-instruments, and 4-Singers using a software, please describe to me how I can do this using: i) a software, ii) using a mixer and other recording equipment. Which other recording equipment you think can be essential?
There are 4 different ways of recording a live band performance. Select something that is within your budget and skills.
I will like the final product, the final sound to be just like any professional studio sound, what should I do?
It can take months to years. It depends on the level of your hard work and dedication. Regarding your skills, you need to have a trained ear and should practice professional recording and mixing techniques. The following links can be very helpful:
a.) 54 ways you can improve recording quality
b.) Avoiding these 7-common recording mistakes
c.) Demystifying broadcast quality
d.) Make your mix to sound great in radio and broadcasting
e.) Listening exercises for engineers
Spend some time to read the entire contents of this blog, slowly you can get knowledge and wisdom needed to create quality recordings.
I am ready to spend $5000 to $7000 (five to seven thousand dollars) maximum for recording equipment.
I think that is too much. Spend conservatively at a start. The most important is to acquire basic recording techniques, skills and ears. Not too much on gear. I even started recording using just a simple PC, a PCI sound card, a cheap Behringer Xenyx 502, a dynamic shure Mic and I manage to get good sound. Nearfield monitor is very important for audio monitoring accuracy but you can buy less than $1000 for a pair and that is already superb.
What interface and what software should I buy which will give me the best professional sound quality?
As of 2012, I would recommend REAPER as the licensing cost is very low and it contains all features you need for recording.
Is music recorded by software as good or as distinct as any music professionals will appreciate?
Yes. It’s the technique and ear training that matters.
What is the real function of a mixer in recording? I had gone to a big music equipment store, met someone there — a sale person, and he kept talking to me about recording into the computer, but I thought, recording is done into a mixer, as showed in one of your designs here below.
The real function of the mixer is to condition or pre-amplify a number of input signals, apply effects to these signals (EQ, compression, panning) and then feed the output into another device such as a computer, DAT or reel tape. In short, a mixer is used as a summing or audio mixing device. Audio interface is different; it is only used in recording/tracking and not in the mixing. This means you cannot apply a number of effects, route signals and sophisticated signal processing with audio interface. If you use an audio interface, the recorded tracks are mixed inside the computer. This is called “digital audio mixing” (see diagram previously) because everything is done using a software. You can also use a mixer simply for recording purposes and nothing else, but an audio interface would fit the job better at a lower cost.
Previously there was no recording software, if I want to record without using the software, what equipment should I buy, and in what combination should I put them together.
This is the traditional analog recording method (not using computers or digital audio workstation). Using a mixer, you can record and mix audio tracks without the need of a computer and or any audio mixing software. In this case; you simply need a mixer, a ½ inch analog reel tape for audio mix down, etc. This is called analog audio mixing because the entire signals are mixed in an analog domain (not using digital signals unlike in a computer) and bounced to analog tape. This is common in the 1970’s and 80’s. In short, you record and mix entirely using a mixing console. More details in this tutorial on building analog recording studio.
Summary-Checklist before recording
1.) Make sure the audio recording interface is connected to your computer.
2.) Ensure that your DAW is configured to work with your audio interface.
3.) Connect your nearfield/reference monitors to your audio interface analog outputs.
4.) Boot your computer and launch your DAW/recording software.
5.) Power-on your audio interface and nearfield monitors.
6.) Connect your musical instruments to your audio interface preamp inputs using balance cables. Recording a band requires it to be recorded in multi-track.
7.) Do a test recording. Make sure you adjust the preamp gain for best signal-to-noise ratio. This will let you record at optimum levels to attain both clarity and preventing distortion/clipping.
8.) Once all are set, hit the record button.
Below is a picture of a home recording studio, very simple yet can be useful for your self-produced music projects:
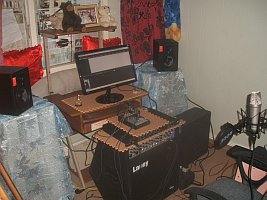
Home recording studio
Advice on beginners :Success in home recording is not all about using expensive recording gears, it is all about using your “EARS” and years of experiences using your own original gears (it does not need to be expensive).
Bookmark this website, you can learn a lot of ways about home recording, mixing and mastering. Start slow but learn well. Rushing too fast makes you less effective, because recording is all about “capturing the best performances”- more of trial and error strategy, professionals even do this. It takes patience and lots of time.
Content last updated on October 23, 2012