
This is a tutorial about how to record your screen activity in Ubuntu. Ideally with respect to audio recording and mixing in Linux environment using Ardour digital audio workstation. There are times when you need to record screen activity procedures for documentation purposes. Performing recording and mixing process can be a delicate procedure and if you are beginner it would be nice if you can record the important mixing steps and recording procedures so that you won’t get lost in the future.
Writing the steps in the text manner may be good but its not entirely accurate and can be time consuming. The best way is to record the procedure directly on the screen. In Ubuntu, the best screen recorder is “Record My Desktop”. This is free, high quality screen recording software and highly configurable. Below are the procedures to make this work in your Ubuntu computer:
Note: This tutorial is written on Ubuntu 10.04/Linux, otherwise known as Lucid Lynx.
Step1) Go to Applications – Ubuntu Software Center – in the search box type recordmydesktop , see screenshot below:

Ubuntu software center Record My Desktop
Out of the results, select “gtk-recordMyDesktop” and click “Install”. You are then required to enter your root Linux password. The installation process is easy and straightforward.
Step2) Confirm if you have successfully installed the screen recorder by going to Applications – Sound & Video and you should see “gtk-recordMyDesktop”.

Installed Record My Desktop
Step3.) Let’s try launching screen recorder. Go to Applications – Sound & Video – gtk-recordMyDesktop. This is how it looks like:

Record My Desktop utility
You will be asked to select a portion of your Desktop to record. You can click “Select Window” and start selecting the regions. It is not advisable to record the entire screens of your Desktop because the file sizes of the generated video can be extremely large.
Step4.) Once you have actively select the regions. Try clicking “Record” and do something in your Ubuntu Desktop. This will record your screen activity. By default , all movie file generated will be save to your home folder.
Step5.) After you have clicked stop; the software will encode your video and you will see the “WARNING” not to close it while encoding. After everything has been done, go to Places – Home Folder.
The file extension of the generated movie is .ogv, by default the file name is out.ogv.
Common Problems Encountered:
1.) No sound included in the screen capture/activity for Record my Desktop:
Solution:
a.) Go to Applications – Accessories – Terminal
b.) In the command prompt, type this command: aplay -l
c.) You should then see the list of sound devices detected by Ubuntu. For example is an example output:
**** List of PLAYBACK Hardware Devices ****
card 0: CA0106 [CA0106], device 0: ca0106 [CA0106]
Subdevices: 0/1
Subdevice #0: subdevice #0
card 0: CA0106 [CA0106], device 1: ca0106 [CA0106]
Subdevices: 1/1
Subdevice #0: subdevice #0
card 0: CA0106 [CA0106], device 2: ca0106 [CA0106]
Subdevices: 1/1
Subdevice #0: subdevice #0
card 0: CA0106 [CA0106], device 3: ca0106 [CA0106]
Subdevices: 1/1
Subdevice #0: subdevice #0
d.) Now click “Advanced” and go to “Sound” tab. Under the Device. Enter: “hw:” + the name of the sound card as shown above. For example if the sound card is CA0106 (as provided on the above results), so the device is entered as hw:CA0106. See screenshot below:
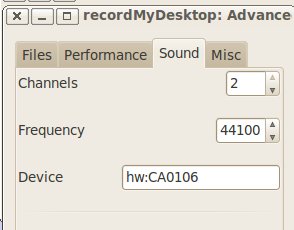
Sound card device configuration
2.) No sound when recording JACK audio applications when using Ardour.
Solution: The good thing is that “Record my Desktop” allows JACK audio applications as the source of the audio. Follow the steps:
a.) Launch Ardour.
b.) Prepare all audio files and mixes.
c.) Now launch Record my desktop and then click “Advanced”. Go to Sound tab. Make sure “Use JACK for audio capture” is checked.
d.) Configure your jack connectivity to accept audio capture.
In some instances, you will see this error:
Recording is finished. RecordMyDesktop has exited with status: 281
Description: Improper Window Specification
If you see this error, then you will not be able to continue to record the screen output of your Ardour with sound from JACK. So what are the possible causes of this problem?
Possible Cause #1: The Window you have selected is very large causing your RecordMyDesktop to crash because of insufficient memory and CPU resources. Take note that if JACK will be enabled, JACK consumes almost the entire RAM and CPU to get minimal latency and lag. So enabling both JACK and recording with a large window using RecordMyDeskop will possibly cause the screen capture to return that error.
Possible Solution#1: Try selecting a very small window and repeat the process above. For example , see the screenshot below:
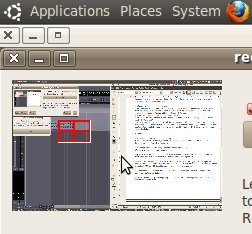
selecting small window in recordmydesktop
Possible Cause#2: If the solution above will not work. Then mostly it has something to do with configurations in RecordMyDesktop. These configurations are the video and audio quality settings.
Possible Solution#2: Try the tweaks below:
a.) In RecordMyDesktop, change the video quality settings to 5. This is a very low quality video settings only appropriate for troubleshooting purposes. Low quality forces the program to use low system resources.
b.) Now do the same thing with Sound quality, change it around 10.
c.) Select a small window.
Possible Cause#3: The last possible cause is in the performance settings of RecordMyDesktop.
Possible Solution#3: To minimize CPU and memory usage, the following are recommended:
a.) Encode on the Fly= uncheck
b.) Zero compresion = check
c.) Quick subsampling= check
d.) Full shots at every frame= uncheck
If all attempts fail to correct this issue. This is most likely a bug in the RecordMyDeskop that relates to the JACK audio environment. Feel free to submit a bug report or join the discussion here. I have the tried all the possible solutions and none of them seems to work except if you turn off the audio (unchecking the box beside Sound quality) in RecordMyDesktop and the screen capture will be OK. It might work for you.
3.) Still no sound from ALSA applications.
Solution: You need to make sure the capture is enabled and has enough volume. In this case, you need to install Gnome ALSA mixer. Go to System – Administration – Synaptic Package Manager. Enter your root Linux password and then type in the quick search box: gnome alsa mixer
Proceed to install it to your computer and then confirm if it is successfully installed by going to Applications – Sound & Video – Gnome Alsa mixer. Now make sure the capture is NOT MUTED and should have adequate volume. For example , the screenshot below shows that capture is muted:
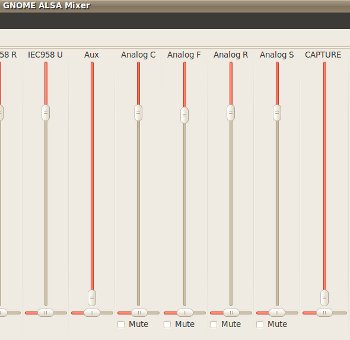
Screen capture volume muted
Content last updated on June 27, 2012