Finally this is the complete mix using the vocal processing procedures above:
As you have observed the vocal now sounds tight and balance in the mix. The vocal reverb has been set to low and the vocals are made to sit with the instrumentation with appropriate EQ and compression settings. Personally, I love the vocals to sound up-front and dry.
But what if you want more reverb? Make sure it sounds great
The reverb depends on the expectation of the producer (depending also on the targeted genre). Sometimes being tight sounds great but the producer might want a longer reverb tail. This requires a lot of listening, balance and experimentation to ensure that the reverb added would not be detrimental to the mix.Also moderation is the key.
Below is a sample vocal mix done with moderate reverb setting (medium jam room presets in Focusrite reverb plug-in):
If you like to use an entirely free plug-in that comes along with Reaper DAW, you can use “insert-live vocal” plug-in. Below is a setting if you want a longer reverb tail:
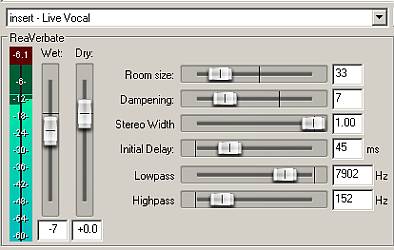
Live vocal insert reverb plugin
The trick is to lower the “wet” settings until the desired reverb tail has been achieved. For example in the above screenshot, I set it to -7.
This is a sample vocal mix done with Reaper “insert-live vocal” plugin.
To accurately set reverb and other vocal processing effects, you need to have reliable audio monitoring systems in your home studio and mix at low to moderate volume (friendly to your ears). You should be using nearfield monitors and not computer speakers. Also with reverb processing, I tend to double check the vocal mix with headphones to make it sounds nice in any monitoring environment.
Content last updated on June 14, 2012