One of the essentials in building a home recording studio is to test the room acoustics and analyze it for possible issues. This is a tutorial on how to do this procedure. Before moving forward below are the requirements before you will start analyzing your room acoustics:
a.) Set up the studio monitors, DAW, etc. as completely as possible.
b.) Try turning on your PC and studio monitors’ then play some music, you should be able to play music for both monitors.
c.) If you have subwoofers, you might as well add them so that you can analyze the room acoustics with the subwoofer.
d.) Try putting your room acoustic treatment materials as completely as possible. This includes putting bass traps, absorption materials, diffusers, etc.
e.) Make sure you correctly arranged the studio monitors; it should form an equilateral triangle with the mixing position (to where you will sit to listen to the mix). Read more details about this in home studio room acoustic setup.
f.) Download this test tone and unzip it. It is a 24-bit/48KHz mono test tone that will play from 20Hz to 20,000Hz. If your subwoofer or nearfield monitor is only capable of reproducing starting at 50Hz, then in the result, start analyzing at this frequency.
Setup the Test Equipments and Test Tone
Position the condenser microphone (in this test I am using Rode NT1A) at the mixing position (center of the equilateral triangle where you are listening to the mix). Make sure the microphone is at the same level with the tweeters of the nearfield monitors, see screenshot below:
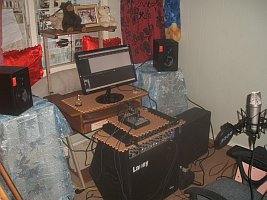
Mixing position calibration
Connect the microphone to your audio interface and switch the gain to moderately high (around 70% to 80%). But switch the main volume/monitor output of audio interface at moderate volume (starting at 50%). This will let the microphone pickup sensitively while monitoring at realistic audio mixing volume. Insert the 24-bit/48KHz test tone in your digital audio workstation software. Then insert one track ready or aimed for recording, this is where the room response will actually be recorded. See screenshot below for this configuration in Reaper:
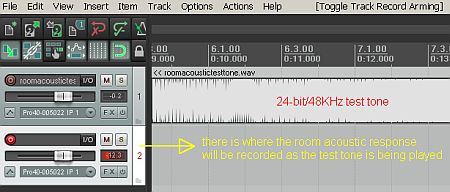
Reaper test tone setup