Most drum recordings are done with 3 or more microphones. This method is easier to work with, more efficient and easier to mix than working with only two microphones. In this post, I would give my thoughts on how you would be recording and mixing acoustic drum set recordings done using two microphones.
Getting the Recordings Right
Always remember the “garbage in-garbage out” analogy of music production process. You cannot have a great mix if you do not have great recordings. If you have full control of the drum recording session, I recommend you give the best effort in capturing the best sound as possible from the drums. With two microphone setup, the most optimal setup seems to be aiming one microphone on kick drum and one on the overhead. See screenshot below (enclosed in yellow circle):
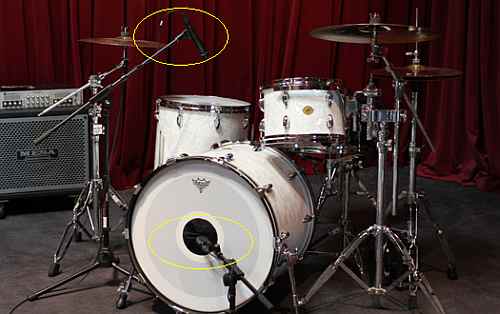
Miking a drums with two microphones
Photo credits: apogeedigital.com
The choice of microphones is critical to the captured sound. However even with lower budget microphones, you can still have a great drum sound. At a minimum you can use SM 57 for your overhead microphones mounted at the overhead area pointing to the snare and Audix D6 (or Shure 52A) for your kick drum. If you have some budget, you can buy a condenser microphone such as Rode NT1A for your overhead.
Condenser microphones are more appropriate for overhead because they have much wider frequency response and wider capture range than the dynamic microphones. It can capture both the low and high end frequencies very well. So that should result to a more brilliant cymbals, hi-hats and snare sound as well as more punchy tom drum sound. You can read more about the frequency capturing differences in this post on the comparison of condenser and dynamic microphones.
The room where it will be recorded would influence the sound of the drums even using only two microphones. A less reverberant, cemented room would translate to a more “in-your-face” kick and snare sound appropriate for punk and alternative music. A more spacious reverberant room would make the drum more open and airy, making it more appropriate for slow pop and country ballads.
Lastly the quality and sound of the drum kit is very important. I suggest spending some time tuning and conditioning the drum set before using it for recording. If the sound of the drum kit before recording is bad, it will also sound worse after recording. So make sure you have a great sounding drum kit.
Since you will be using only two microphones, you need to meet the following requirements:
1.) At least a two-channel external audio interface with preamps should be used. It should be capable of at least 24-bit/44.1KHz recording. If you do not have an audio interface, you can refer to this post on the cheapest 24-bit/96KHz USB audio interface. But recording at 96 KHz sample rate is too much for beginner projects, I would recommend recording at least 44.1 KHz or 48 KHz sample rate if you have ample space in your hard drive.
Always record at 24-bits; connect each of the two microphones to the audio interface preamp inputs. Your audio interface is connected to your PC/laptop via USB or Firewire (depends on the type of your audio interface). See diagrams below:
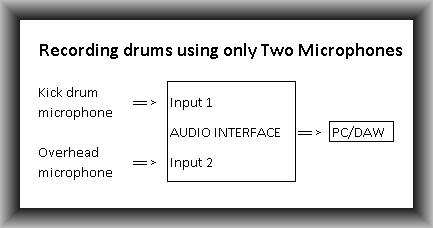
Signal path of using two microphones during recording
3.) You should be using quality DAW software such as Reaper for multi-track simultaneous recording. You need to create two tracks in Reaper (one for kick drum and one for overhead) and configure it to work with your audio interface for multi-channel recording. For more details on this setup, you can read the following tutorials:
Reaper DAW Tutorial and Getting Started Quick Guide for Beginners
How to do a multi-track recording session?
Although the above tutorials illustrate recording using four microphones, you only need to create two tracks in your DAW software for recording drums with two microphones.