This is a tutorial for Reaper beginners. This should help you get started quickly in recording and mixing Reaper as fast as possible. You can bookmark this post as a guide. As a requirement, you should know how to install Reaper in Windows XP or Windows 7; it should be fully working.
Setting Recording bit depth and Sample rate in Reaper
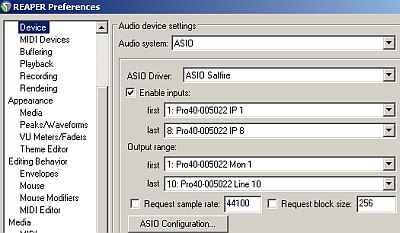
The first thing is to configure your audio device to work with Reaper. And also to set the desired bit depth and sample rate to use in recording. Supposing you would want to record at 24-bit/48KHz, these are the things you need to check if Reaper is recording at your defined bit-depth and sample rate (enclosed in yellow box):
Reaper recording bit depth and sample rate
If it is not showing correct bit depth/sample rate, you can configure your audio interface (using the provided software or driver like the mixer control) first to record at the define bit depth/sample rate, then Reaper would automatically use that setting. If you click on that, you will see the device configuration:
Reaper audio device configuration
As you can see, audio system should be set to ASIO then the ASIO driver showing your audio interface driver. And well as to enable the inputs 1 to 8 (using Saffire Pro 40 which has around 8 inputs, it may be different depending on the number of hardware inputs). For configuring sample rate; you can adjust it on your audio interface (for example 48 KHz is set on audio interface mix control which is also the one used by Reaper in default):
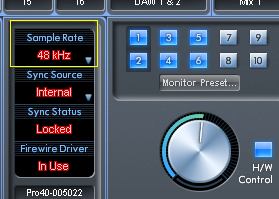
Audio interface sample rate settings
Inserting new Tracks, Media Items and Configuring for Multi-channel Recording
This is very simple to do:
1.) Go to Track – Insert New Track. This insert one track. Repeat the process if you want to insert more than one track to your session.
2.) If you want to insert media items (audio files such as WAV, mp3, etc.), go to Insert – Media File.
Most of the time, you might want to insert a new track for two reasons:
1.) Mix existing wav files in your computer (so you would be inserting media items such as illustrated in the procedure above).
2.) Record new tracks in Reaper using your audio interface.
For the second reason, you need to add several new tracks in Reaper and configure it for multi-channel recording. As an illustration, supposing you are recording drums using 4 microphones (one microphone for each of the following: snare, kick, overhead 1 and overhead 2)
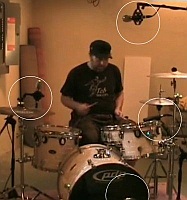
Microphones in recording drums
There will be four simultaneous channels to be recorded at the same time (from four microphones pointing at snare, kick drum and overheads). If you have an audio interface capable of multi-channel recording and accepts more than 2 inputs (for example a Saffire Pro 40 audio interface) at the same time; then you need to connect those four microphones to each of the audio interface preamp inputs (total of 4 inputs used). Then in your Reaper DAW, do the following:
1.) Insert 4 new tracks.
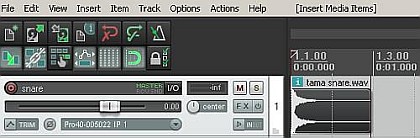
2.) Configure each of those tracks to receive inputs from each of your microphones in audio interface. For example look at the screenshot below:

Reaper multi-channel recording
You noticed that there are four tracks added (snare, kick, overhead 1 and 2). And then if snare microphone is connected to input 1 of your audio interface; then snare track is configured to receive IP 1 input (signifying audio interface first input) as seen in your Reaper input device (see enclosed yellow boxes). The name of your inputs might change depending on the type of audio interface used. Some might be using “analog 1”, “analog 2”, instead of “IP 1”, “IP 2”, etc. The key is to match the track name to the correct inputs you set in the hardware (audio interface). Then the rest would follow as shown in the screenshot below:
Reaper track and routing
You can configure each track to choose a specific input by clicking on the drop down arrow – select “Input: Mono” then choose the corresponding audio interface inputs.
3.) Finally when you hit the record button, the drummer would then perform and Reaper would be recording all these 4 tracks simultaneously.
Duplicating items/media files within the track
Sometimes you are working with drum samples which are only loops (not actual recordings). In a certain drum track consisting of samples, it is looped thus you need to duplicate it. To add and loop samples (or any items or media files):
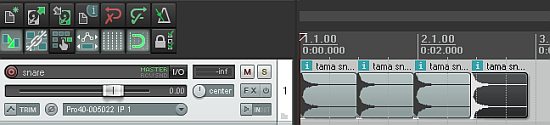
1.) Insert media item (a drum sample for example). See screenshot:
samples of drum
2.) Position the marker to the end of the sample and make sure the track is selected (it will highlight to white):
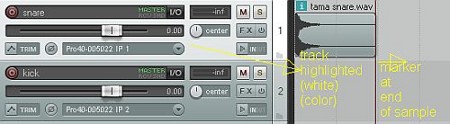
Position at last
3.) While the track is highlighted and marker placed at the end of the sample; press Control + C in your keyboard.
4.) Then press Control + V. It will paste/duplicate another sample next to the original sample. To make several copies/duplicates, continually press Control + V until you have the desired number of samples. See screenshot:
duplicated item screenshot
Managing the Audio Mixing Process in REAPER
This section assumes you already know how to track/record in Reaper but does not know the fundamentals in mixing. At the end of this section, you should have pretty solid skills in mixing inside the box using Reaper Digital audio workstation.
First Skill: Adding Plug-in to Reaper
Plug-in is the heart of digital audio mixing in Reaper. You will be using this to apply some effects that are vital to improving the quality of your mix. The following are the general steps on how you can add plug-ins in Reaper:
For DirectX:
1.) Install first the plug-in installer. In Windows, this is an exe file. Restart your Windows PC after installation.
2.) Launch Reaper then go to Options – Preferences – Plug-ins – Rewire/DX then make sure “Enable DX Plug-ins” are checked.
3.) Click the button “Scan for new DX Plug-in”. The press OK; exit Reaper and start it again.
4.) To check if Reaper recognizes the plug-in; go to Track – Insert New Track. Click the FX button on the track, see screenshot:
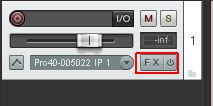
FXButton reaper
5.) You should then see the list of Direct X plug-in you have installed:
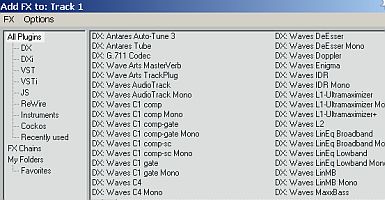
Direct X plugin added