Controlling the gain level of tracks in audio mixing
In audio mixing, it is essential that you control the gain level of each track to avoid distortion, noise and artifacts. For example, consider the following simple vocal FX chain: https://www.audiorecording.me/reaper-fx-chain-tutorial-for-beginners.html used in audio mixing:
EQ — > Compressor — > Reverb
Supposing after recording (without effects applied) the loudness of the recorded track is -22dB RMS. Now if you insert FX in the track, gain will be introduced that changes the volume of the track. A good example is the EQ. If you boost some frequency range, it will add some gain to your track that will add some loudness. Getting your tracks loud as a result of FX can be undesirable in audio mixing. The objective is to preserved the originally recorded volume as possible and simply use the track level faders to make the final volume adjustment. If you are mixing with REAPER, you can use the audio statistics and volume plug-in to control the gain introduced by your FX. Follow the steps below:
STEP1.) Make sure your mix is loaded in REAPER so as with the FX chain you are using.
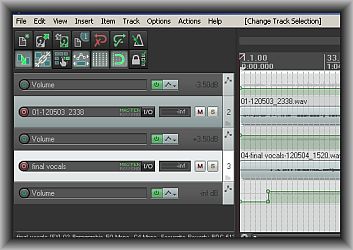
mix screenshot
STEP2.) Insert the audio statistics and volume plug-in as follows:
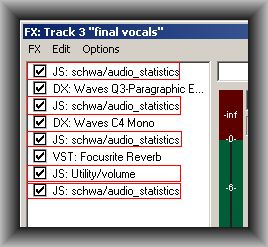
Audio Stat1 — > EQ — >Audio Stat2 — > Compressor — > Audio Stat3 — > Reverb — > Utility/Volume — > Audio Stat4
Where:
Audio Stat1 — > measures the original volume of the track (without FX)
Audio Stat2 — > measures the volume after EQ.
Audio Stat3 — > provide the volume after compression.
Utility/Volume — > adjust the volume after reverb (if your reverb plug-in does not have output gain control).
Audio Stat4 — > final volume statistics output
This is a real-world implementation (enclosed in red box are statistics and volume plug-in):
structured gain
Make sure the volume plug-in is reset to 0dB so that it won’t add some gain to your mix.
STEP3.) Assign appropriate EQ, compression and reverb settings to your track in the mix then play the audio to review the settings. Apply the following rules in gain level adjustment:
a.) If audio stat2 volume > audio stat 1, it implies a gain is added by the EQ. Compute the EQ output gain as follows:
Audio stat1 – Audio Stat2 = EQ output gain
Supposing the volume is -22.2dB before EQ but -21dB after EQ then the output gain is -1.2dB. Assign this reduction to your EQ plug-in, example:
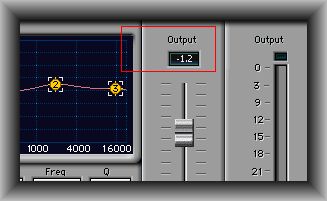
after EQ gain
b.) If audio stat3 > audio stat2, a gain is added on the compressor; adjust the output gain accordingly (use the formula above.)
c.) If audio stat4 < audio stat3, volume is reduced using reverb; you can bring up the volume by adding the lost gain using the utility plug-in.
STEP4.) After gain level adjustments in Step3, the volume will be preserved even with FX added. Once all FX are final, you can then listen to your mix and use the track faders to finally balance the volume of each track in the mix. Track faders are shown below:
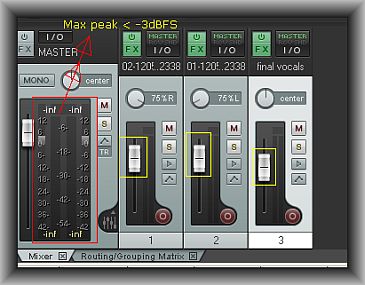
final adjustment
When you are adjusting the faders, watch out for the master output level meters. It should not exceed -3dB peak to allow some headroom for mastering.
Content last updated on June 14, 2012