In this quick tip, you will learn how to do quick mastering with Reaper. Bear in mind that Reaper still lacks some important features as full-fledged mastering software. However, it has sufficient tools that can transform your ordinary mix into a broadcast-ready song.
Assess the mix before mastering
STEP1.) Check if your mix is ready for mastering. The first step is to load the track in Reaper by going to Insert Media –> then locate the high resolution mix down in your computer.
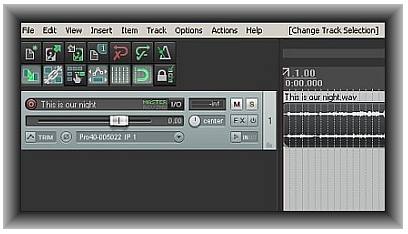
Image of mix
STEP2.) Ensure that you are working with a 24-bit mix down. Select the waveform and then go to Item –> Source Properties. 24-bit mix down is strongly recommended for mastering. If it’s not 24-bits, you need to do another mix down in 24-bits.
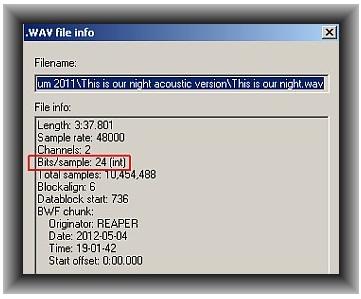
resolution of mix in Reaper
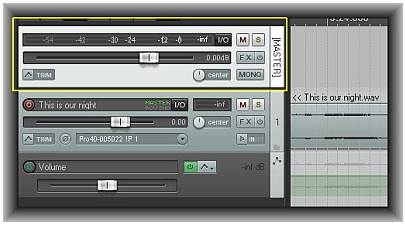
STEP3.) Make sure that the maximum peak amplitude of your mix down is below -3dBFS. Play the song in Reaper from start to finish. Look at the master level meter after finishing the playback. The maximum peak should fall below -3dBFS. If its not, you need to go back to your mix, lower down the master level meters until the desired headroom is achieved. For details on how to prepare your mix for mastering, you can read this tutorial on setting correct audio mixing levels for mastering.
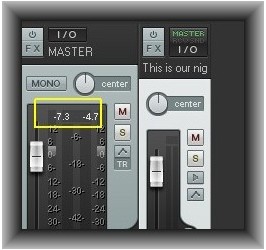
peak levels
In the above screenshot, the maximum peak level is around -7dB which is OK because its less than -3dB.
Audio mastering steps in Reaper
STEP4.) Mastering is a process. It usually starts with cleaning up the audio, EQ then finally limiting at the last stage. This is the simplest approach. Although mastering engineers often have a lot of additional processes to further enhance the audio; it‘s not included as the scope in this quick tip. Let’s proceed with cleaning up the audio start and end. Go to Edit –> Select all items. Then go to Track –> Envelopes –> Toggle Volume Active. You should see the volume envelopes.
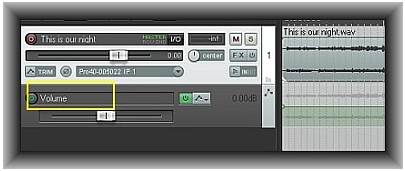
Toggling volume
STEP5.) Clean up the start of the audio especially the long silence as well as the end of the audio. You can do this by moving the volume envelope points. This is important because sometimes this will contain some noise which is not part of the song. For more details, you can read this tutorial on Reaper volume envelope.
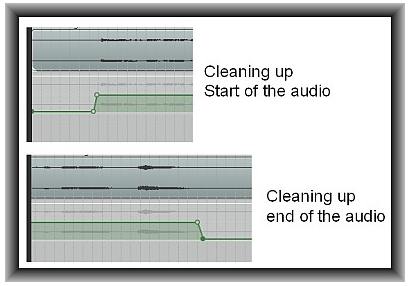
Clean up waveform
STEP6.) Mastering effects (EQ, limiter, etc) should be added to your master track. To enable master track in Reaper, go to View –> Master Track. You will then see the master track added to your project.
Adding Reaper master track
STEP7.) You can then start adding your mastering effects to the mastering track. Supposing let’s start with parametric EQ. You will use this to adjust the presence, sibilance and bass to your mastered track. To add EQ effect, click FX button.
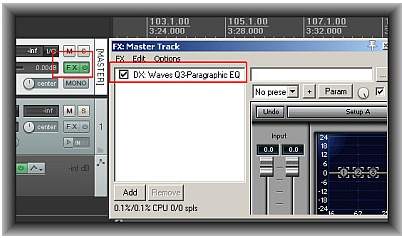
Effects added
STEP8.) Using your accurate monitoring environment, sculpt the frequency response to provide the best sounding/flat response. Supposing your mix down lacks mid-frequency and high-frequency response; then you might have the following EQ settings as shown in the screenshot below. It is a good practice that you don’t cut or boost more than 3dB in any frequency bands during mastering. Severe EQ issues can be best fix during recording or mixing. Learn some other EQ mastering settings tips in this tutorial.
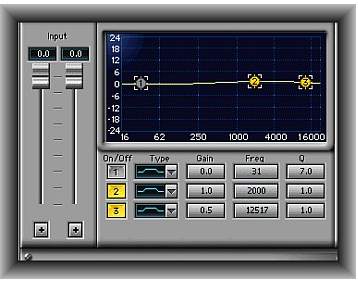
EQ response
STEP9.) You need to get the audio statistics after EQ, you can do this by adding the effect JS: schwa/audio_statistics next to the parametric EQ.