If you like to know how to master your own tracks properly at home without asking for professional help; then some of the guides here are definitely helpful to you. In this short guide, you will learn how to use dithering and sample rate conversion properly during your audio mastering stage.
The input to mastering stage is the product or output of the audio mix down (done by the mixing engineer). To optimize the quality of your final audio mastering output, you need to ensure that your material has the correct mix down levels in preparation for mastering.
Assuming you have the correct audio format for mastering then you should be working with the recommended audio bit depth that is 24-bits. If you need to know a bit of the digital audio mastering process, take a look at the flow chart below:
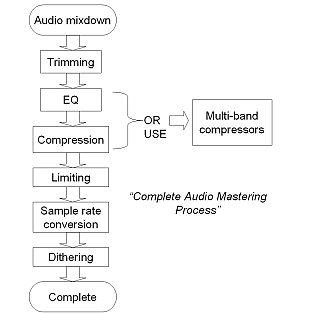
As an overview (especially for beginners):
1.) It all starts with the audio mix down (as discussed previously).
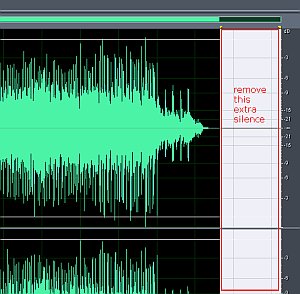
2.) “Trimming” means that you will cut unnecessary portions in the start and end of the audio (such as long silence) so that it will have a reasonable length. This is process cleans the start and end of the audio.
3.) EQ means to shape the quality of the audio by cutting and boosting important frequencies for best results. The next step is to apply compression. Or, you can combine the EQ and Compression adjustments simultaneously are using a multi-band compressor. Read this multiband compression tutorial for details.
4.) After this, you can now use limiter to maximize the volume of your mastered track. Common tools are L1 waves.
5.) Finally this is where you can start using sample rate conversion (SRC) and dithering techniques to complete the mastering. It is important that SRC should come first before dithering. This is to maintain the consistency of audio quality that is highly dependent on the audio bit depth than sample rate.
To implement sample rate conversion
1.) You can use Voxengo R8brain. This is one of the best sample rate converters for audio mastering and it’s free. You can download it here.
2.) R8brain automatically detects the audio input sample rate and bit depth. If you are only doing SRC, then set the bit depth to be same as the input (leave this unchanged). Then set the output sample rate to 44.1KHz. Do not forget to set quality to “very high”.
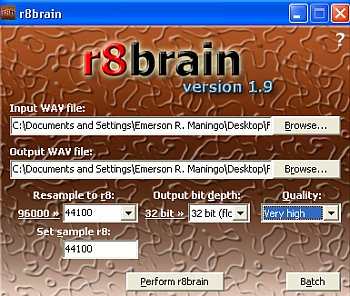
r8brains final settings
Supposing you will have an audio with resolution of 24-bits/96KHz. After SRC with R8brain, the output resolution would be 24-bits/44.1KHz. The bit depth is not changed.
To implement dithering correctly
Some important guidelines before doing dithering:
1.) The input audio in the dithering (last stage) is the output of the sample rate conversion. You can use a lot of quality dithering tools such as Waves IDR, iZotope Ozone, Pow-R, MegaBitMax Ultra. The low cost (open source) option is still to use Voxengo R8brain as illustrated previously.