This is a detailed tutorial for singer/songwriters planning to record their own demo at home. This is an “inexpensive” solution particularly aimed at producing an “unplugged” acoustic version of your song using your own personal computer. The PCI soundcard method will not provide that “perfect” or “professional” studio sound but at least having a good sounding acoustic guitar demo of your song. The external audio interface method is more recommended although it requires you to buy a new audio interface (USB or Firewire) for your PC.
Method #1: Using a PCI soundcard and a small mixer
What do you need?
It is not recommended that you buy what is being used by this tutorial. If you already have your own gears, such as having your own set of microphones, guitars, recording software, etc. Then by all means use them.
1.) At least Pentium 4 Windows PC/Mac with a PCI Soundcard , 2GB RAM, 500GB hard drive. The more powerful the better. It is also OK to record through a laptop. It is not recommended to use onboard sound card, it is not reliable. This tutorial is using Creative Audigy Soundcard, although not a professional recording soundcard but it’s doable.
2.) Recording software. There are lots of options to choose. If you want free software, you can use REAPER or Audacity. This tutorial is using Adobe Audition 1.5.
3.) A small mixer such as Behringer Xenyx 502 mixer. This is an inexpensive mixer that cost less than $40.
4.) Acoustic guitar with active pickup that allows you to adjust the volume or gain.
5.) Guitar tuner (Matrix SR-1060 Digital Chromatic Guitar and Bass Tuner) -optional.
6.) Computer speakers (this tutorial is using Altec Lansing ATP4), the bigger sound output the better.
7.) Any dynamic microphone. Shure SM-58 is highly recommended although you can use your existing microphone. Having a microphone stand is highly recommended.
8.) Microphone cable with XRL output (for low noise).
9.) Guitar cable
10.) Mixer output to Sound card stereo cable.
Setup the connection
a.) Mount the microphone in stand. Avoid feedback. Do not let the computer speaker sound to go into the microphones. You can do this by facing the microphone towards you and not to the computer/speakers. Put some isolation to prevent this problem. And make the recording environment as quiet as possible.
b.) Connect the dynamic microphone to MIC preamp input in Behringer mixer. Enclosed in a yellow box below is the microphone preamp input (XLR type) of the mixer where you will be connecting your microphone output:
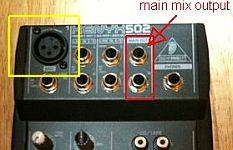
IMPORTANT: You cannot use this preamp input if the microphone cable is not having an XLR output. If this is the case, you need to buy a microphone cable with this type of output.
If you really don’t have one, you can still connect the dynamic microphone to the any of the line inputs (using TS plug instead of XLR) and not to the preamp XLR inputs. But this will add some noise to the mix.
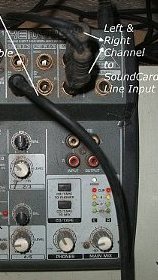
c.) Connect the mixer main output to the sound card line input. The mixer output should be stereo (left and right channels are used and then connected to your sound card stereo line inputs). Make sure to use clean sounding cables. And connect the guitar cable to any of the line inputs.
d.) Turn on the Behringer mixer. (Tip: Turn off the computer speakers before turning on the mixer to prevent possible loud noise).
Prepare the acoustic guitar and microphone levels
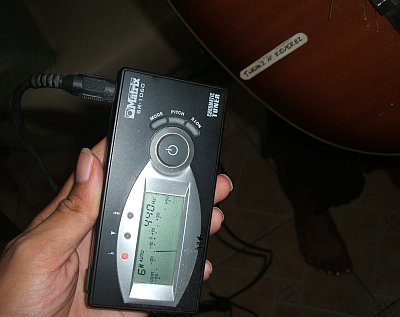
1.) Tune the guitar to desired pitch (e.g. standard tuning E-A-D-G-B-E). Use a guitar tuner. If you don’t have one, make sure that the guitar is well-tuned. Show screenshot:
2.) Connect the guitar cable to Line 2/3 Input-Right channel of Behringer mixer.(see screenshot below)
3.) Adjust the Behringer mixer, below are the final settings implemented:
Main mix: 30% (maximum setting is 100% and minimum is 0%)
Line 1 level: 50%-65% (for microphone)
Trim: 35%
EQ: All flat (unadjusted)
Pan: Center
Line 2/3 level: 45% (for guitars)
4.) Adjust the sound card mixer input. This is bundled with the sound card software inside your operating system. Below are the final settings implemented:
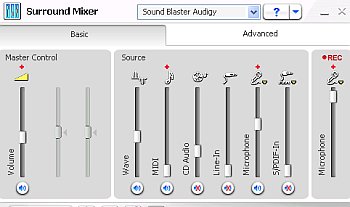
Important: Set the recording to “microphone”, un-mute the microphone source and then set the volume levels according to the screenshot above.
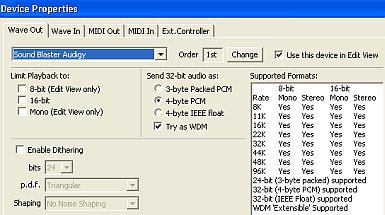
3.) Open your recording software. This tutorial is using Adobe Audition. Go to Options – Device Properties. Make sure the “Wave Out” is set to the correct soundcard, and then “Use this device in Edit view” is checked. For other recording software, you simply need to configure your software to record using that device (in this example it’s SoundBlaster Audigy as the sound device).Screenshot:
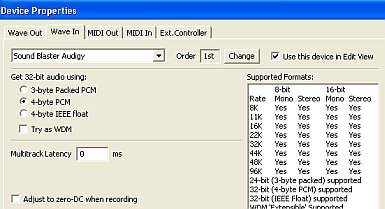
Also ensure “Wave In” is set to the correct soundcard and “Use this device in Edit View” has been checked. Screenshot:
4.) Try playing the guitar and sing to the microphone. Have an assistant to check the volumes that are coming out from your computer speaker. The vocal and guitar volume should balance. This means that your vocal is not drowned with the guitar or the other way around. Tweak the mixer or the soundcard software mixer if necessary. Make sure there is no clipping on the output. Read more about clipping in this tutorial.The above settings shown in the previous screenshot are the one used to balance my testing.
The actual vocal/guitar recording
Since this is a live recording and not a multi-track type of recording, the vocal and guitars are recorded simultaneously.
1.) Go to Edit view of Adobe Audition. Go to File – New; then under “New Waveform”. Select “44100” for Sample rate, “Stereo” for Channels and 24-bits OR 32-bit (float) for Resolution. Selecting a sample rate to be used for recording is very easy to do for other recording software. The most important is to record at 24-bits. Make sure you don’t miss this important setting.
Read this tutorial why you should be recording at 24-bits. Some recording software doesn’t want you to record directly at 24-bits (such as Adobe Audition). But it will only provide an option for 32-bit float, so use that. Basically 32-bit float has the same resolution as 24-bits.
In other recording software, there is always a 24-bit option that you should be using.
2.) If you are ready, let your assistant hit the recording button. Start the recording. Give a “3 seconds dead air” before start playing. This will add some silence at the beginning which is recommended. If you commit a mistake, do not afraid to re-take. It’s normal. Of course it’s best to practice/master your song performance before doing any recording session, it saves a lot of time.
3.) Hit the stop button after all recording has been made.
Editing the Recording
Editing is important to remove some unnecessary parts like noise and optimize the volume. Below are some steps that you can try:
1.) Load up the wave in Editor view.
2.) Go to Edit – Select Entire wave.
3.) Go to Effects – Amplify/Fade
4.) Click “Calculate Now” then hit OK. This will normalize the wave for optimal volume.


No responses yet