If you already installed Windows XP or Windows 7 in your computer and you would like to try Ubuntu music production such Ubuntu studio; then you would need to install Ubuntu operating system along with Windows.
This can be very tricky and difficult especially for those having no background in Linux operating system. If you are really in need to have Ubuntu installed along with Windows, below are some suggestions on how you would be installing them:
You need a dedicated hard drive for Linux use. At a minimum, you should have the following hard drives:
1) One hard drive for Windows XP/Windows 7 operating system.
2.) One hard drive for Ubuntu operating system.
3.) One or two hard drives for data, audio files.
The primary reason is for speed and efficiency in handling audio recording task. If you are using a single hard drive for both operating system, then there is a chance you might corrupt either operating system rendering your computer completely unusable.
With dual boot on different hard drives, you can safely backup and replace them when they are broken. Also operating system tends to be very fast if they are provided with a dedicated hard drive and less likely to suffer system related problems.
The Installation Steps
In this procedure, you will have Ubuntu installed in different hard drives (not with the Windows operating hard drive) but the master boot record (the one responsible for booting) is still in Windows main drive (which is always Drive C).
Step1.) Start by freeing space on the spare hard drive that you would like to install Ubuntu. Backup all the files in the spare drive because once you will be using this for Linux, all files would be lost.
After doing the backup, go to Windows Control panel – Administrative tools – Computer Management – Disk Management. Supposing the spare hard drive is “Recording”, right click on it and click “Delete Partition”.

Delete partition for free space
After deletion, you should now be seeing a spare hard drive space on the deleted hard drive partition (as unallocated):
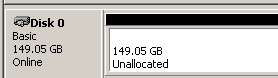
Spare space created after deletion
Step2.) Download the latest ISO on the Ubuntu download page.
This will take very long because the ISO file size would be around 700MB.
Step3.) Create a bootable CD or USB out of that download Ubuntu ISO image. For example, if you are creating a bootable USB, you would have the following files below in your USB:

bootable USB installer
The Ubuntu download page has some very good steps on how to create a bootable CD or USB.
Step4.) Place your bootable CD or USB to your computer and configure your motherboard BIOS to boot on them first. Refer to your motherboard manual on how to boot first from CD or USB. If you encounter this error on your first boot:
vesamenu.c32: Not a COM32R image
Simply type the word “live” (no quotes) besides “boot:” then press enter.
Step5.) Click install Ubuntu 11.10 on the desktop after complete booting:
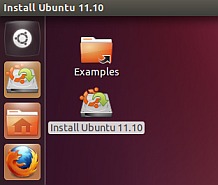
Install Ubuntu screenshot
You need to ensure that the computer is connected to the Internet and then check “Install this third party software”.
Step6.) Proceed until you are asked to select the “Installation Type”, make sure you select “Something else”.
Step7.) You will then presented with partition list and hard drives where the installer ask you where to install Ubuntu. Since you have created a spare hard drive on Step1, look and select/highlight the spare drive labeled as “free space”. For example, see screenshot below:
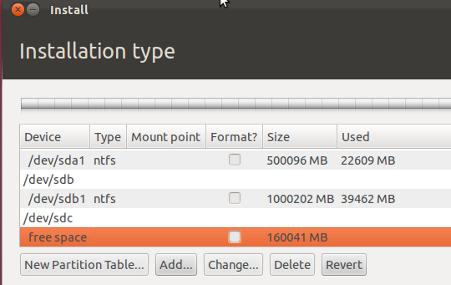
Installation type in Ubuntu
Step8.) Compute the space to be used by Ubuntu main partition and the swap. The formula are as follows: