If you are looking for ways how to create a karaoke version or removing vocals from a music track, then it can be done using Adobe Audition or Audacity.
Creating Karaoke version in Adobe Audition
In this step, you can either select to create a karaoke version that removes the vocals from a song. Below are the steps:
1.) Launch Adobe Audition.
2.) Load up/Open up the audio in Adobe Audition editor view (File == Open). The most recommended is audio CD wav 16 bit resolution. However you can also work with an MP3 file type, although the quality is NOT that good as compared with the wav version.
3.) Once the audio has been completely loaded, press Control- A to select the entire audio waveform.
4.) Go to Effects == Filters == Center Channel Extractor.
5.) You have two options at the Presets to look at, these are the:
a.) Karaoke (Drop vocals 20dB)
b.) Vocal Remove
Screenshot (using Karaoke Drop vocals 20dB presets):
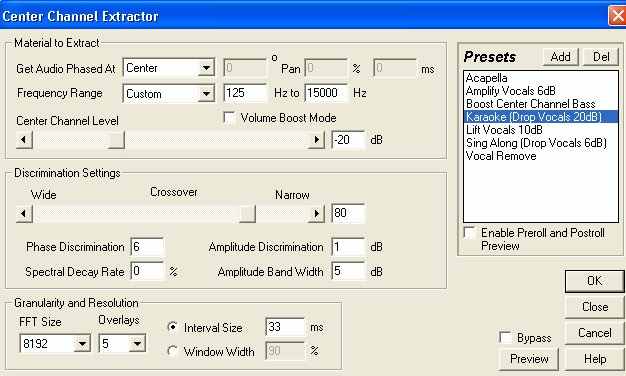
Adobe audition center channel extractor karaoke drop settings
6.) Try selecting the “Karaoke” presets and then click “Preview” to listen. You might notice that it won’t completely remove the vocals. For most singers, this is enough; because once the original vocals on the recording have been substantially dropped (like 20dB), they can comfortably sing along with that karaoke version.
One good tip is that; it is not advisable to go overboard with the Center Channel Extractor settings in order to “completely” remove the vocals. It will NOT sound nice and your minus-one/karaoke version will sound worse.
7.) Alternatively, you can try “Vocal Remove” presets and see if you are happy with the settings (by clicking Preview and listening to the rendered minus one version).

Center channel extractor vocal remove presets
8.) Once you have applied the settings to the entire waveform, it is now the time to save it. Go to File == Save As, and then type the file name. Do not forget to save it as “Windows PCM (*.wav)”, this will save it as a lossless audio format.
Warning: It is very important to “Save As” always particularly if you are working with original audio. It is because if you directly save your work from Adobe Audition editor, it will “overwrite” the original and you won’t be able to recover it again.
Below are the important technical settings of Center Channel Extractor that you should know:
Center = Get audio phased at: Most vocals are panned in the center during mixing process, so it is why this is set to center because this is where the vocals are located. If the vocals are panned to either right or left, not in the center, then it won’t be removed with “Center” settings then you need to set it accurately to the correct location.
Frequency range = this is the estimated and effective vocal related frequencies to be removed.
Center channel level = the lower the settings (more negative dB), the more vocals will be removed. For example, it is obvious that karaoke still has substantial amount of vocals left as compared to “vocal remove” presets, and karaoke use a -20dB Center channel level while Vocal remove uses -40dB.
The rest of the settings can be left at its default, feel free to experiment further with the rest of the settings. Be careful not to overwrite your original audio when working with it. It’s important to “Save As” when you are saving any edited audio.
Removing Vocals in Audacity
Audacity is free software that you can use to remove vocals. However there is a catch, some Audacity versions (like in Windows XP) does not yet include the vocal removal feature. I also tried using the latest Audacity version in Windows 7 but do not seem to the remove vocals very well.
I have tried with other software solutions such as plug-in in Reaper and still do not remove vocals properly. All of them degrades the quality of the original recording (such as filtering the bass too much) and introduces a lot of audio artifacts/noises.
In this tutorial, you will learn the most effective way of removing vocals without depending on a plug-in or your software audio editing features. The result is still clean and close to the original source as much as possible. Let’s get started.
The IMPORTANT Audio Requirements
First, make sure you are NOT working with an MP3 file. If you want to remove the vocals of an MP3 file, first convert that one to 24-bit/44.1KHz WAV file. The following are the procedures:
1.) Launch Audacity.
2.) Go to Edit – Preferences.
3.) Select “File Format” tab.
4.) Under “Uncompressed Export Format”, select “Other”.
And under “Header”, select “WAV (Microsoft)” and in the “Encoding” select “Signed 24-bit PCM”.
5.) Click OK.
6.) Go to File – Open, browse to the MP3 file then click Open. This will load the MP3 waveform in Audacity.
7.) Then go to File – Export as WAV. Save it to a location where you can access it easily.
8.) Double check whether the file is now actually a 24-bit WAV. Right click on the exported WAV, click “Properties” and go to summary tab.

24-bit audio exported
Split the stereo track to mono