Interpretation of the results: The two most important results are the “peak amplitude” and “average RMS power”. Peak amplitude is the loudest peak captured while average RMS power is the average level. Based on the results, the peak amplitude for left and right channel is -3.97dB and -5.89dB which is within/below -3dB standard. The average RMS power for both left and right channel is -24.41dB and -24.3 dB which are also within -30dB to -20dB standard. Therefore the headroom settings are correct. What happens if my mixdown does not follow the correct headroom? You can still re-open the mixing project and adjust either the master faders or the track individual faders (also not forgetting rule#1 and rule#2) so that the mixdown will observe the proper headroom.
Checklist on Submitting the Mix to Audio Mastering Studio
Now you have the correct levels, refer to the following checklist below when submitting your work for audio mastering.
Check List #1: Is your mix final? Has it already been approved by the concerned artists and recording producers?
Purpose: Assuming all technical specifications and requirements are satisfied (as discussed in the previous section); you need to have the mix approved by the artists and the recording producer. You need to make sure that there is no other request for changes from them in the mix, it is because once the material will reach the mastering studio, there is no turning back. If you turn back, you need to do a separate mixdown again with the artist/producer requested changes that can take time and destroy your schedule.
Check List #2: You SHOULD mix down to highest audio resolution as possible.
Purpose: You need to create a very high quality mix, isn’t it? If you mixdown to low resolution such as 16 bit 44.1Khz (by applying dithering for example), you are destroying your mix.
Do not apply any dithering or sample rate conversion during mixdown. Leave that to the mastering engineer. The mixdown resolution (output of audio mixing) should be exactly the same as the source audio file resolution. For example, if the project is recorded at 24-bits/48KHz, then the mixdown should also be at 24-bits/48KHz. As stated, you should not be altering the bit depth and sample rate when mixing.
The required bit depth should be 24 bits (you should never mixdown to 16 bits, ever!). The sampling rate can be 44.1Khz, 88.2Khz or 96Khz. Using 192Khz is not recommended and neither it is beneficial in contributing to the sound quality. But again, 24 bit, 96Khz or 24 bit, 44.1Khz are the standards.
Check List #3: Never , ever apply too much compression on your mixdown in an attempt to make it LOUD and at the request of your clients.
Purpose: By compressing to make it loud in an attempt to praise clients or it is a client request, you are destroying your mix which is IMPOSSIBLE for mastering engineer to repair and restore its dynamics in natural way. If you really need to compress the mixdown for some reasons, make sure you read this mix buss compression tips.
Illustration: Steps to do a High Quality Audio Mixdown (Master Mix)
When doing an audio mix down which would be submitted to a mastering engineer; it is very important to provide the highest resolution possible.
Follow the steps below on how to do a mix down on Reaper:
1.) Launch Reaper, open the project, mix and apply effects on it as desired.
2.) When the mix sounds perfect and you decided to do a mix down; you need to select which section in your session you would like to be rendered. To do this, move your mouse cursor somewhere over the timeline and then hold left click to select regions. It would be highlighted as shown in the screenshot below (gray white):
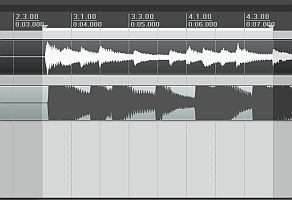
Highlighted Reaper section
3.) Once you have selected a region in your session, go to File – Render.
4.) Ensure that you have the following:
a.) Render: Master Mix
b.) Render Bounds – Time selection
c.) Assign a file name of the mix down (exclude the file extension) as well as the output directory. This is where you could find the file after mix down/render.
d.) Sample rate – (the same as the sample rate of your Reaper session); if you use 48 KHz as your sample rate during tracking/recording then use this sample rate during mix down.
e.) Channels – stereo / Full Speed offline
f.) Leave Resample mode at its default settings as well as multi-channel, dither and noise shaping.
g.) Set output format to WAV.
h.) WAV bit depth – 24 bits
i.) Check Write BWF and “Allow Large files to use Wave64”.
This is a sample screenshot:
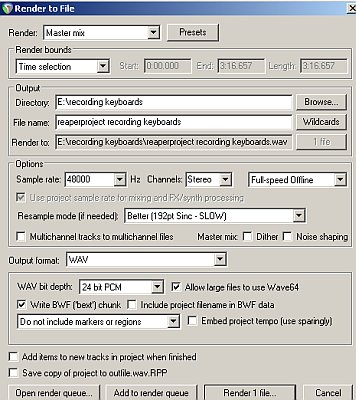
Reaper Render Example
3.) Finally click “Render 1 file”, do not do anything as Reaper would render the mix. After completion, you can open the file saved in its specified output directory.
Content last updated on October 14, 2012