This an important beginner guide in audio mixing. This is all about setting right levels and headroom for your audio mixing projects. If you ignore the importance of setting proper levels and setting headroom, the mixdown ends up squashed, poor in dynamics and not ready for mastering. For recording and tracking (not in mixing); you can read these tips on setting proper levels in your recording and preventing clipping. The following are the rules that you should always remember every time you are setting the proper levels in your audio mixing project. Let’s start.
Headroom Settings for Individual Tracks in the Mix
Rule#1: No audio clipping on individual tracks. Your individual tracks/channel or bus in mixing has its own volume level meters. Take a look at those in your DAW (Digital audio workstation) software. It should not clip. Clipping occurs when it hits above 0dB and it will become red in the level meters. See examples below:
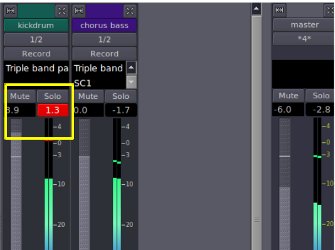
The kick drum channel is clipped at +1.3dB and the level meters indicate it as red. It exceeds the maximum allowable level of 0dB. As a rule; the peak level of individual tracks should not exceed -3dB to have some little headroom for the track. As a definition, peak level or amplitude is maximum volume level detected on the entire track. The audio track also has its own average level. There is where most of the track volume settles. You can estimate it from your audio waveform (however accurate measurement of peak amplitude and average level will be discussed later):

Maximum and Average level in audio waveform
Why avoid clipping? This results to ugly/unwanted distortion of your individual tracks which can be obvious during and after mastering stage. For example, you are not aware that the vocal channel is clipped. When your track gets mastered, it will result to distorted vocals when played at loud volumes.
Rule#2: Conservative EQ boosting and Track fader adjustment. If you noticed some clipping after implementing effects that could boost the volume (such as EQ boosting); then try lowering the volume of the track using its fader. However it is best to apply a reasonable boost on EQ. It is not wise to apply +12dB or more boost on using EQ and use the track fader to lower down the volume to compensate increase in levels.
Instead, apply only a conservative amount of +3dB to +6dB boost on any frequency band but rely more on cutting audio frequency problems. You can read these EQ techniques for clarity. You will notice that simply by cutting problematic frequencies is much safer because it won’t increase the track levels/volume. Too much EQ boosting can result to unnatural sound which is undesirable. In some cases, if it requires too much EQ boosting during mixing, it is best to re-record the track and adjust desirable EQ settings before it will be recorded.
Headroom Settings for Master Channel
Rule#3: No clipping on master channel. Most DAW features a master channel level meters where this is the summing volume of all the tracks in your mixing projects. This should not be clipped also or else serious distortion problems can occur later (such as in mastering). Apply the following rules on headroom for the master channel:
1.) -3dB maximum peak volume.
2.) -30dB to -20dB average SPL
More about the above rules will be discussed later. If you noticed some clipping on your master bus, then adjust the master fader by lowering it down. But always remember Rule#1 and Rule#2. If you have some extreme EQ boosting and clipping on your individual tracks that also caused the master channel to clip; then it is always advisable to correct these individual problems first.
Rule#4: Implement correct headroom for mastering. If you are now very happy with your mix, you are now ready to mix down the project into a single waveform ready for mastering. It is always a good practice to double check your wave statistics before submitting to the mastering engineer. Double check your results vs. Rule #3. Let’s have an example:
1.) Supposing you have a stereo mixdown wave that looks like below:
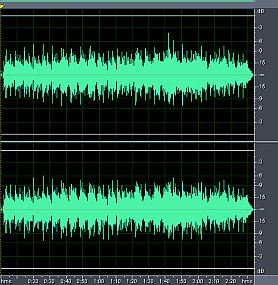
stereo mixdown audio wave
2.) It is not enough to just look at the wave and conclude it’s ready for mastering. You should check the waveform statistics and decide whether the headroom is correct. In Adobe Audition 1.5, you can check the waveform statistics of the mixdown wave by going to Analyze – Statistics. For example you see the results below:
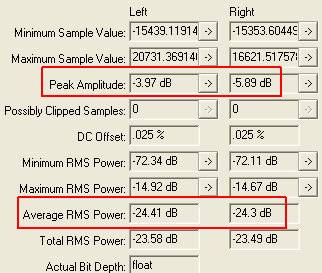
waveform statistics for examining headroom