Audio mixing is the heart of the music production. It is where the “overall” sound of the album is being shaped or crafted. Although you might say that its mastering that will be the one to transform it into “hits”. The importance of proper audio mixing is also a factor in any mastering success. Remember the “garbage in- garbage out” analogy. Even the best mastering engineers cannot fix a garbage mix. So what’s the professional technique in mixing? What are these tips and secrets that a pro mixer won’t tell? Below are important rules, skills, techniques that you need to know if you need to drastically improve the quality of your mix:
Tip#1: Cut more — Boost Less in doing any EQ adjustments
Analogy: Let’s illustrate this tip with a practical/real-mixing scenario example; supposing you start to mix a certain project. The moment you played it; you observed that the vocals are substantially buried in the mix because of the guitars. Beginners in mixing approach this problem by boosting the vocal sensitive frequencies which is 2000Hz – 3000Hz, Q at 1.0 with +3.0dB to +6.0 dB for example. So after boosting those frequencies, he/she will again review the mix. Then the mixer noticed something. The guitar overall volume level is now low in the mix and the vocals starts to become very dominant. To compensate for vocal dominance, beginner mixer will increase the track volume of the guitar (no EQ adjustment on the guitar). Guess what happens? The vocals again are drowned in the mix because of the guitar loud volume.
Conclusion: Boosting can hardly solved any EQ mixing issues. It’s why if you see a professional audio mixer doing a mix in a console or in a DAW; you might be surprised that a pro mixer will do a lot of “cutting” as compared to “boosting”. So how will a pro-mixer approach the above situation? First, since the vocals are drowned in the mix because of the guitar. A pro-mixer will simply cut the “vocal sensitive” frequencies on the guitar, so in this case the 2000Hz range. The following EQ setting will be applied on the guitar: Cut -6dB; 2000Hz Q=1.0. If the vocals are still drowned a bit, the cut can be increased from -6dB up to -9dB; until the vocals starts to shine out of the mix. So what about the EQ vocals? In some cases, the mixer might only apply a very slight boost on the vocals at 2000Hz to give it more clarity, so in this case: Boost +2dB, 2000Hz Q=1.0. The result: Vocals and guitar are now started to blend nicely in the mix. Of course the above technique illustrates the classic problem on vocals and guitar, the technique/principle can as well be applied to any musical instruments that includes the kick drum and the bass.
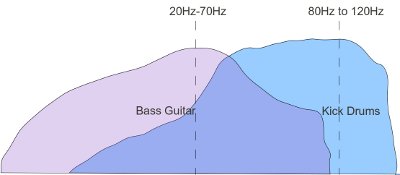
kick drums and bass guitar frequency spectrum
In the screenshot above, the kick and bass frequencies have each own location in the bass frequency spectrum resulting to clarity after cutting the kick drums bottom to give way for the bass guitar. Read here for more tips about mixing bass guitar/kick combination.
Tip#2: Apply Panning creatively and “realistically”
Back again to the previous example; supposing a beginner in mixing is doing a mix of a project for a rock band. After adjustments; the mixer noticed something odd. The mixer sounds so dull both in the headphones and the studio monitors. What’s going on here?The problem is that the mix has a very poor stereo image or no stereo image at all. It’s because all the tracks are placed on the center of the mix, resulting to very dull and “unrealistic” sound of the band. So how will the pro-mixer deal with this issue? First, the mixer imagines the mix as a live band playing in front of him/her. So the guitars are both in the left and right of the stage. In this case the left guitar will be panned on the left at 70% while the right guitar on the right at 70% for example. The vocals and bass is on the center as well as the kick drums. Cymbals and hi hats are slightly off-center; etc. You can search this website for some panning tips. This is how it looks like:
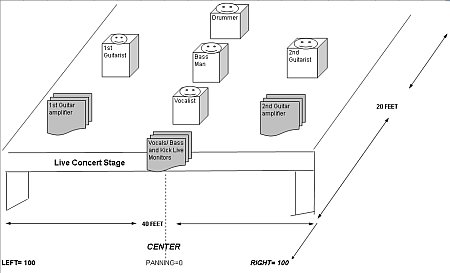
panning tips