This is a tutorial on how to implement pitch correction in Adobe Audition. Bear in mind that re-recording is still the best way to correct out-of tune instruments.
It is why you need to carefully check the tuning of your instruments with a digital tuner before doing any recording. In case you really need to implement pitch correction feature, below are the following steps:
The Complete Steps in Adobe Audition
Step1. Open the audio track in Adobe Audition Edit View.
Tips: If you are using pitch correction to aim for best recording quality results, it is good to use a high resolution audio. High resolution audio should be better than CD audio or MP3. In this case, 24 bit and 44.1 KHz wav file is the recommended format. If you asked why, it’s because you are doing digital manipulations to the wav file. High resolution audio obviously contains more digital audio information (in terms of digital bits) as compared to ordinary CD audio/mp3.
Step2. Go to File – Save as. You need to save a copy of your wav file as a backup. Assign a different name. This is important in case you need to revert to the original wave unedited with pitch correction.
Step3. In Adobe audition, notes are detected in terms of chord names. Chord names are A-A#-B-C-C#-D-D#-E-F-F#-G-G#-A. For example say you have a 3.45 seconds bass guitar riff or passage that should be in a G major chord. You can check whether the recorded passage is actually a G major chord. To do this, highlight the 3.45 seconds passage.
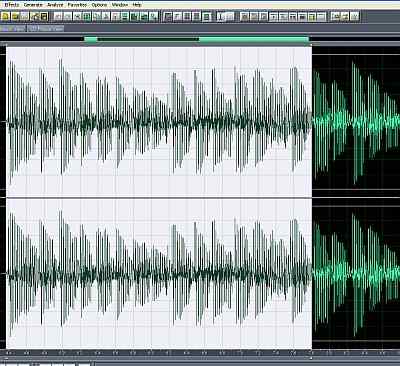
Selected audio passage for pitch correction
Step4. Go to Analyze – Show Frequency Analysis. Set the FFT size to 65536/Blackmann-Harris settings. Then click “Scan”. Below is the screenshot of the results:
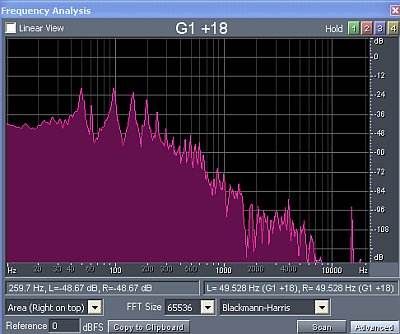
Chord verification in Frequency analysis
It shows that the 3.45 seconds audio passage is actually having G chord sound. No need to use pitch correction to this passage because it is “in-tune”. You have just learned how to verify the pitch/tuning in Adobe audition edit view using the built-in frequency analysis tool.
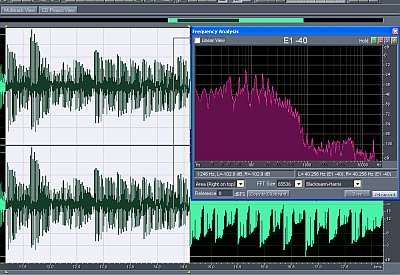
Step5. Supposing the next passage (after the 3.45 seconds) should be an E-minor chord. You can select that passage and repeat the above steps to analyze the chords. Screenshot:

out of tune screenshot
It shows that the recorded passage is “out of tune”. It is because you are expecting it to be “E” –chord sound but the recorded passage is having a “D#” sound.
Step6. To correct the pitch of the out of tune recording passage; go to Effects – Time/Pitch – Pitch Correction.
Step7. Go to “Automatic” Tab and configure as follows:
Scale: Minor
Key: E
Attack: Middle (between slow and fast)
Sensitivity: 110
FFT size: 4096
Calibration: 440Hz
It should like this one below:

pitch correction settings in adobe audition
Finally, click OK.
Step8. Verify the pitch again of the corrected audio passage using frequency analysis tool using the procedure illustration in Step4.
after pitch correction
It now shows that the pitch of the out-of-tune wave is now having an E minor chord sound (as pitch correction from D# minor to E-minor)
You can even extend this pitch correction technique to not only tuning chords in a passage but to single notes. You just need to zoom the audio waveform as high as possible so that you can analyze on a note per note basis. Same concept/principle can be implemented as illustrated in this tutorial.
However, pitch correction is ideal for editing a small portion of the wave. It is not recommended to do major pitch correction editing for the entire recorded tracks because this can seriously affect the resulting sound quality.
Implementing Pitch Correction in Audacity
One of the challenging audio editing tasks is to change the pitch of the music. This is particularly useful if a certain singer needs a change of pitch or a key signature to fit his/her vocal range.
If the pitch is high for the singer, the best suggestion would be to lower down the key signature of the song, this is done by lowering the pitch of the entire music notes. So if the current key signature is G major, the singer might need to transpose it down to F major or E major, depending on the choice.
The same case if a certain singer finds out that the current key is too low for the vocal range and wants to increase the pitch of the background music.
Note: Changing pitch does not necessarily change the key signature of the music at all times. Example of this is when you transpose the pitch to one octave. The key signature would stay the same. But changing key signature would always change the pitch of the music. You need to bear this in mind.
It is interesting to know that this feature is available in open source audio editor like Audacity. Not only changing the pitch but normalizing the audio wave is also important. This is the process of maximizing the volume of the audio without the use of compression or limiting.